Tutorial
This tutorial provides a basic introduction to Service Mesh concepts using Istio and Kiali.
- Prerequisites
- Install the Travels Demo application
- Connect
- Secure
- Uninstall
Prerequisites
Platform Setup
This tutorial assumes you will have access to a Kubernetes cluster with Istio installed.
This tutorial has been tested using:
Platform dependent tasks will be indicated with a special note like this.
This tutorial has been tested using minikube v1.16.0, istio 1.8.1 and kiali v1.28.0
This tutorial has been tested using openshift v4.8.3, istio 1.11.0 and kiali v1.39.0
Install Istio
Once you have your Kubernetes cluster ready, follow the Istio Getting Started to install and setup a demo profile that will be used in this tutorial.
Determining ingress IP and ports and creating DNS entries will be necessary in the following steps.
For Minikube users, this tutorial uses Minikube tunnel feature for external Ingress IP.
For OpenShift users, this tutorial uses a route for external Ingress IP.
DNS entries can be added in a basic way to the /etc/hosts file but you can use any other DNS service that allows to resolve a domain with the external Ingress IP.
Update Kiali
Istio defines a specific Kiali version as an addon.
In this tutorial we are going to update Kiali to the latest release version.
Assuming you have installed the addons following the Istio Getting Started guide, you can uninstall Kiali with the command:
kubectl delete -f ${ISTIO_HOME}/samples/addons/kiali.yaml --ignore-not-foundThere are multiple ways to install a recent version of Kiali, this tutorial follows the Quick Start using Helm Chart.
helm install \
  --namespace istio-system \
  --set auth.strategy="anonymous" \
  --repo https://kiali.org/helm-charts \
  kiali-server \
  kiali-server
Access the Kiali UI
The Istio istioctl client has an easy method to expose and access Kiali:
${ISTIO_HOME}/bin/istioctl dashboard kialiThere are other alternatives to expose Kiali or other Addons in Istio. Check Remotely Accessing Telemetry Addons for more information.
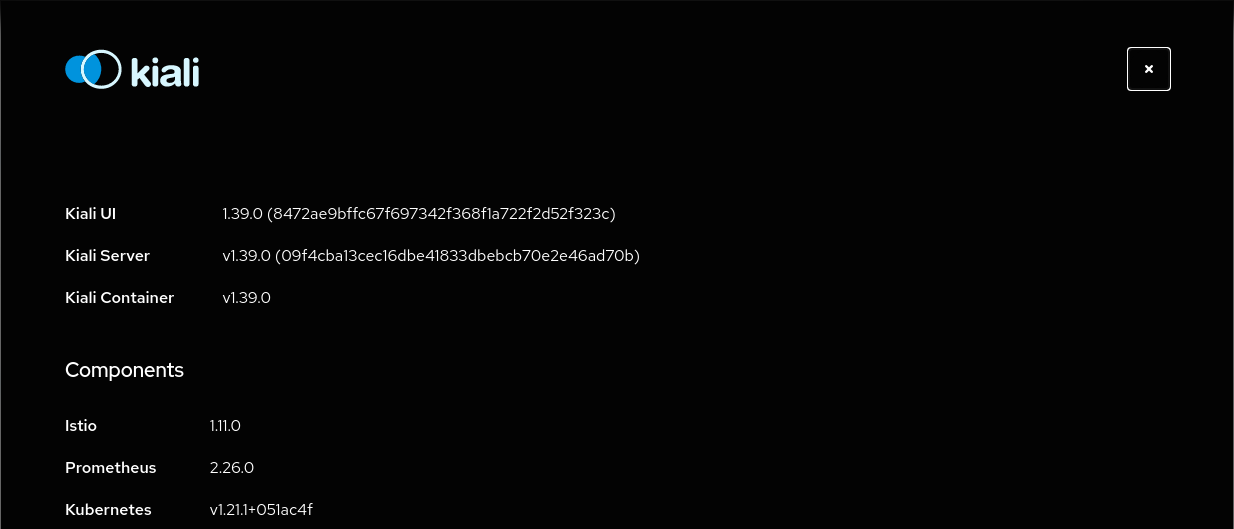
After the Prerequisites you should be able to access Kiali. Verify its version by clicking the "?" icon and selecting "About":
Install the Travels Demo application
Deploy the Travels Demo
This demo application will deploy several services grouped into three namespaces.
Note that at this step we are going to deploy the application without any reference to Istio.
We will join services to the ServiceMesh in a following step.
To create and deploy the namespaces perform the following commands:
OpenShift users can substitute oc for kubectl. OpenShift users will need
to add the necessary NetworkAttachmentDefinition to each namespace. Also, the necessary SecurityContextConstraints
for the service accounts defined in the namespace (minimally, default).
kubectl create namespace travel-agency
kubectl create namespace travel-portal
kubectl create namespace travel-control

kubectl apply -f <(curl -L https://raw.githubusercontent.com/kiali/demos/master/travels/travel_agency.yaml) -n travel-agency
kubectl apply -f <(curl -L https://raw.githubusercontent.com/kiali/demos/master/travels/travel_portal.yaml) -n travel-portal
kubectl apply -f <(curl -L https://raw.githubusercontent.com/kiali/demos/master/travels/travel_control.yaml) -n travel-control
Check that all deployments rolled out as expected:
$ kubectl get deployments -n travel-control
NAME      READY   UP-TO-DATE   AVAILABLE   AGE
control   1/1     1            1           85s

$ kubectl get deployments -n travel-portal
NAME      READY   UP-TO-DATE   AVAILABLE   AGE
travels   1/1     1            1           91s
viaggi    1/1     1            1           91s
voyages   1/1     1            1           91s

$ kubectl get deployments -n travel-agency
NAME            READY   UP-TO-DATE   AVAILABLE   AGE
cars-v1         1/1     1            1           96s
discounts-v1    1/1     1            1           96s
flights-v1      1/1     1            1           96s
hotels-v1       1/1     1            1           96s
insurances-v1   1/1     1            1           96s
mysqldb-v1      1/1     1            1           96s
travels-v1      1/1     1            1           96s
Understanding the demo application
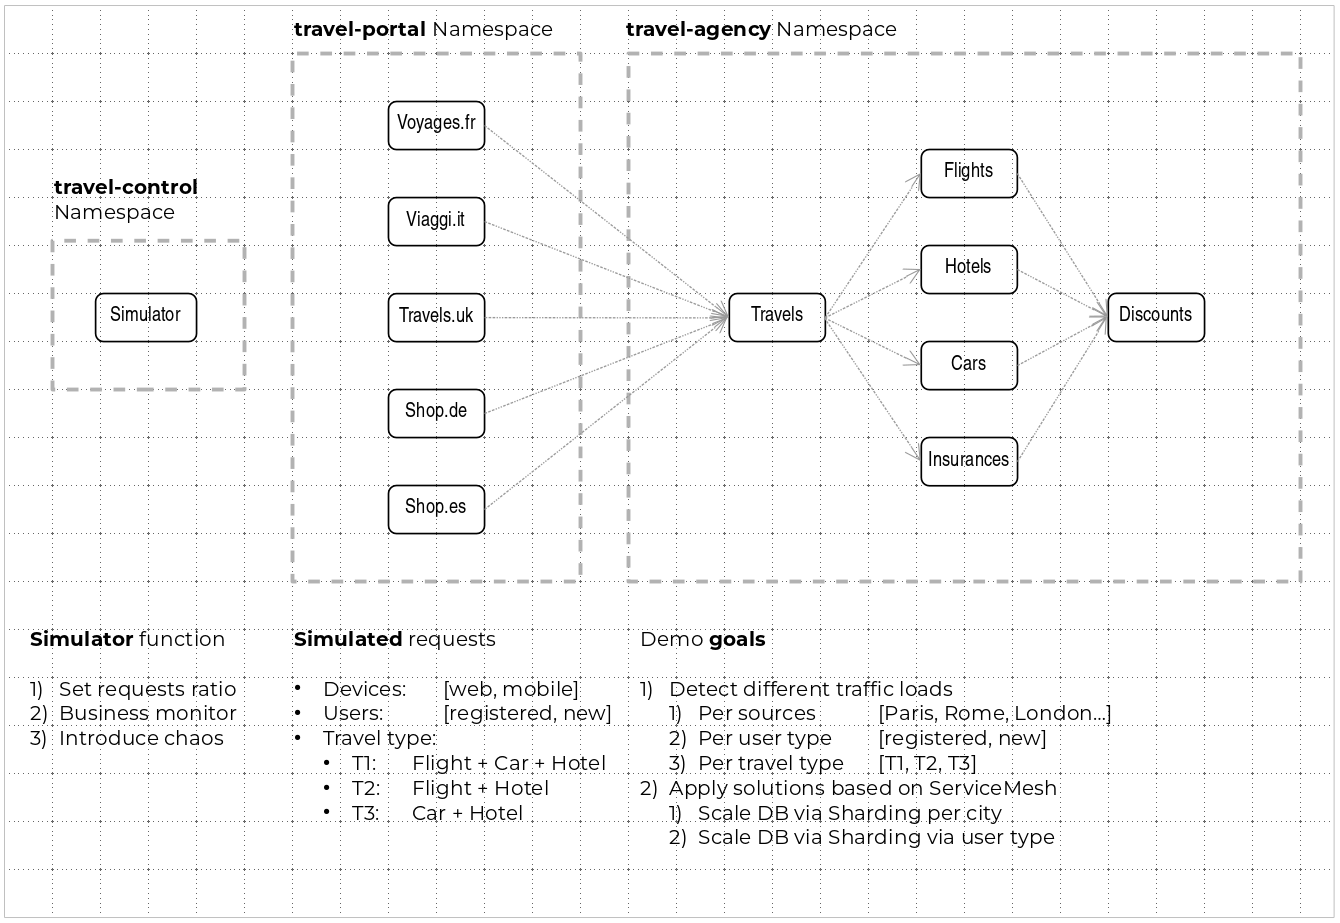
Travel Portal namespace
The Travels Demo application simulates two business domains organized in different namespaces.
In a first namespace called travel-portal there will be deployed several travel shops, where users can search for and book flights, hotels, cars or insurance.
The shop applications can behave differently based on request characteristics like channel (web or mobile) or user (new or existing).
These workloads may generate different types of traffic to imitate different real scenarios.
All the portals consume a service called travels deployed in the travel-agency namespace.
Travel Agency namespace
A second namespace called travel-agency will host a set of services created to provide quotes for travel.
A main travels service will be the business entry point for the travel agency. It receives a destination city and a user as parameters and it calculates all elements that compose a travel budget: airfare, lodging, car reservation and travel insurance.
Each service can provide an independent quote and the travels service must then aggregate them into a single response.
Additionally, some users, like registered users, can have access to special discounts, managed as well by an external service.
Travel Portal and Travel Agency flow
A typical flow consists of the following steps:
-
A portal queries the travels service for available destinations.
-
Travels service queries the available hotels and returns to the portal shop.
-
A user selects a destination and a type of travel, which may include a flight and/or a car, hotel and insurance.
-
Cars, Hotels and Flights may have available discounts depending on user type.
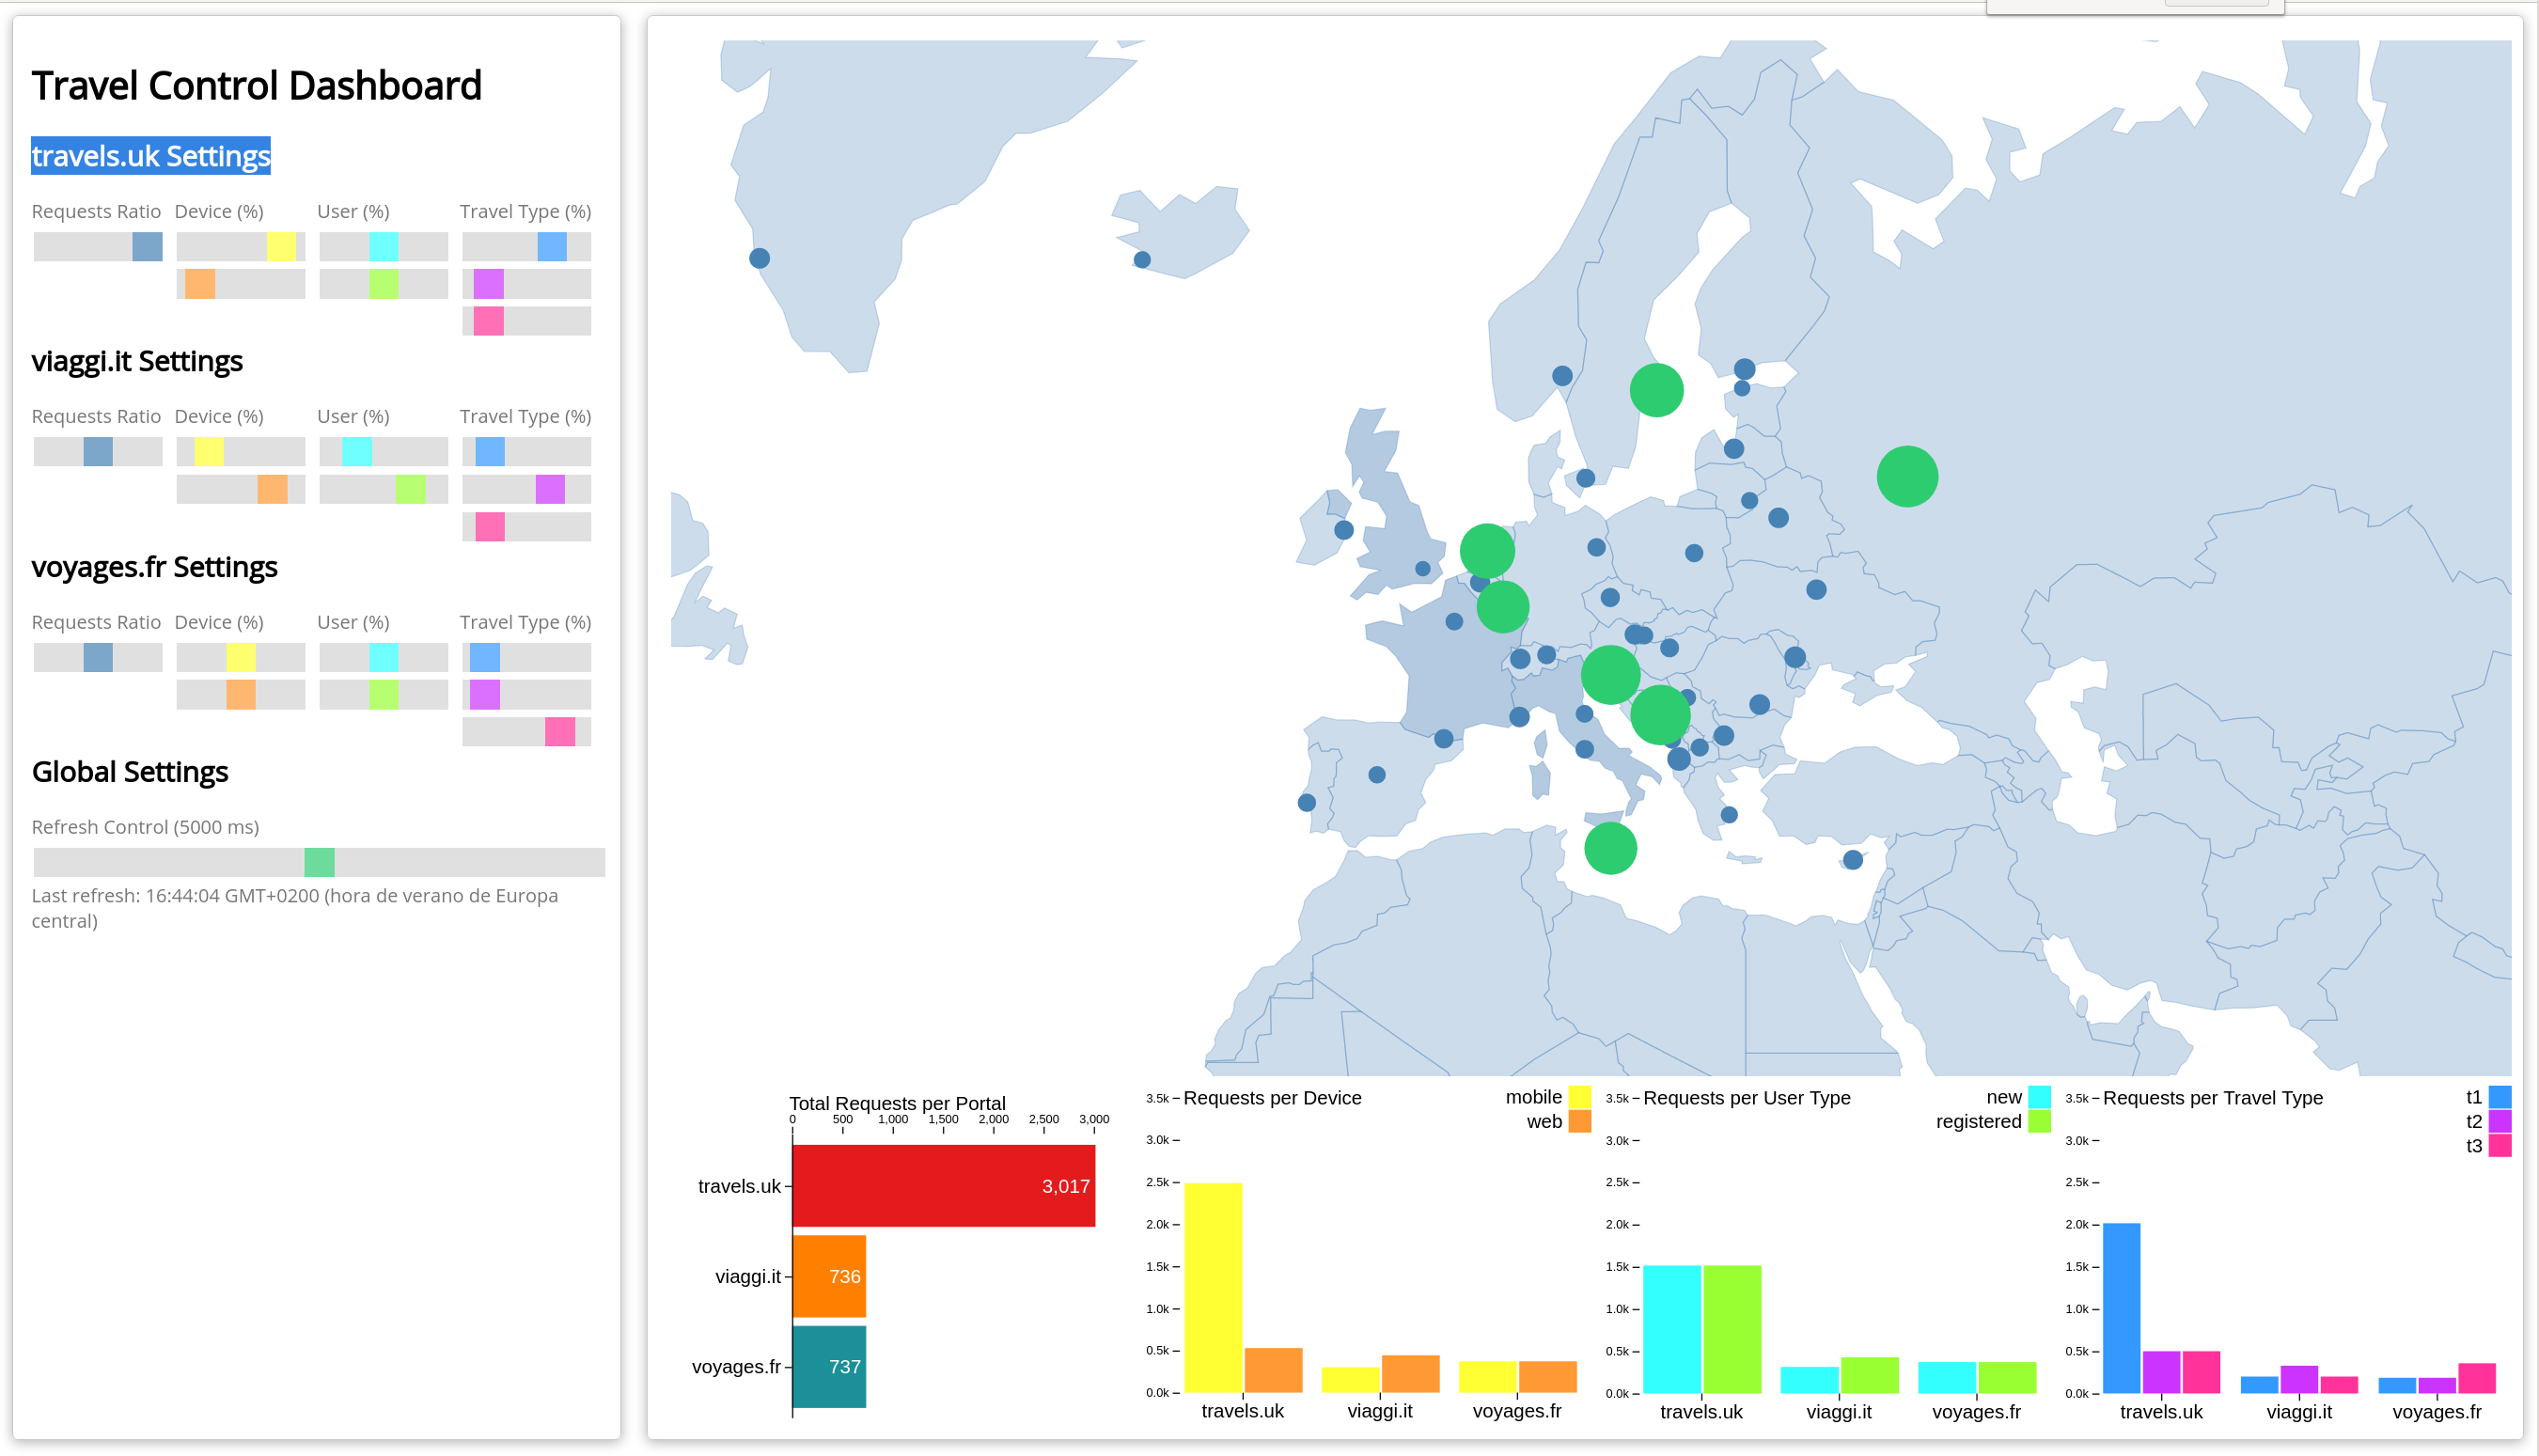
Travel Control namespace
The travel-control namespace runs a business dashboard with two key features:
-
Allow setting changes for every travel shop simulator (traffic ratio, device, user and type of travel).
-
Provide a business view of the total requests generated from the travel-portal namespace to the travel-agency services, organized by business criteria as grouped per shop, per type of traffic and per city.
First Steps
Missing Sidecars
The Travels Demo has been deployed in the previous step but without installing any Istio sidecar proxy.
In that case, the application won’t connect to the control plane and won’t take advantage of Istio’s features.
In Kiali, we will see the new namespaces in the overview page:
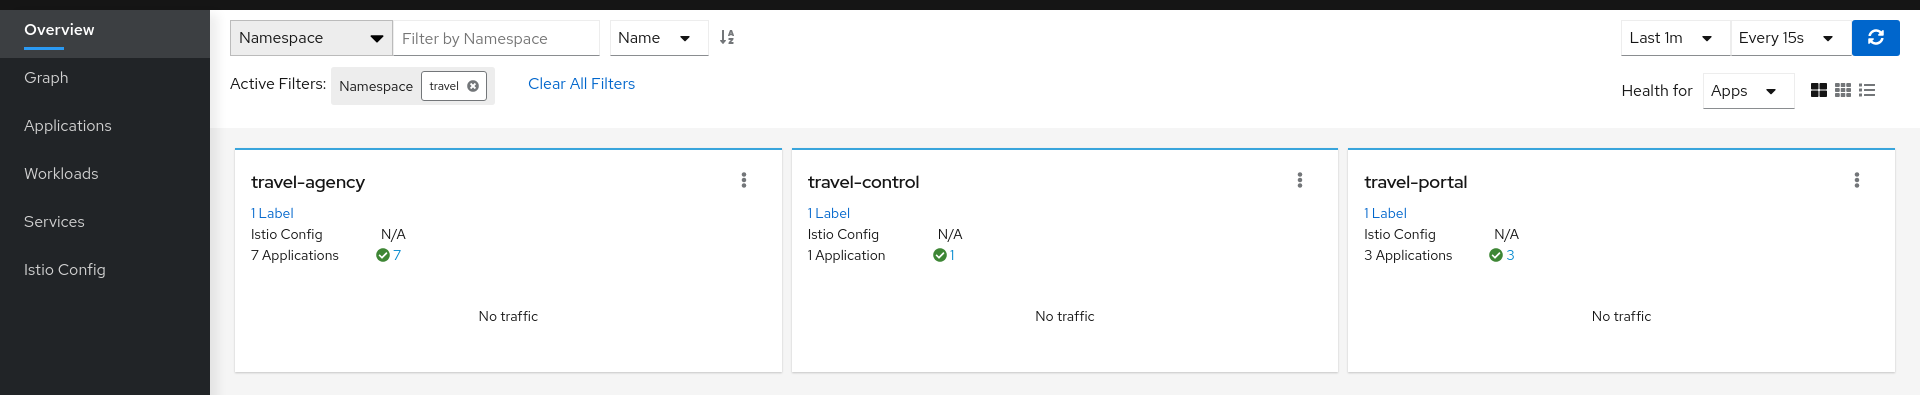
But we won’t see any traffic in the graph page for any of these new namespaces:
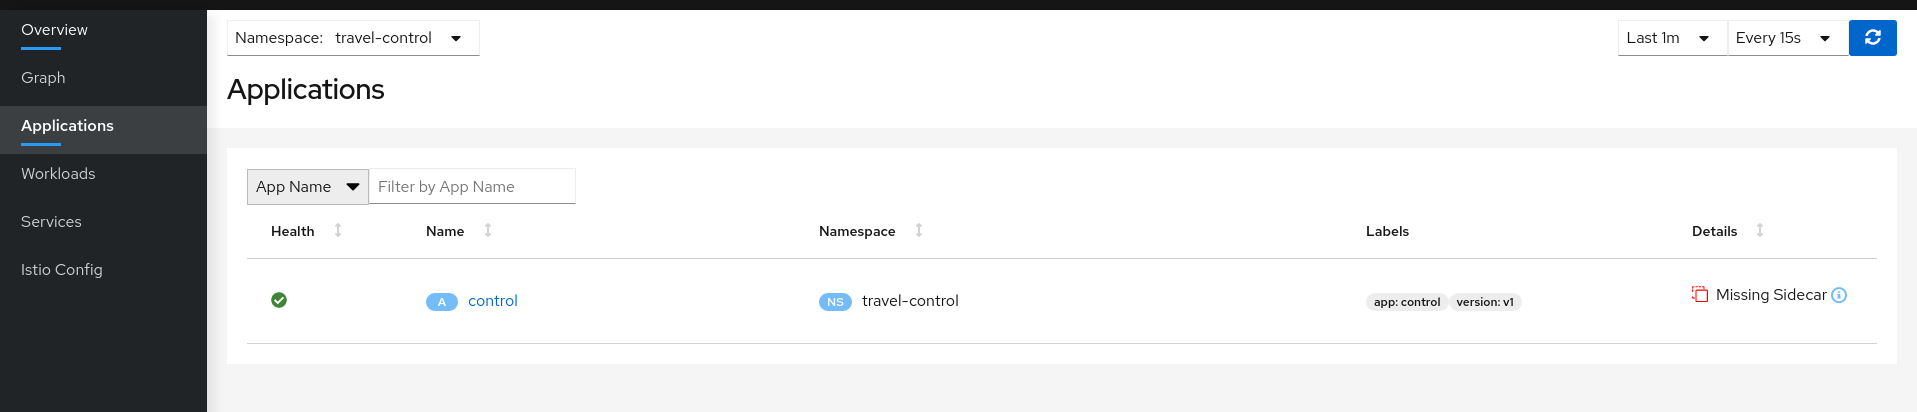
If we examine the Applications, Workloads or Services page, it will confirm that there are missing sidecars:
Enable Sidecars
In this tutorial, we will add namespaces and workloads into the ServiceMesh individually step by step.
This will help you to understand how Istio sidecar proxies work and how applications can use Istio’s features.
We are going to start with the control workload deployed into the travel-control namespace:
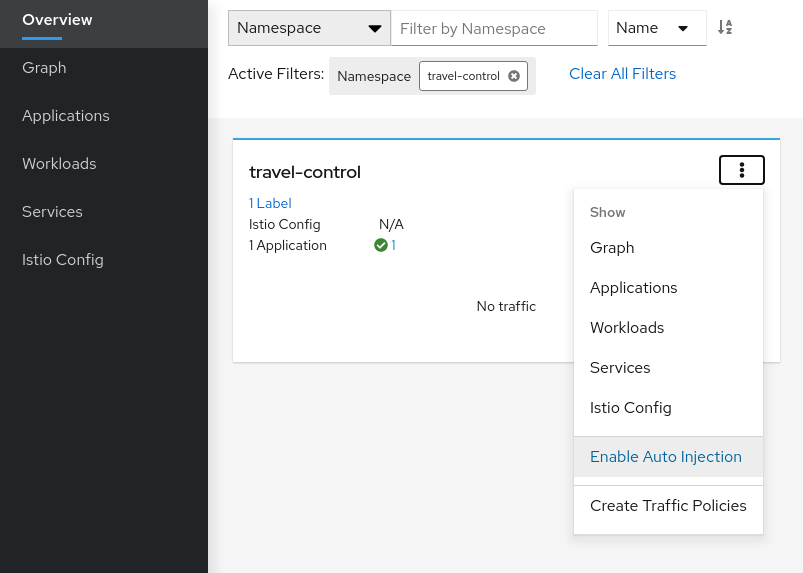
| Step 1: Enable Auto Injection on the travel-control namespace |
| Step 2: Enable Auto Injection for control workload |

Understanding what happened:
Open Travels Demo to outside traffic
The control workload now has an Istio sidecar proxy injected but this application is not accessible from the outside.
In this step we are going to expose the control service using an Istio Ingress Gateway which will map a path to a route at the edge of the mesh.
| Step 1: Create a DNS entry for the control service associated with the External IP of the Istio Ingress |
This step depends on the platform you have chosen, please review Determining the Ingress IP and Ports for more details.
There are multiple ways to create a DNS entry depending of the platform, servers or services that you are using.
Kubernetes Service EXTERNAL-IP for "LoadBalancer" TYPE is provided in minikube plaform using the minikube tunnel tool.
For minikube we will check the External IP of the Ingress gateway:
$ kubectl get services/istio-ingressgateway -n istio-system
NAME                   TYPE           CLUSTER-IP     EXTERNAL-IP    PORT(S)                                                                      AGE
istio-ingressgateway   LoadBalancer   10.101.6.144   10.101.6.144   15021:30757/TCP,80:32647/TCP,443:30900/TCP,31400:30427/TCP,15443:31072/TCP   19h
And we will add a simple entry to the /etc/hosts of the tutorial machine with the desired DNS entry:
...
10.101.6.144 control.travel-control.istio-cluster.org
...
Then, from this machine, the url control.travel-control.istio-cluster.org will resolve to the External IP of the Ingress Gateway of Istio.
OpenShift does not provide the Kubernetes Service EXTERNAL-IP for "LoadBalancer" TYPE. Instead, you can expose the istio-ingressgateway service.
For OpenShift we will expose the Ingress gateway as a service:
$ oc expose service istio-ingressgateway -n istio-system
$ oc get routes -n istio-system
NAME                   HOST/PORT                                  PATH   SERVICES               PORT    TERMINATION          WILDCARD
istio-ingressgateway   <YOUR_ROUTE_HOST>                                 istio-ingressgateway   http2                        None
Then, from this machine, the host <YOUR_ROUTE_HOST> will resolve to the External IP of the Ingress Gateway of Istio. For OpenShift we will
not define a DNS entry, instead, where you see control.travel-control.istio-cluster.org in the steps below, subsitute the value of <YOUR_ROUTE_HOST>.
| Step 2: Use the Request Routing Wizard on the control service to generate a traffic rule |

Use "Add Route Rule" button to add a default rule where any request will be routed to the control workload.
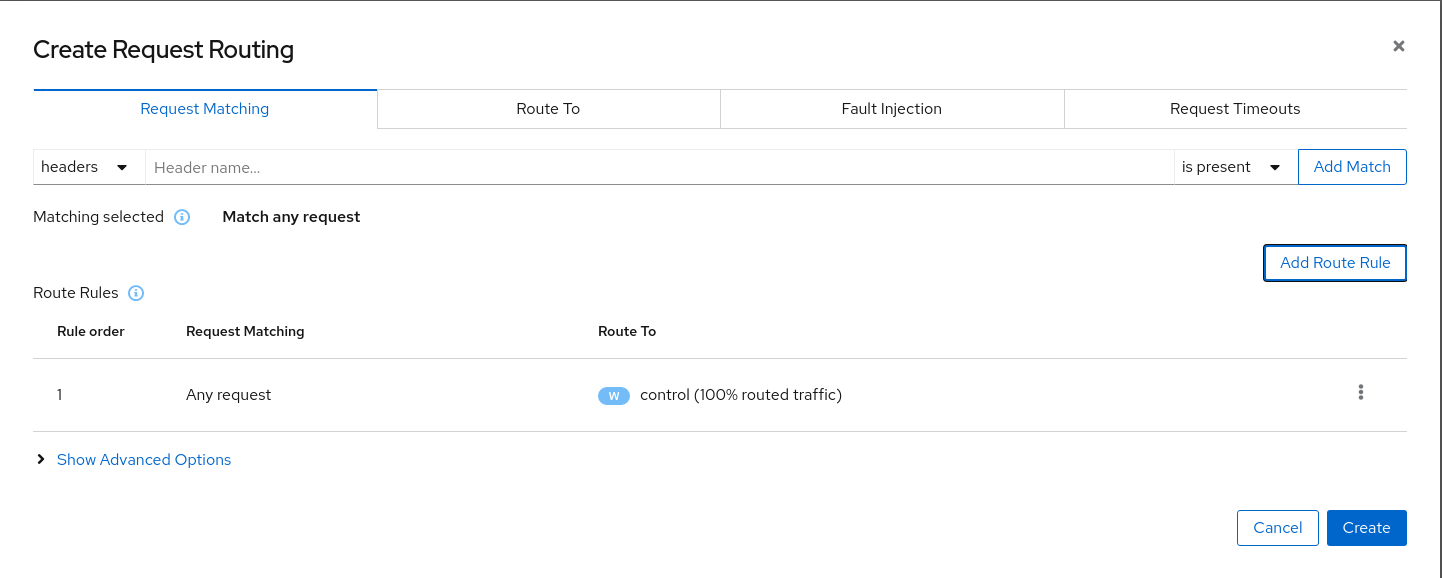
Use the Advanced Options and add a gateway with host control.travel-control.istio-cluster.org and create the Istio config.

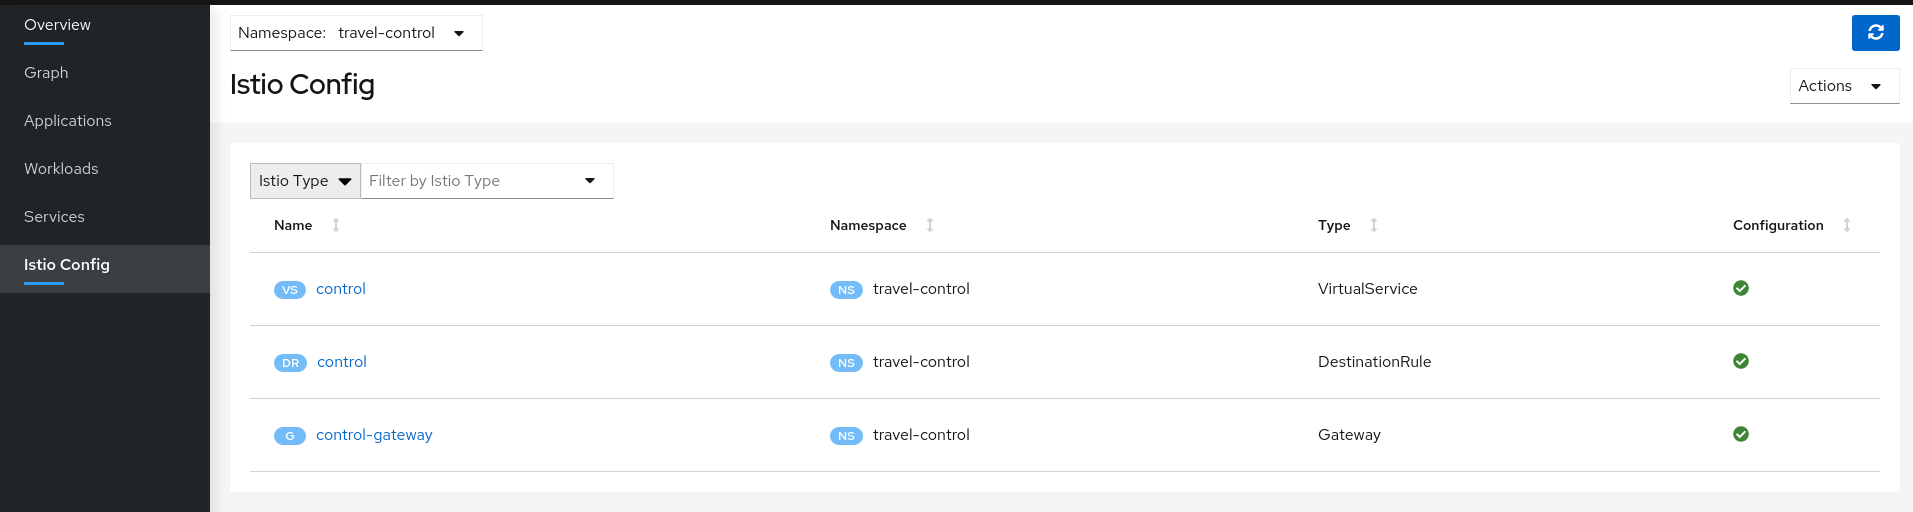
Verify the Istio configuration generated.
Step 3: Test the control service by pointing your browser to http://control.travel-control.istio-cluster.org
|

| Step 4: Review travel-control namespace in Kiali |
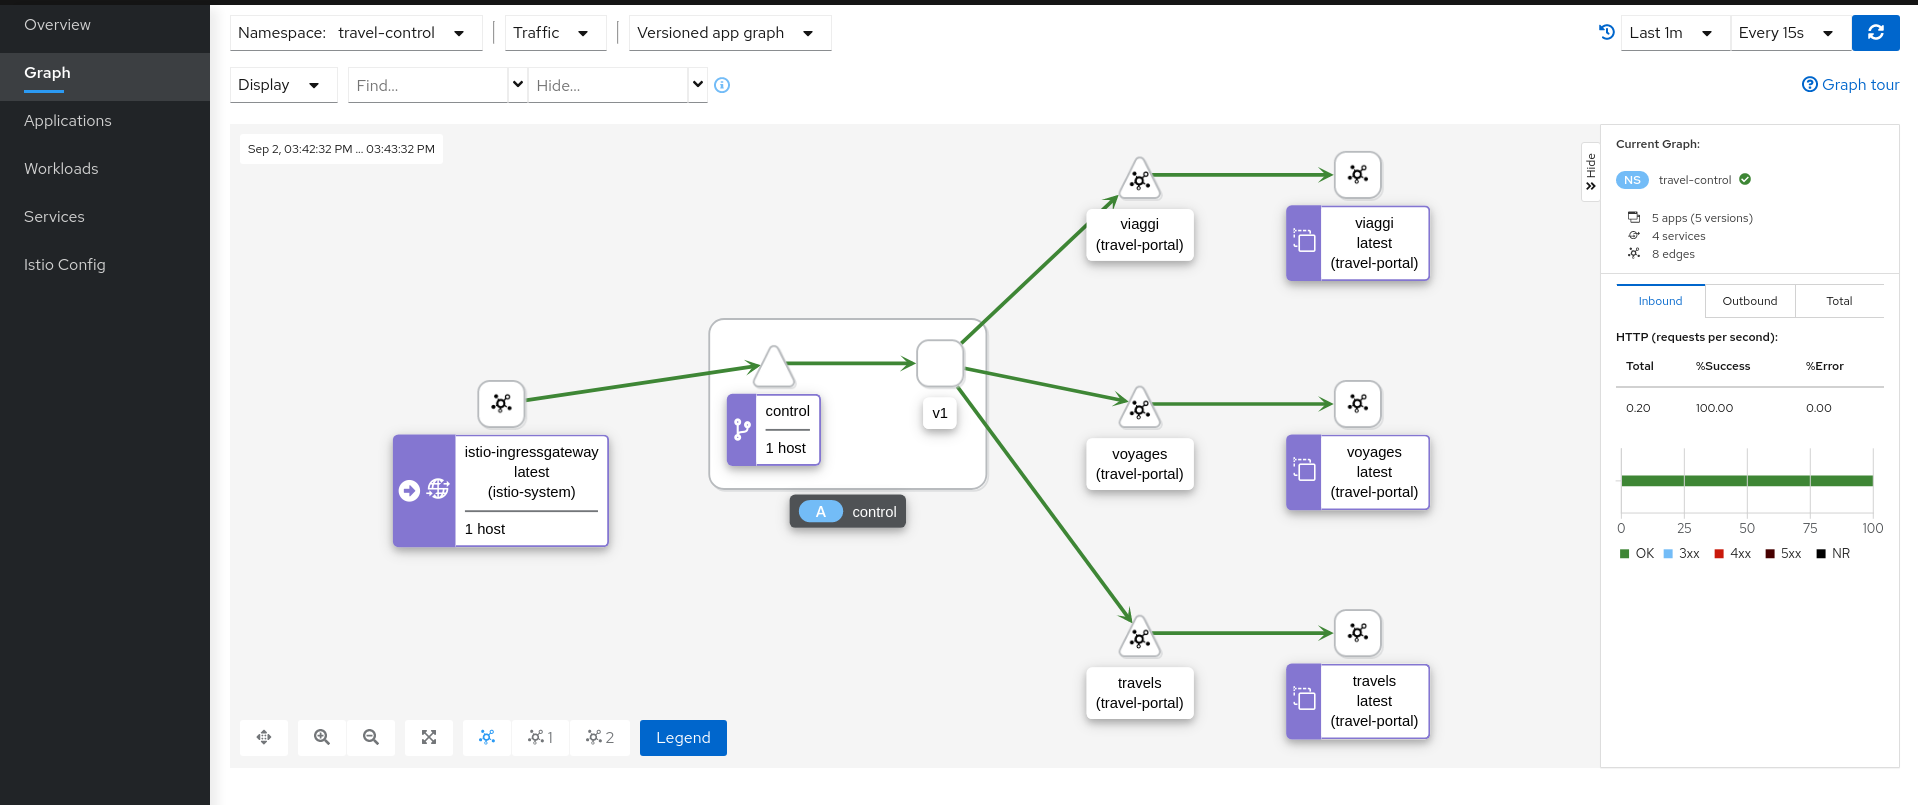
Understanding what happened:
-
External traffic enters into the cluster through a Gateway
-
Traffic is routed to the control service through a VirtualService
-
Kiali Graph visualizes the traffic telemetry reported from the control sidecar proxy
-
Only the travel-control namespace is part of the mesh
-
Observe
Enable Sidecars in all workloads
An Istio sidecar proxy adds a workload into the mesh.
Proxies connect with the control plane and provide Service Mesh functionality.
Automatically providing metrics, logs and traces is a major feature of the sidecar.
In the previous steps we have added a sidecar only in the travel-control namespace’s control workload.
We have added new powerful features but the application is still missing visibility from other workloads.
| Step 1: Switch to the Workload graph and select multiple namespaces to identify missing sidecars in the Travel Demo application |
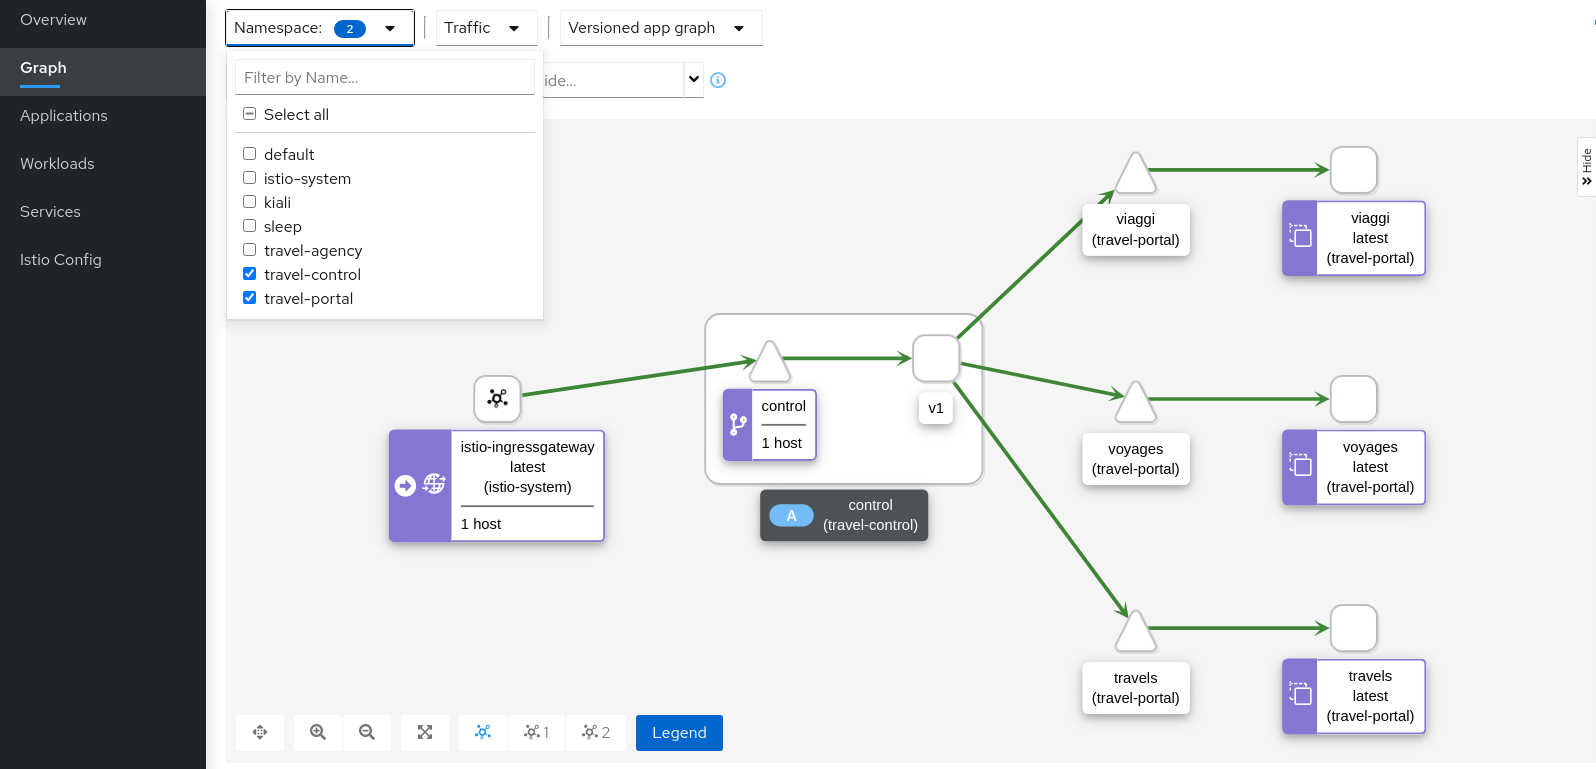
That control workload provides good visibility of its traffic, but telemetry is partially enabled, as travel-portal and travel-agency workloads don’t have sidecar proxies.
| Step 2: Enable proxy injection in travel-portal and travel-agency namespaces |
In the First Steps of this tutorial we didn’t inject the sidecar proxies on purpose to show a scenario where only some workloads may have sidecars.
Typically, Istio users annotate namespaces before the deployment to allow Istio to automatically add the sidecar when the application is rolled out into the cluster. Perform the following commands:
kubectl label namespace travel-agency istio-injection=enabled
kubectl label namespace travel-portal istio-injection=enabled

kubectl delete -f <(curl -L https://raw.githubusercontent.com/kiali/demos/master/travels/travel_agency.yaml) -n travel-agency
kubectl delete -f <(curl -L https://raw.githubusercontent.com/kiali/demos/master/travels/travel_portal.yaml) -n travel-portal

// Wait until all services, deployments and pods are deleted from the travel-agency and travel-portal namespaces

kubectl apply -f <(curl -L https://raw.githubusercontent.com/kiali/demos/master/travels/travel_agency.yaml) -n travel-agency
kubectl apply -f <(curl -L https://raw.githubusercontent.com/kiali/demos/master/travels/travel_portal.yaml) -n travel-portal
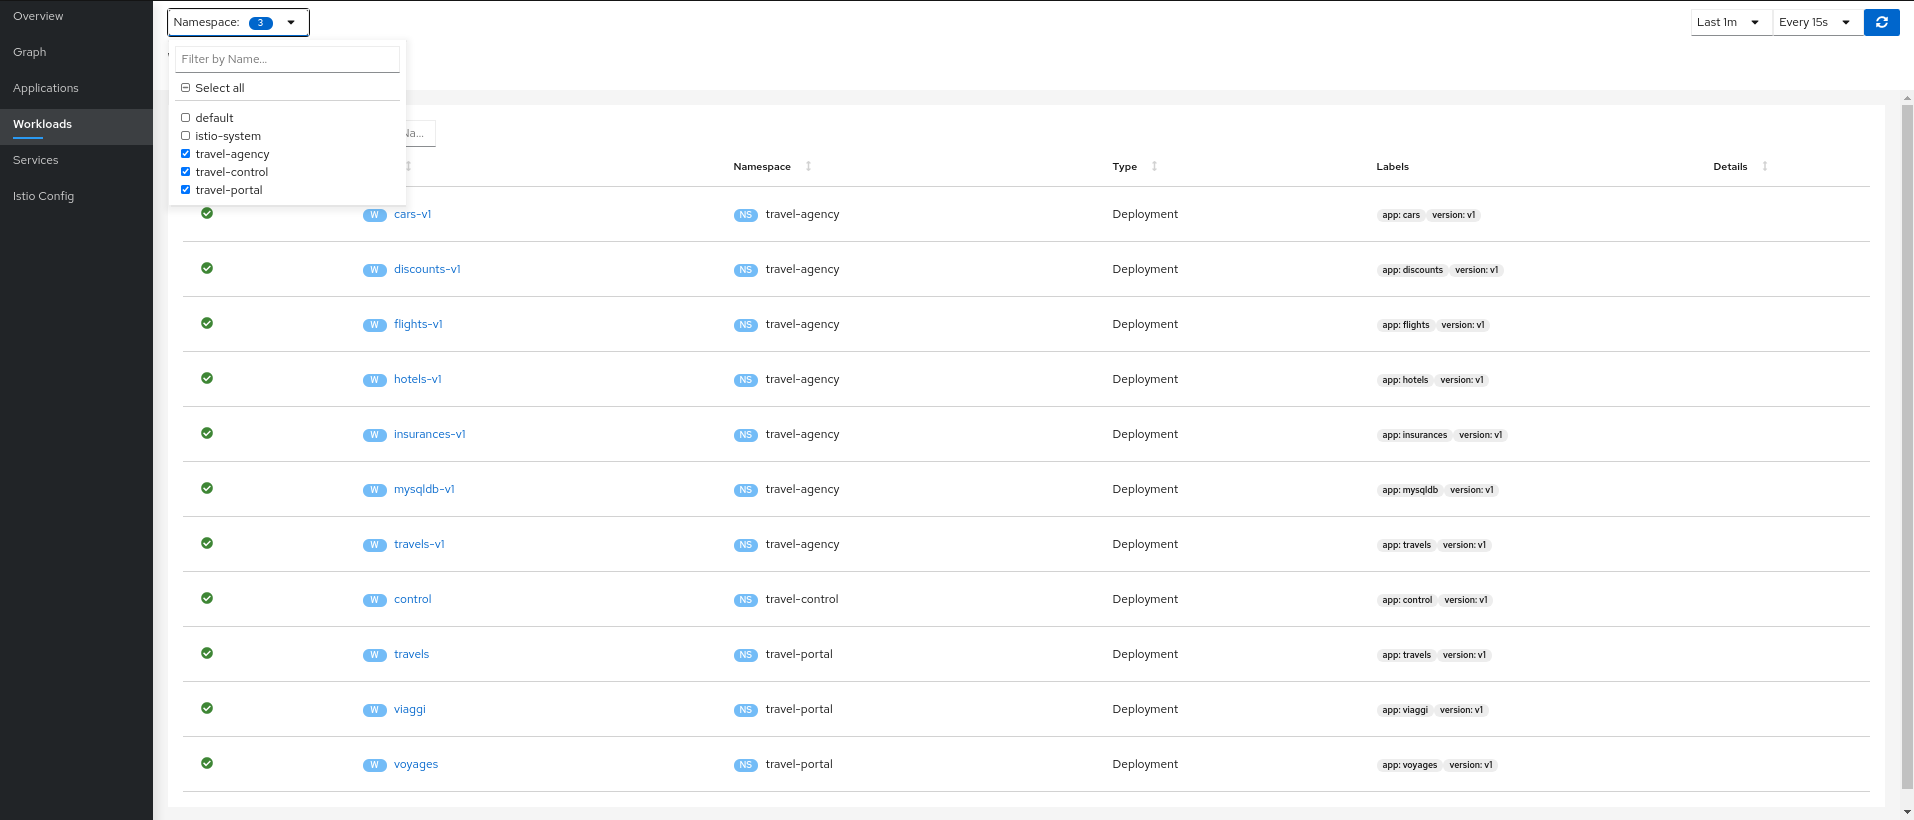
Verify that travel-control, travel-portal and travel-agency workloads have sidecars deployed:
| Step 3: Verify updated telemetry for travel-portal and travel-agency namespaces |
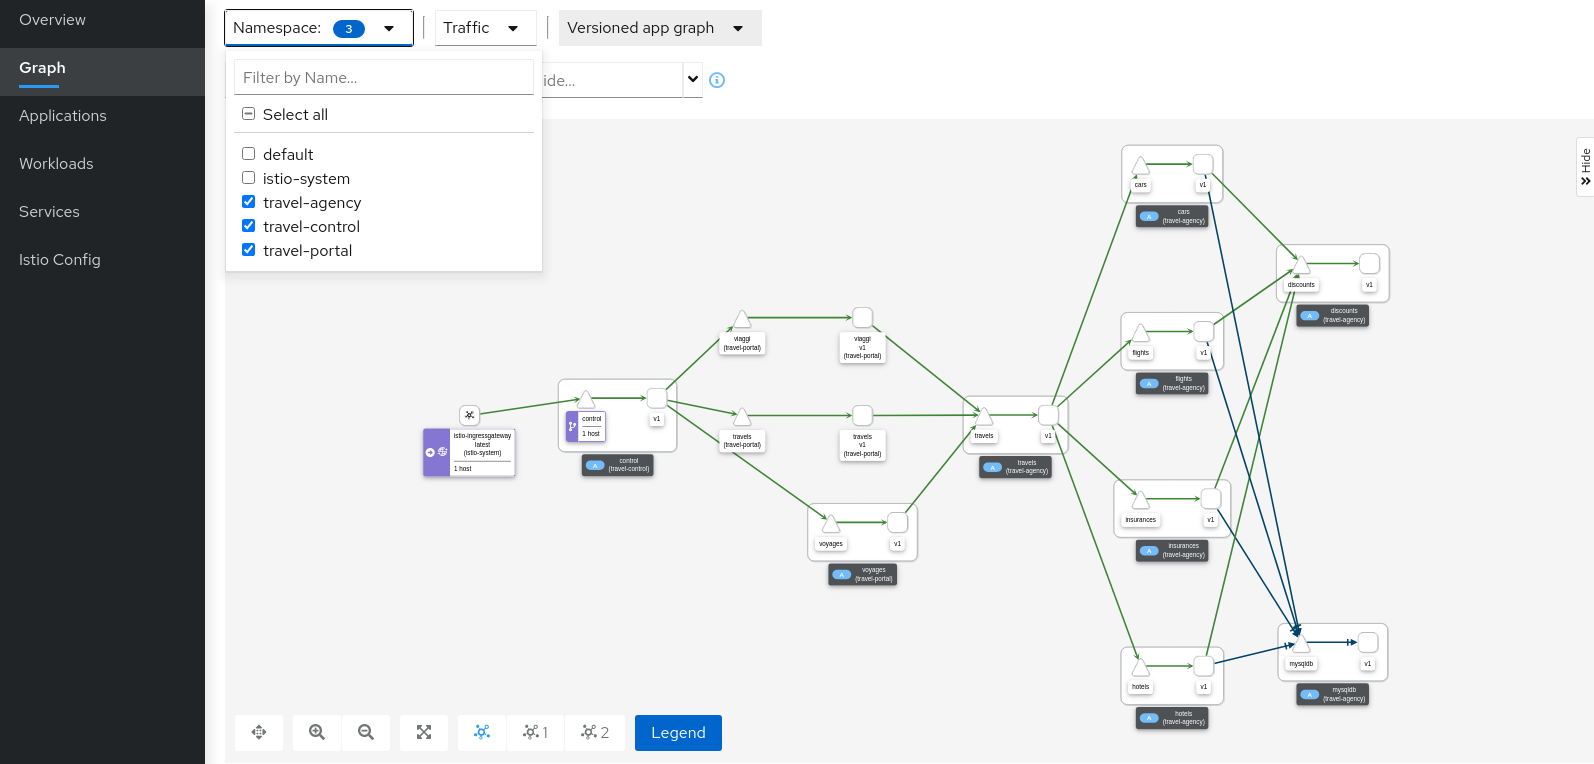
Graph walkthrough
The graph provides a powerful set of Graph Features to visualize the traffic topology of the service mesh.
In this step, we will show how to use the Graph to show relevant information in the context of the Travels Demo application.
Our goal will be to identify the most critical service of the demo application.
| Step 1: Select all travel- namespaces in the graph and enable Traffic Distribution edge labels in the Display Options: |
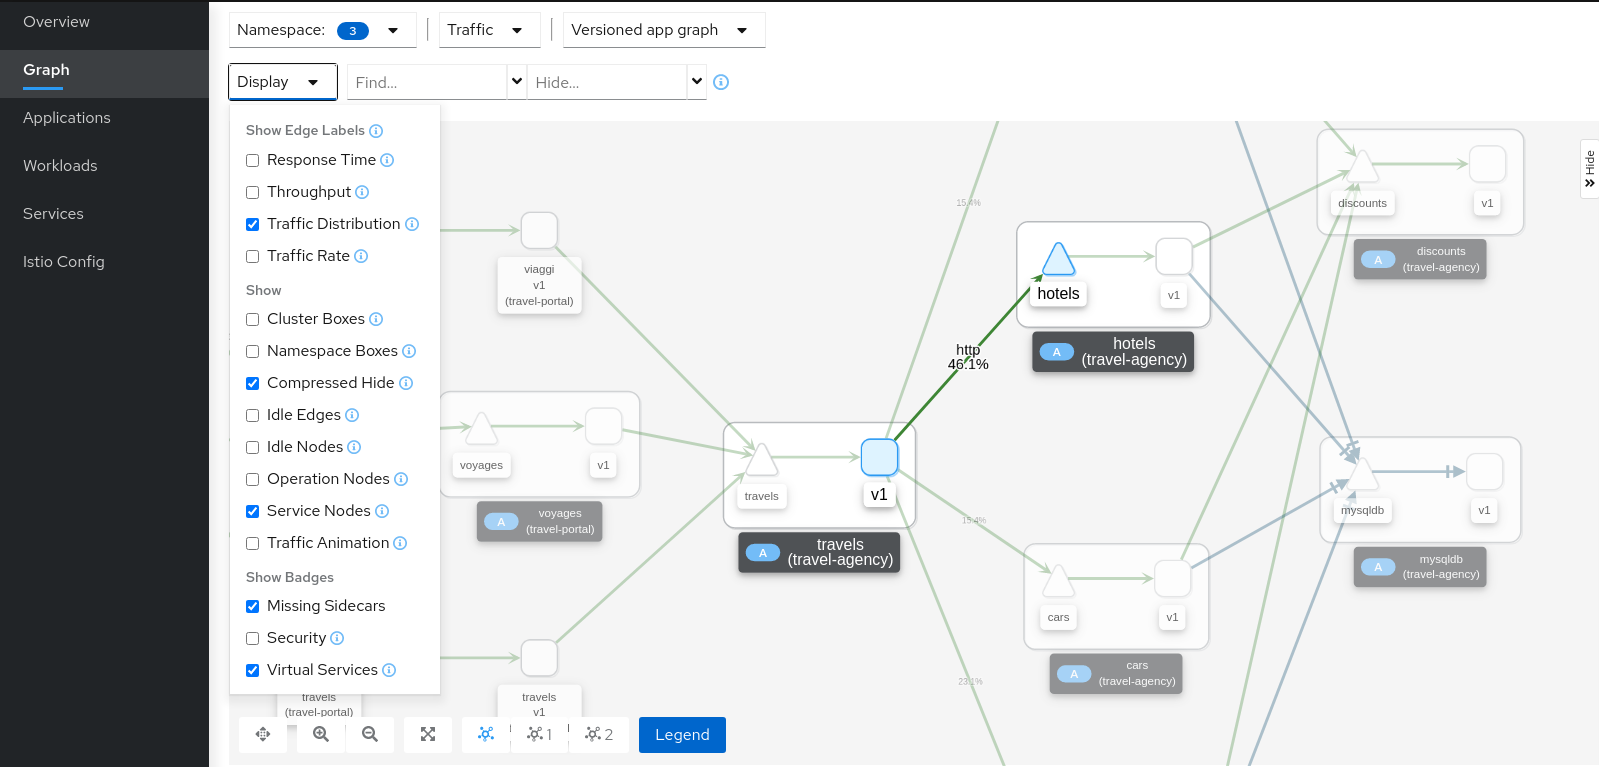
Review the status of the mesh, everything seems healthy, but also note that hotels service has more load compared to other services inlcuded in the travel-agency namespace.
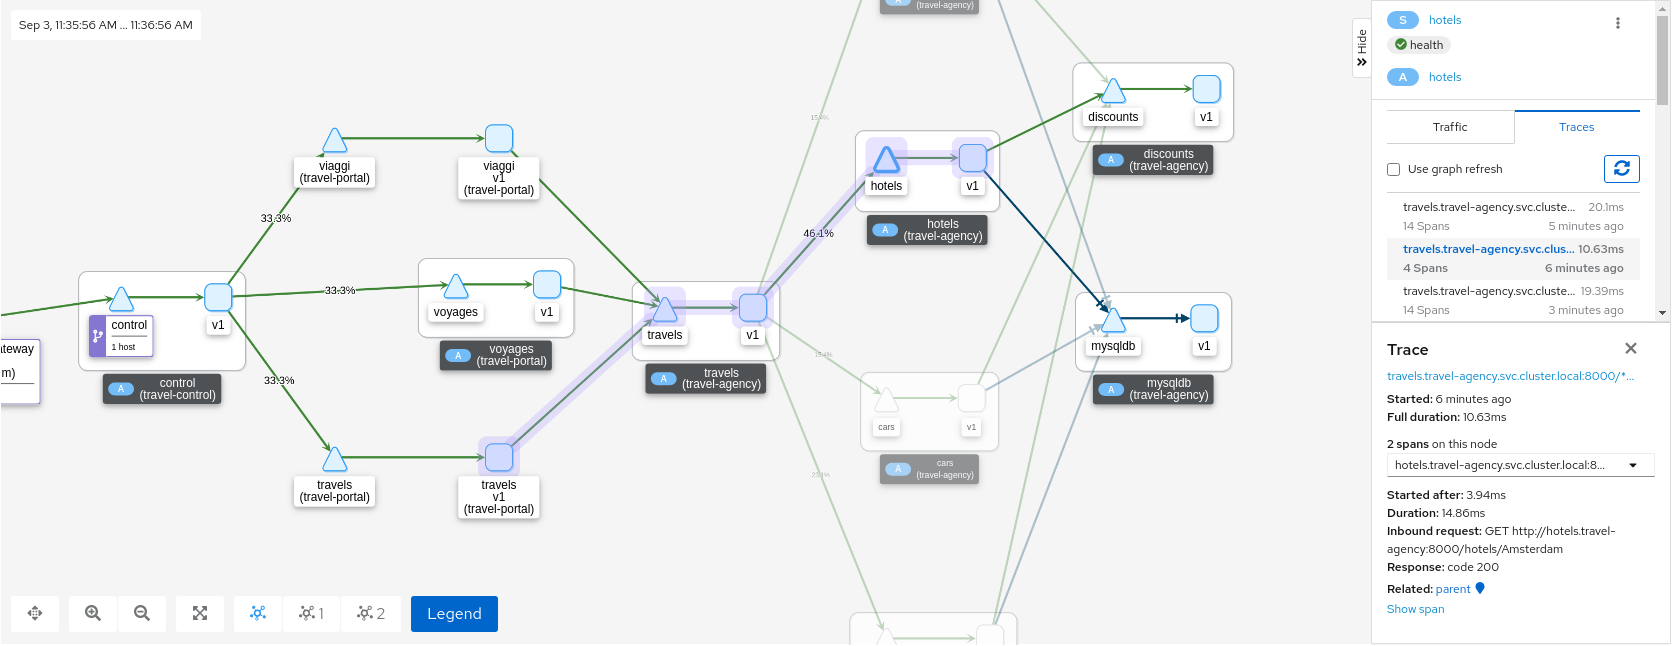
| Step 2: Select the hotels service, use the graph side-panel to select a trace from the Traces tab: |
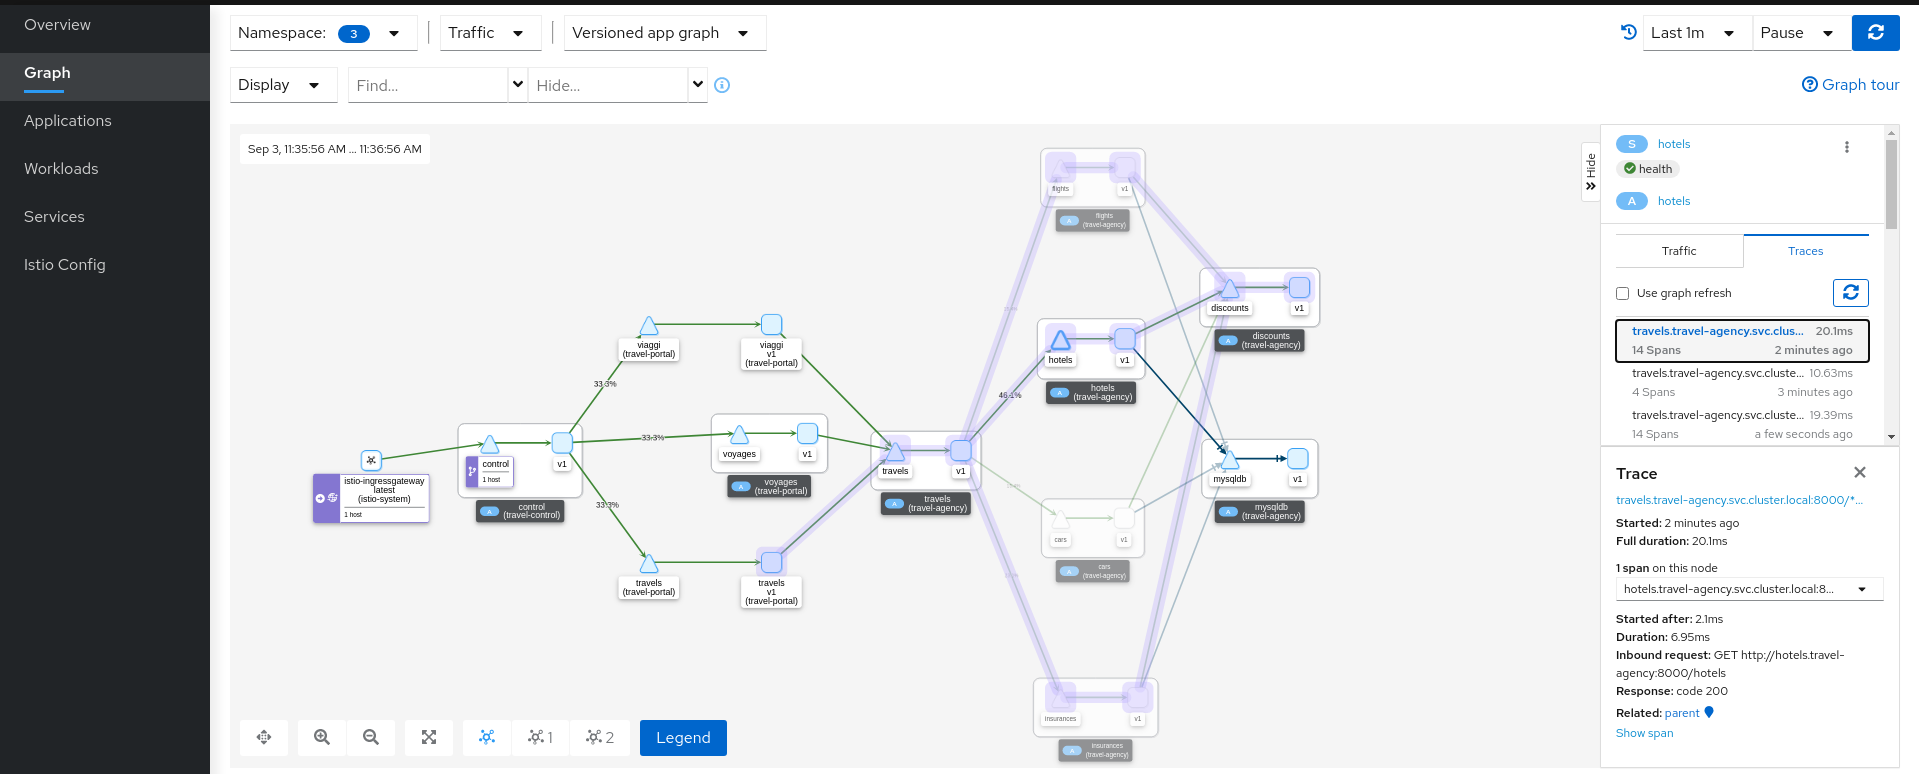
Combining telemetry and tracing information will show that there are traces started from a portal that involve multiple services but also other traces that only consume the hotels service.
| Step 3: Select the main travels application and double-click to zoom in |
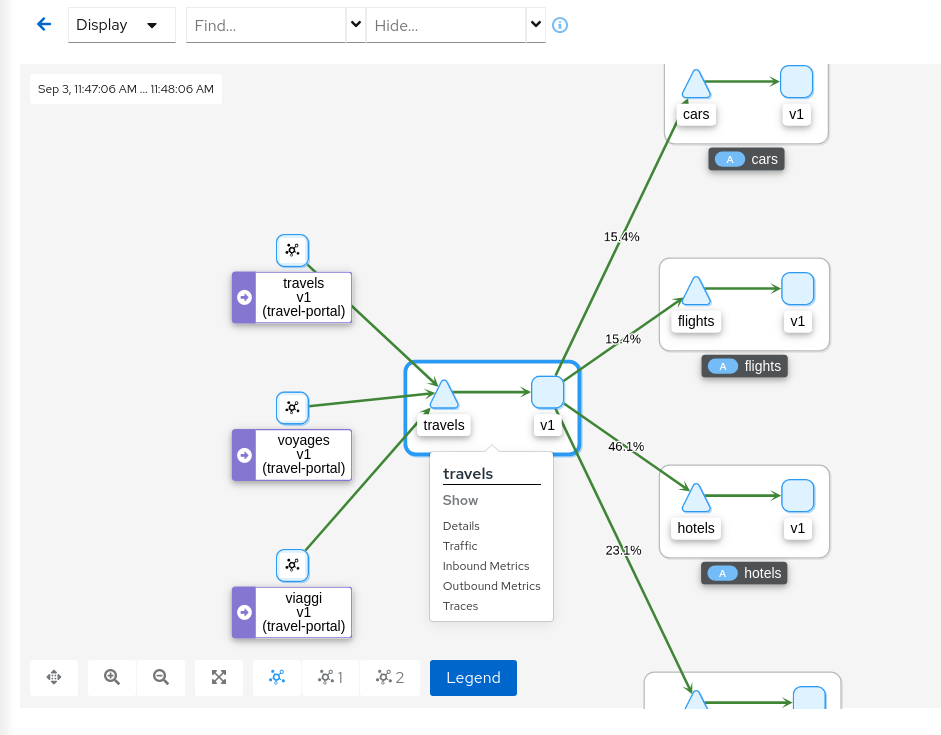
The graph can focus on an element to study a particular context in detail.
Note that a contextual menu is available using right-click, to easily shortcut the navigation to other sections.
Application details
Kiali provides Detail Views to navigate into applications, workloads and services.
These views provide information about the structure, health, metrics, logs, traces and Istio configuration for any application component.
In this tutorial we are going to learn how to use them to examine the main travels application of our example.
| Step 1: Navigate to the travels application |
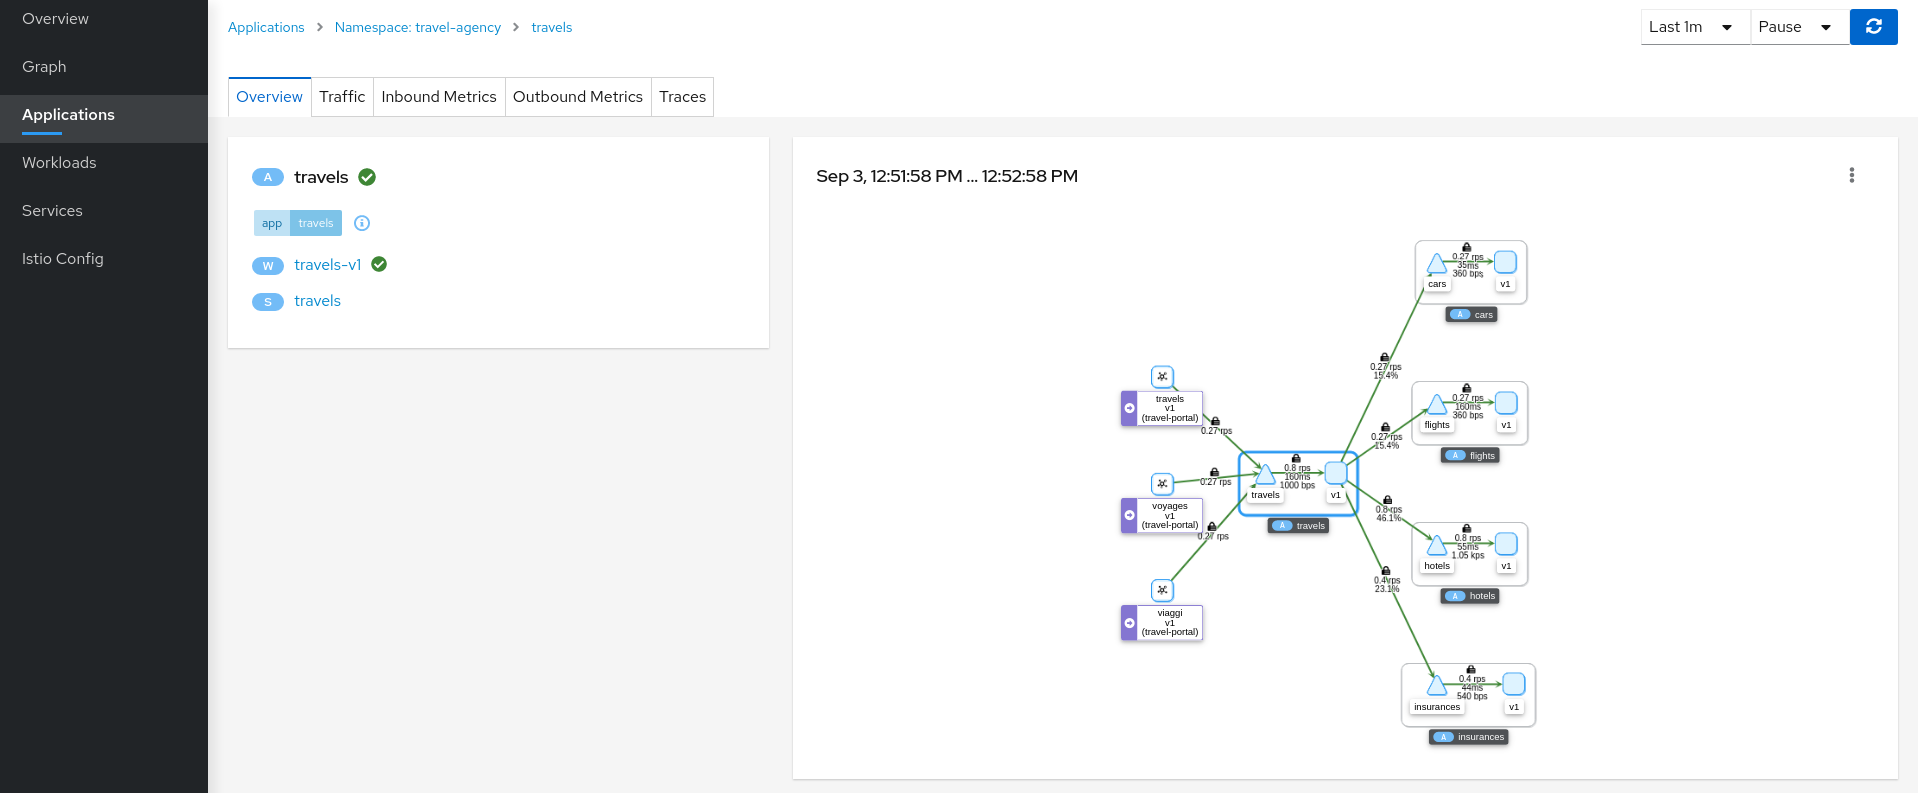
An application is an abstract group of workloads and services labeled with the same "application" name.
From Service Mesh perspective this concept is significant as telemetry and tracing signals are mainly grouped by "application" even if multiple workloads are involved.
At this point of the tutorial, the travels application is quite simple, just a travels-v1 workload exposed through the travels service. Navigate to the travels-v1 workload detail by clicking the link in the travels application overview.
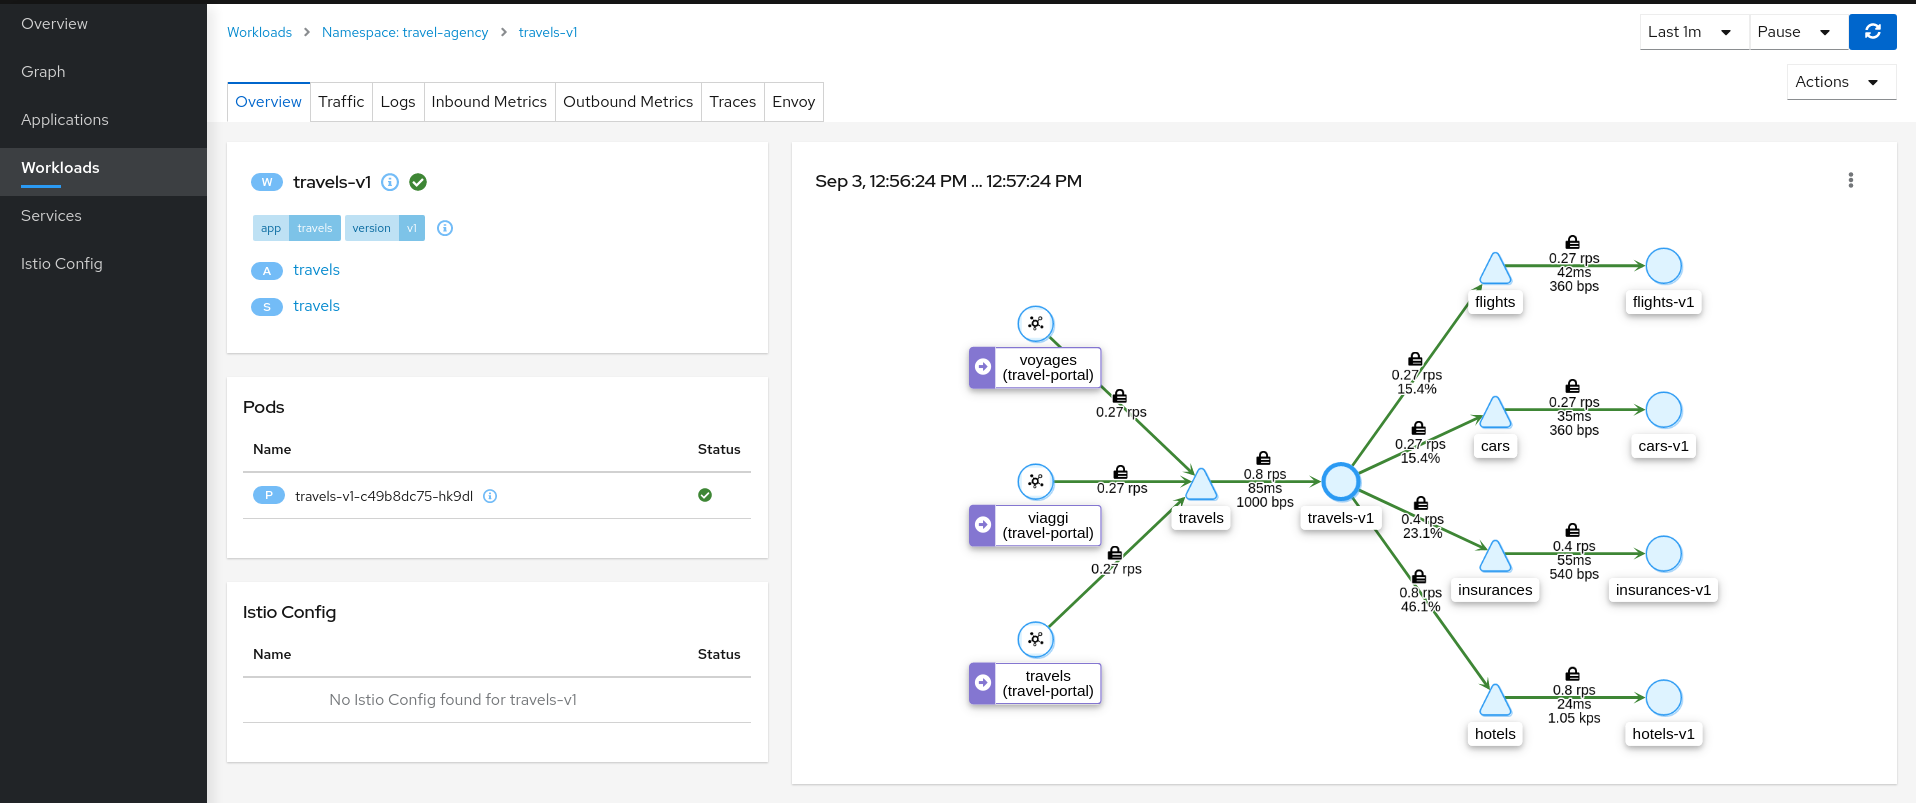
| Step 2: Examine Outbound Metrics of travels-v1 workload |
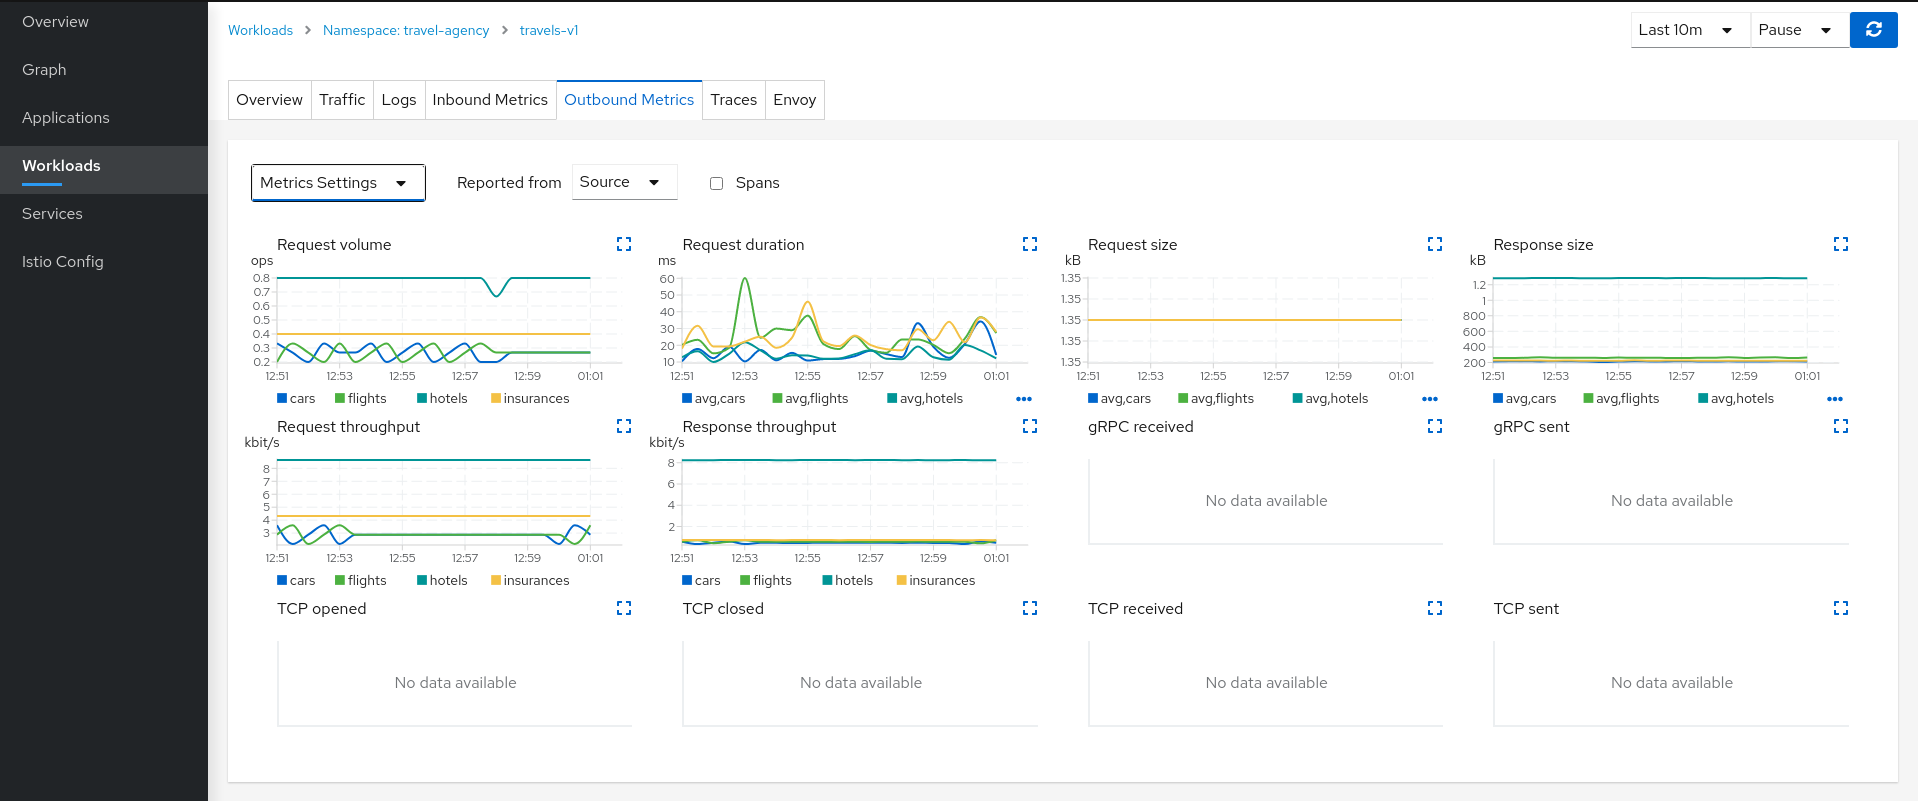
The Metrics tab provides a powerful visualization of telemetry collected by the Istio proxy sidecar. It presents a dashboard of charts, each of which can be
expanded for closer inspection. Expand the Request volume chart:
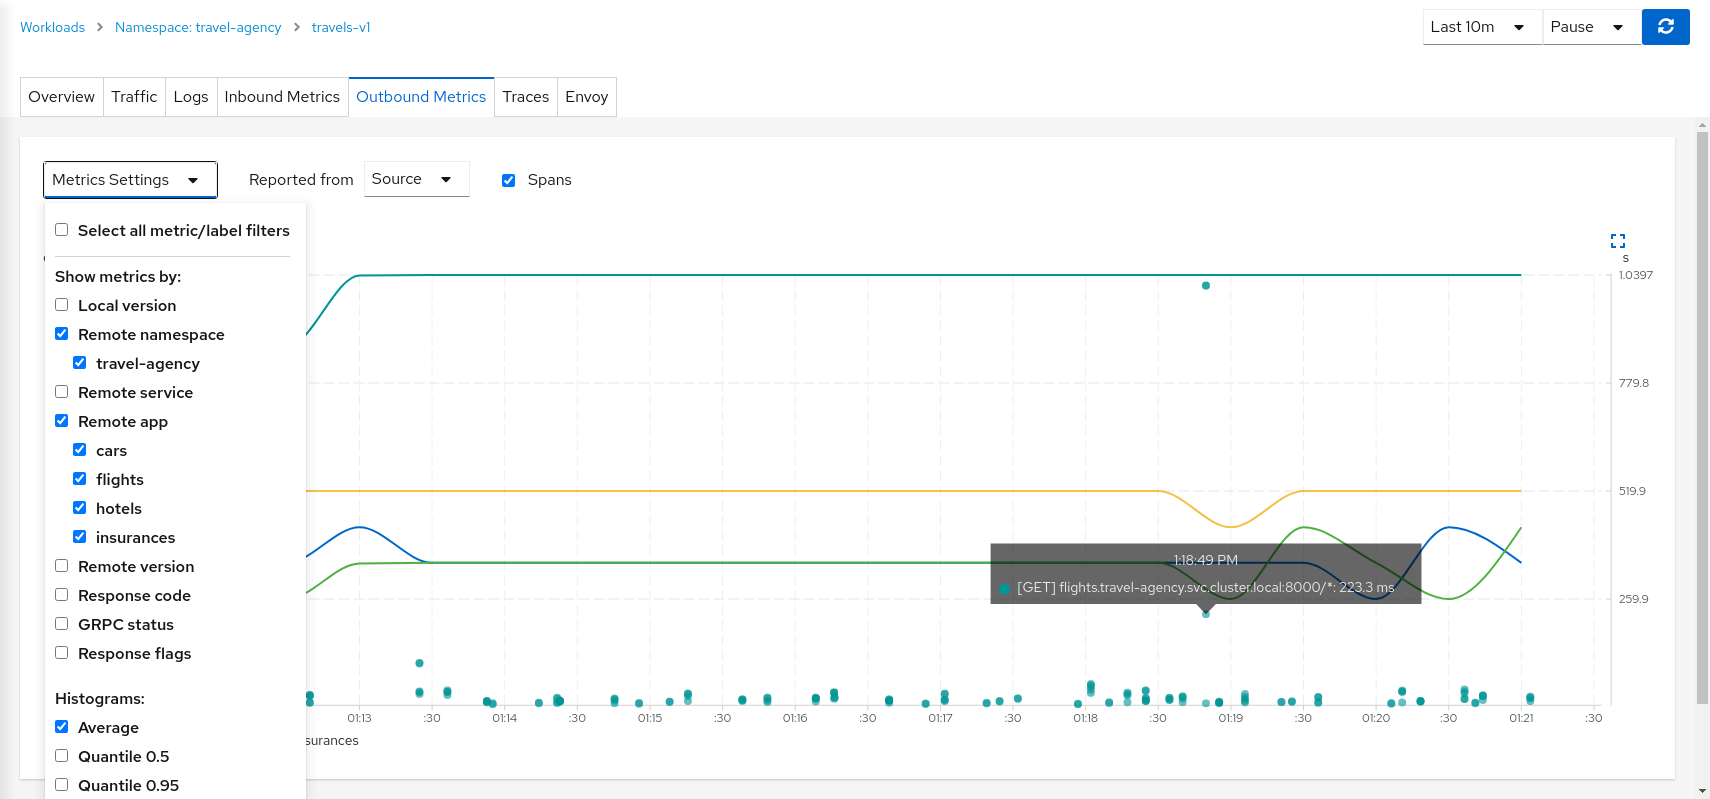
Metrics Settings provides multiple predefined criteria out-of-the-box. Additionally, enable the spans checkbox to correlate metrics and tracing spans
in a single chart.
We can see in the context of the Travels application, the hotels service request volume differs from that of the other travel-agency services.
By examining the Request Duration chart also shows that there is no suspicious delay, so probably this asymmetric volume is part of the application business' logic.
| Step 3: Review Logs of travels-v1 workload |
The Logs tab provides a unified view of application container logs with the Istio sidecar proxy logs. It also offers a spans checkbox, providing a correlated view of both logs and tracing, helping identify spans of interest.
From the application container log we can spot that there are two main business methods: GetDestinations and GetTravelQuote.
In the Istio sidecar proxy log we see that GetDestinations invokes a GET /hotels request without parameters.
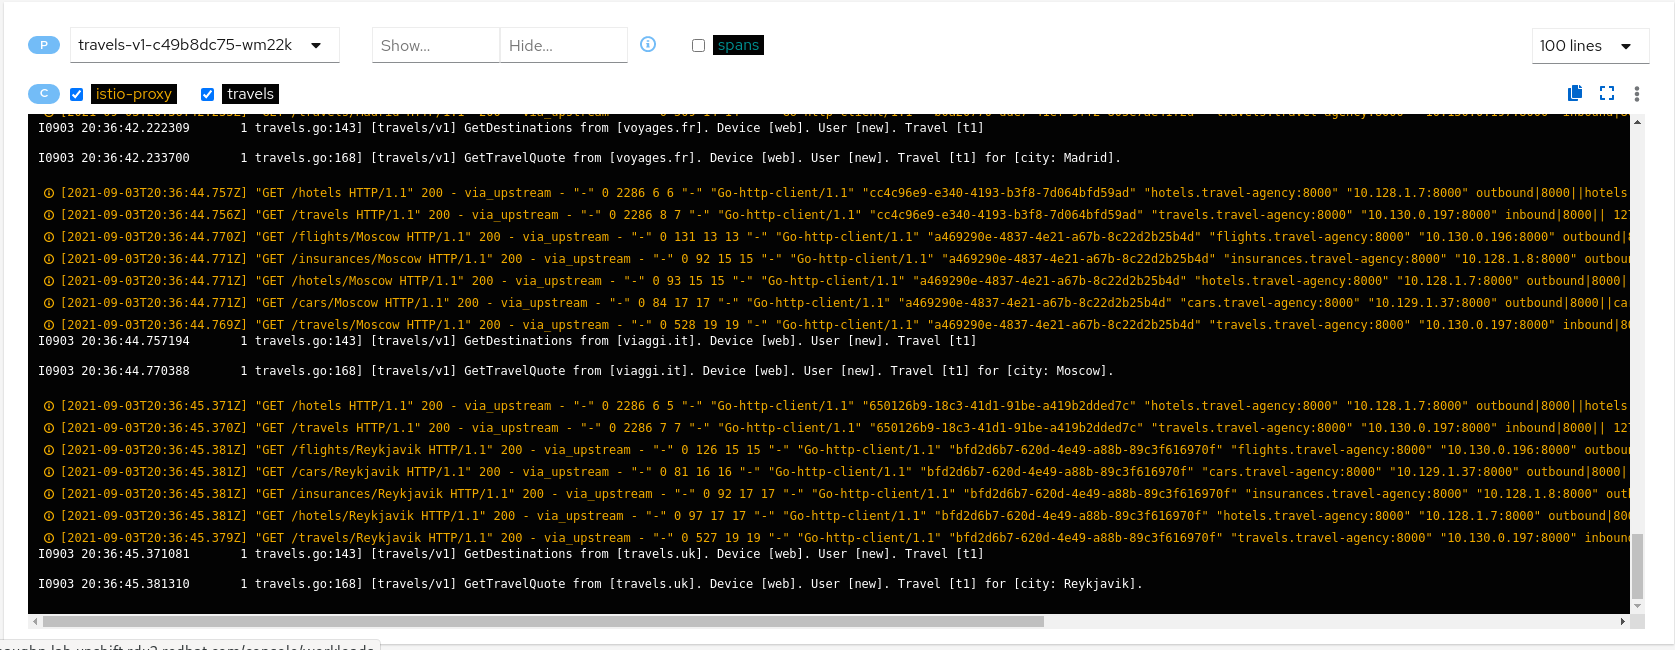
However, GetTravelQuote invokes multiple requests to other services using a specific city as a parameter.

Then, as discussed in the Travel Demo design, an initial query returns all available hotels before letting the user choose one and then get specific quotes for other destination services.
That scenario is shown in the increase of the hotels service utilization.
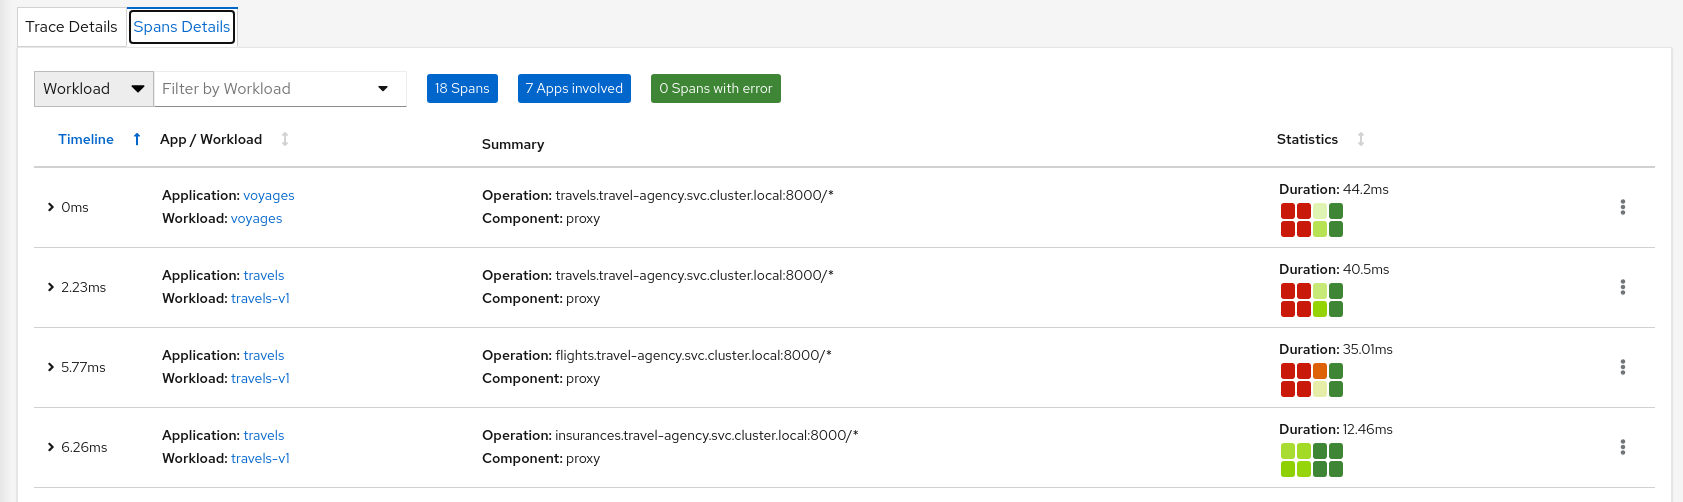
| Step 4: Review Traces of workload-v1 |
Now we have identified that the hotels service has more use than other travel-agency services.
The next step is to get more context to answer if some particular service is acting slower than expected.
The Traces tab allows comparison between traces and metrics histograms, letting the user determine if a particular spike is expected in the context of average values.
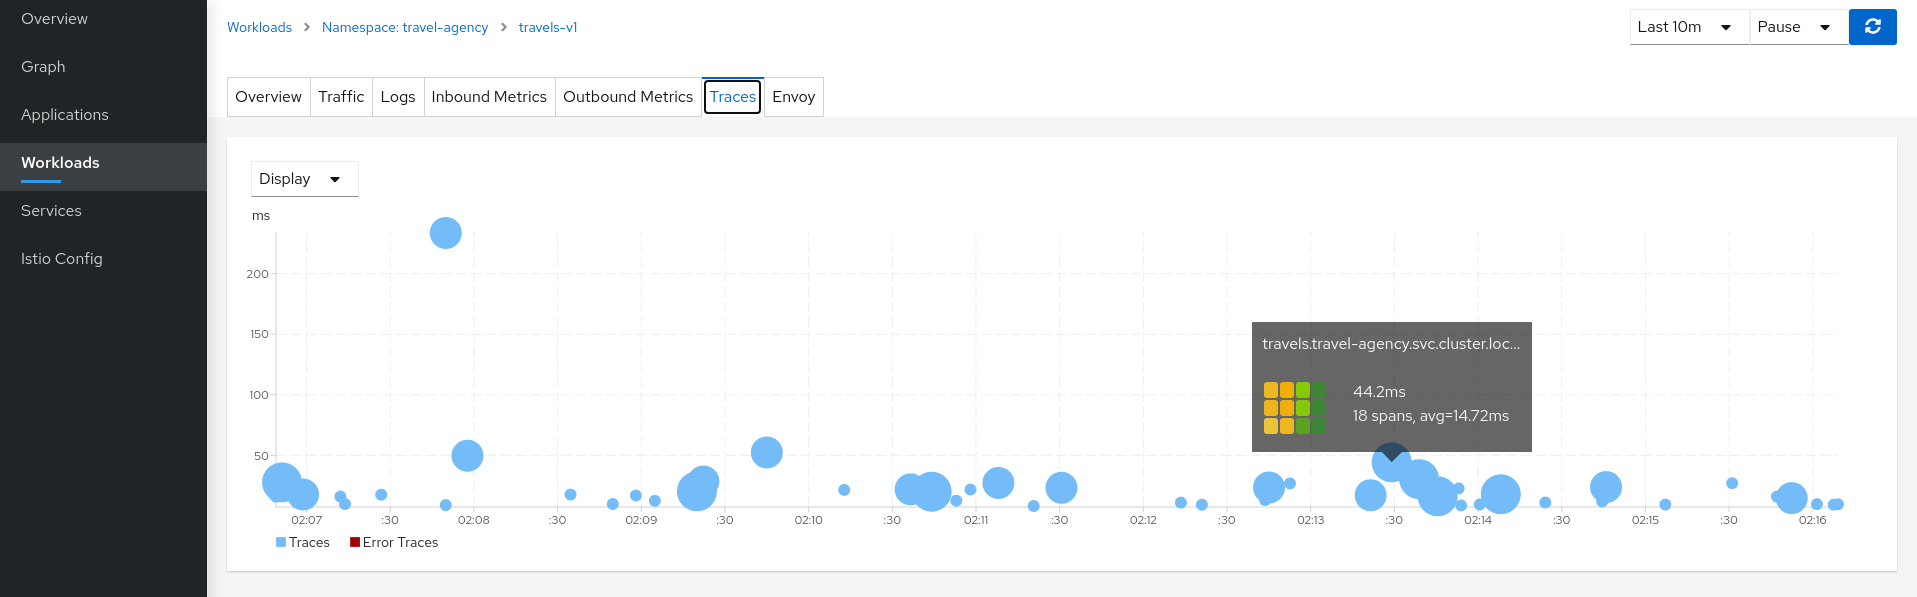
In the same context, individual spans can be compared in more detail, helping to identify a problematic step in the broader scenario.
Connect
Request Routing
The Travel Demo application has several portals deployed on the travel-portal namespace consuming the travels service deployed on the travel-agency namespace.
The travels service is backed by a single workload called travels-v1 that receives requests from all portal workloads.
At a moment of the lifecycle the business needs of the portals may differ and new versions of the travels service may be necessary.
This step will show how to route requests dynamically to multiple versions of the travels service.
| Step 1: Deploy travels-v2 and travels-v3 workloads |
To deploy the new versions of the travels service execute the following commands:
kubectl apply -f <(curl -L https://raw.githubusercontent.com/kiali/demos/master/travels/travels-v2.yaml) -n travel-agency
kubectl apply -f <(curl -L https://raw.githubusercontent.com/kiali/demos/master/travels/travels-v3.yaml) -n travel-agency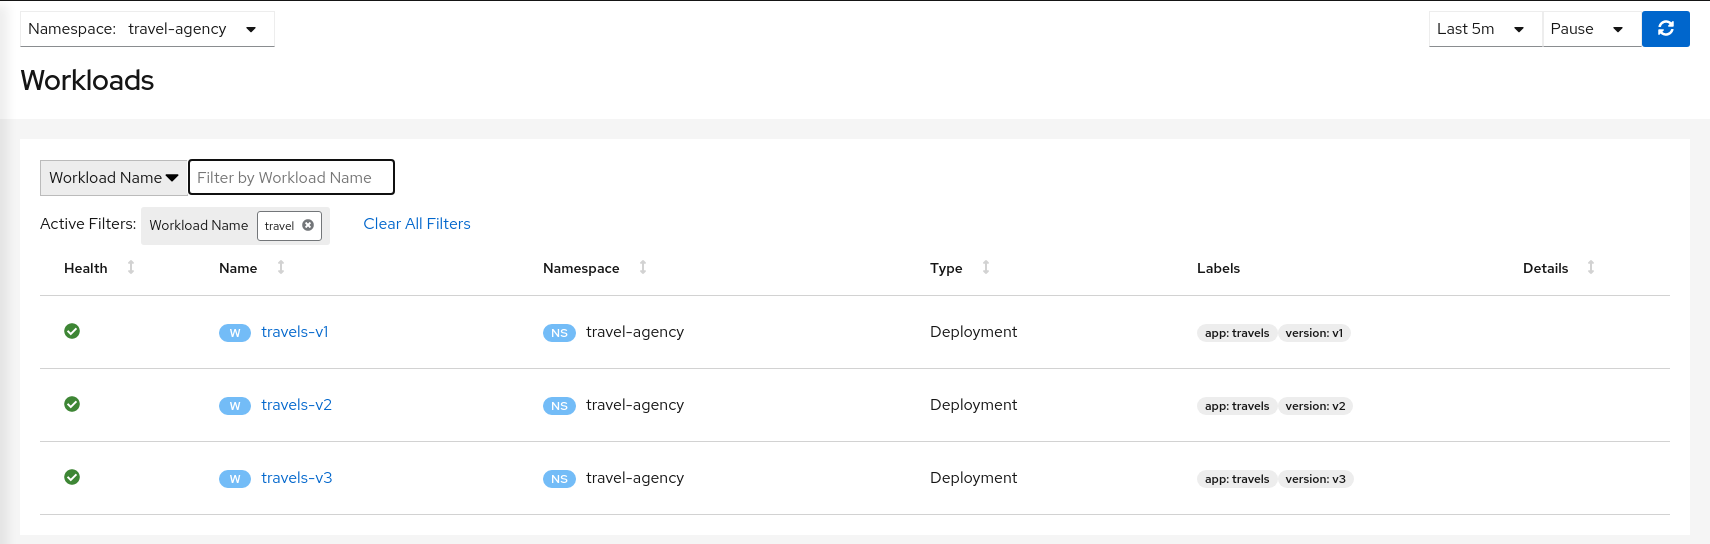
As there is no specific routing defined, when there are multiple workloads for travels service the requests are uniformly distributed.
| Step 2: Investigate the http headers used by the Travels Demo application |
The Traffic Management features of Istio allow you to define Matching Conditions for dynamic request routing.
In our scenario we would like to perform the following routing logic:
-
All traffic from travels.uk routed to travels-v1
-
All traffic from viaggi.it routed to travels-v2
-
All traffic from voyages.fr routed to travels-v3
Portal workloads use HTTP/1.1 protocols to call the travels service, so one strategy could be to use the HTTP headers to define the matching condition.
But, where to find the HTTP headers ? That information typically belongs to the application domain and we should examine the code, documentation or dynamically trace a request to understand which headers are being used in this context.
There are multiple possibilities. The Travel Demo application uses an Istio Annotation feature to add an annotation into the Deployment descriptor, which adds additional Istio configuration into the proxy.
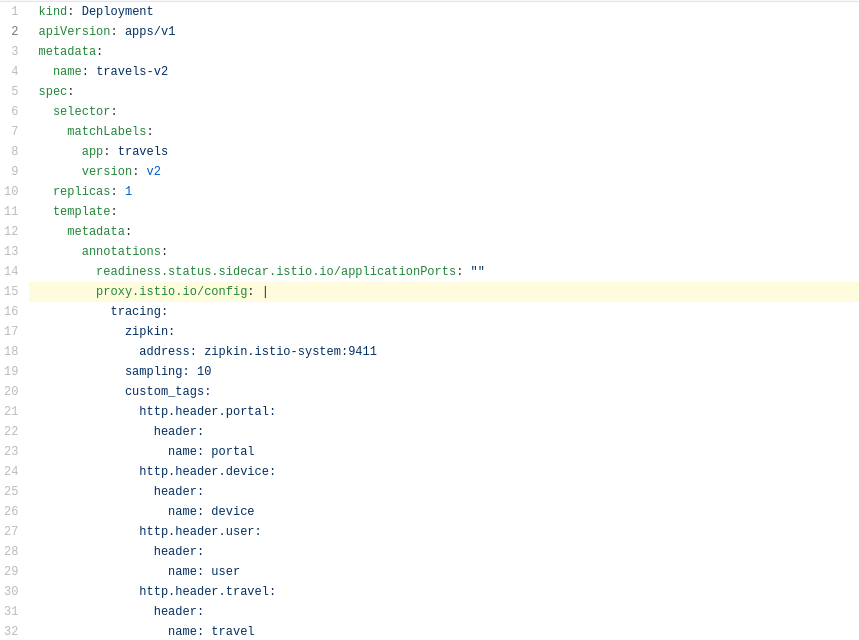
In our example the HTTP Headers are added as part of the trace context.
Then tracing will populate custom tags with the portal, device, user and travel used.
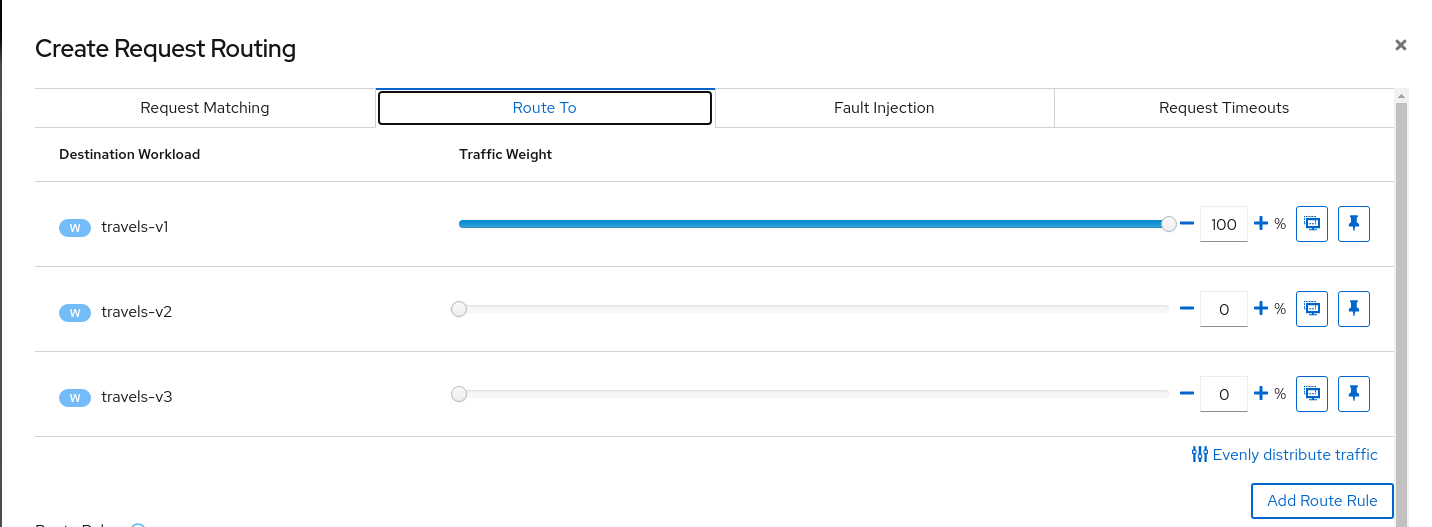
| Step 3: Use the Request Routing Wizard on travels service to generate a traffic rule |
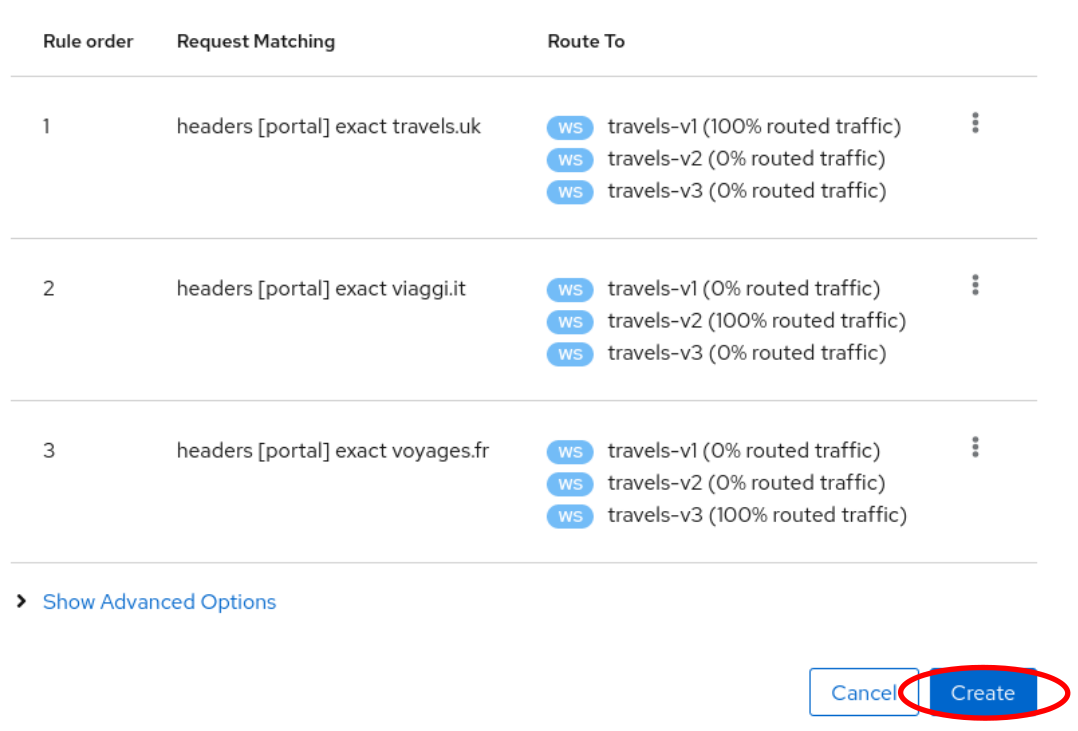
We will define three "Request Matching" rules as part of this request routing. Define all three rules before clicking the Create button.
In the first rule, we will add a request match for when the portal header has the value of travels.uk.
Define the exact match, like below, and click the "Add Match" button to update the "Matching selected" for this rule.

Move to "Route To" tab and update the destination for this "Request Matching" rule. Then use the "Add Route Rule" to create the first rule.
Add similar rules to route traffic from viaggi.it to travels-v2 workload and from voyages.fr to travels-v3 workload.
When the three rules are defined you can use "Create" button to generate all Istio configurations needed for this scenario. Note that the rule ordering does not matter in this scenario.
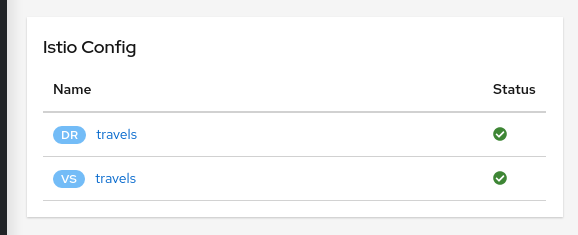
The Istio config for a given service is found on the "Istio Config" card, on the Service Details page.
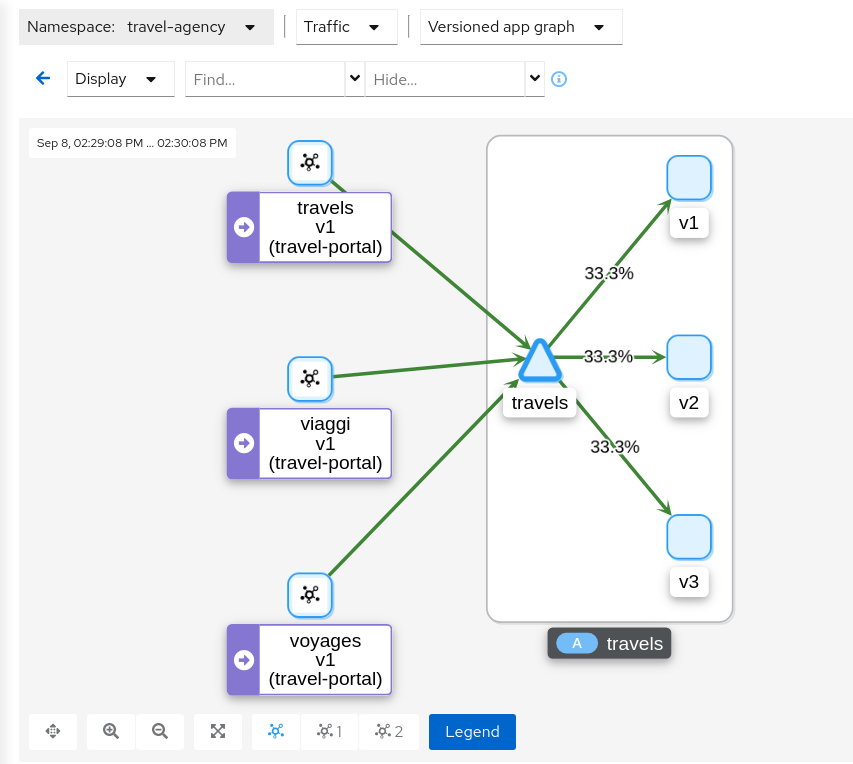
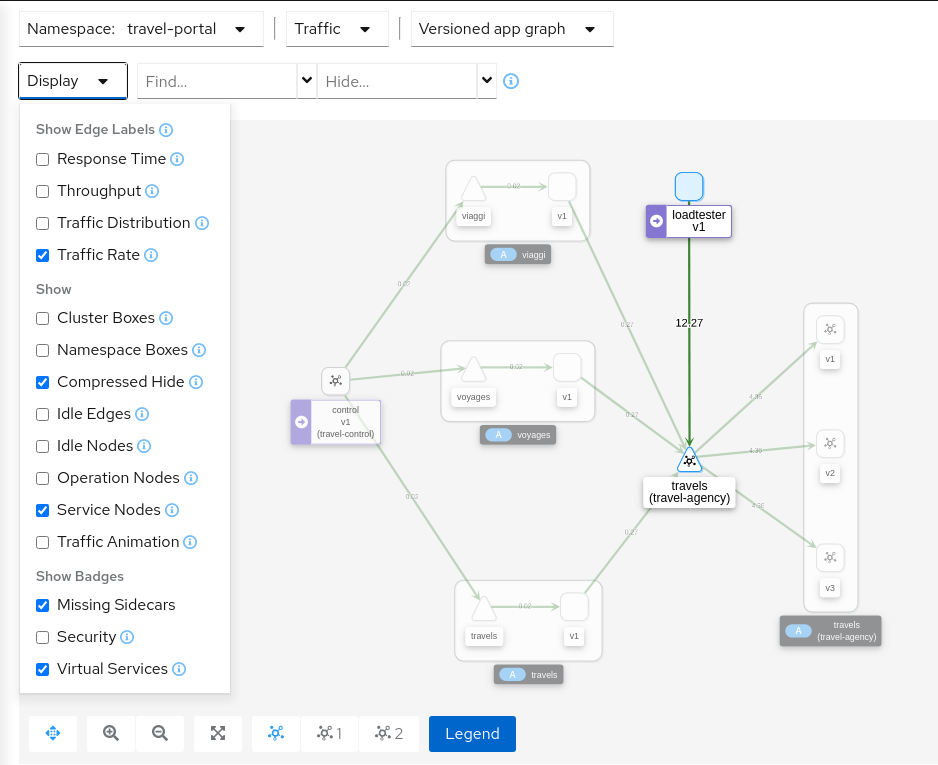
| Step 4: Verify that the Request Routing is working from the travels-portal Graph |
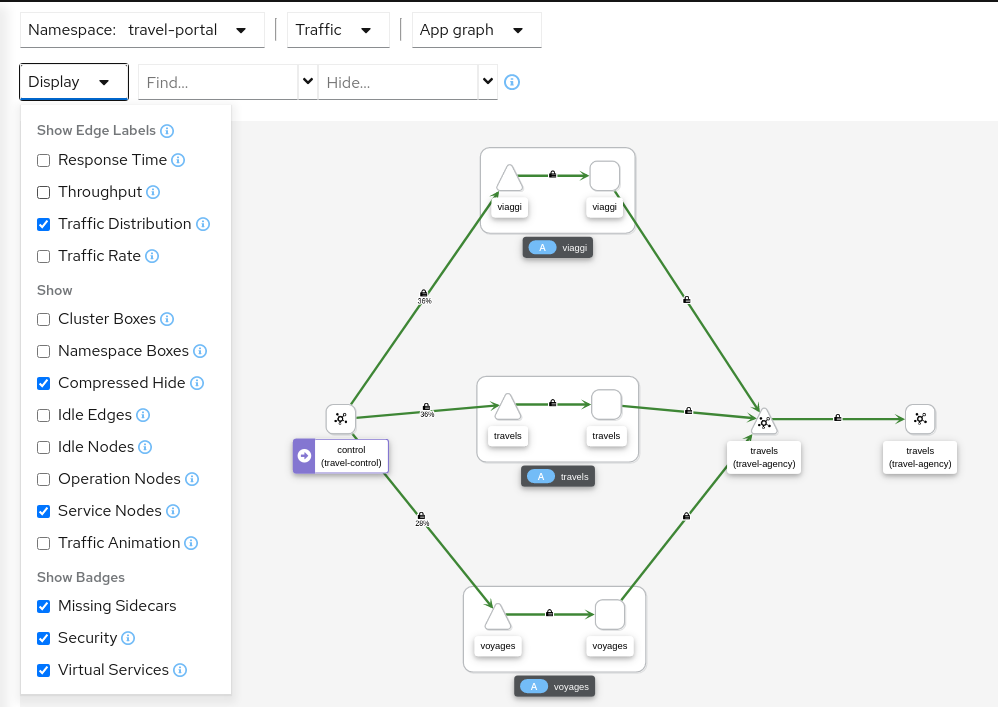
Once the Request Routing is working we can verify that outbound traffic from every portal goes to the single travels workload. To see this clearly use a "Workload Graph" for the "travel-portal" namespace, enable "Traffic Distribution" edge labels and disable the "Service Nodes" Display option:
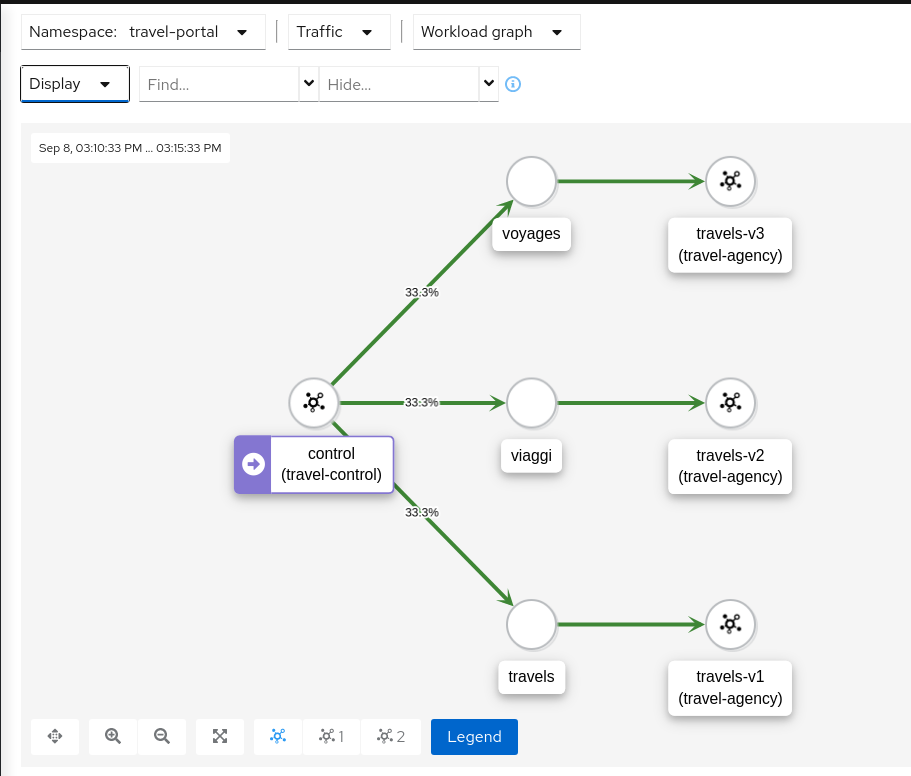
Note that no distribution label on an edge implies 100% of traffic.
Examining the "Inbound Traffic" for any of the travels workloads will show a similar pattern in the telemetry.
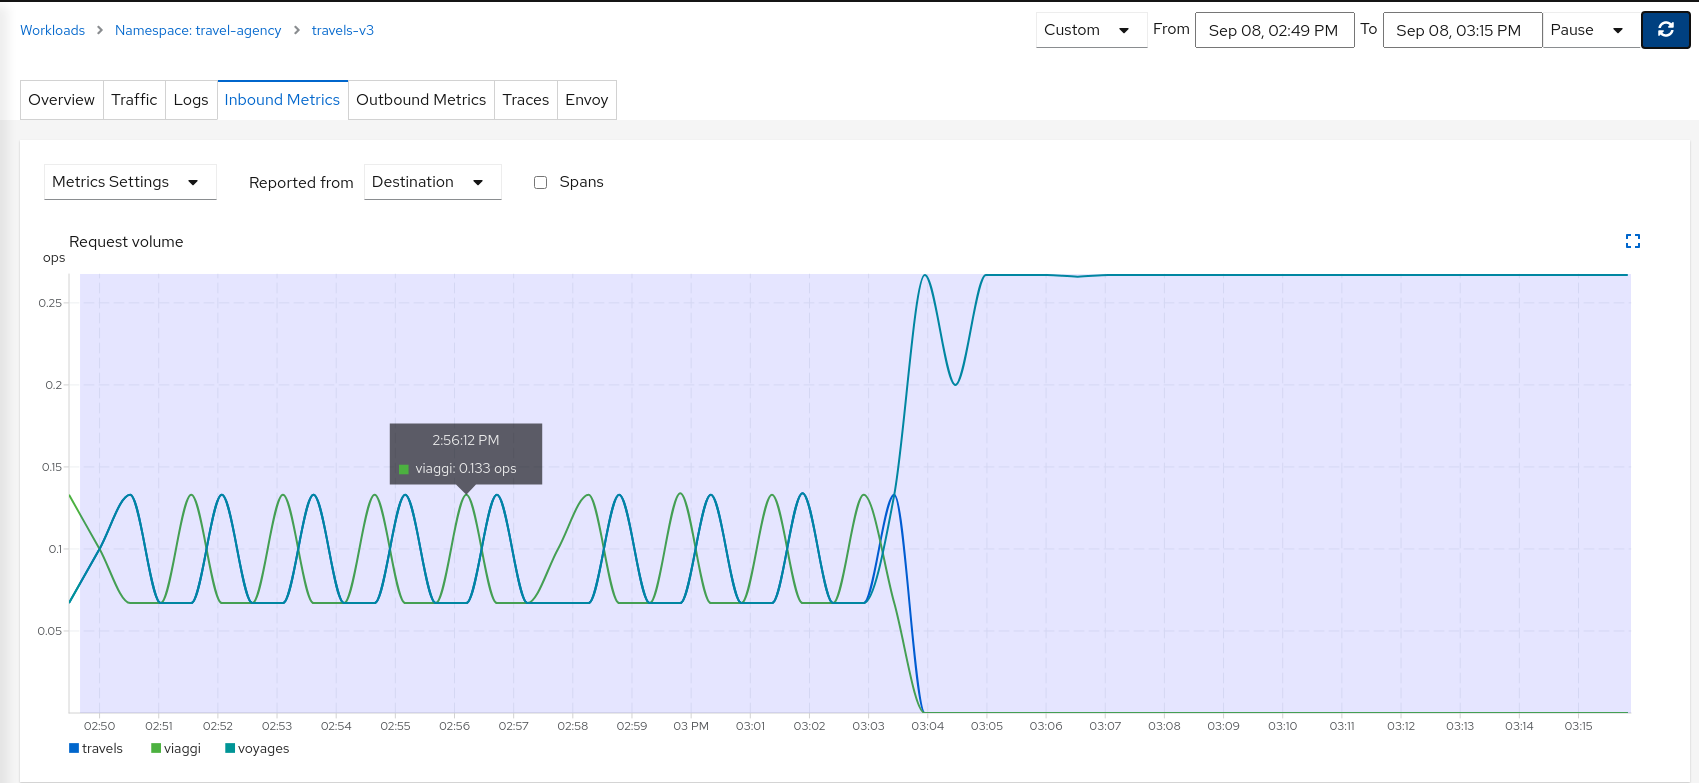
Using a custom time range to select a large interval, we can see how the workload initially received traffic from all portals but then only a single portal after the Request Routing scenarios were defined.
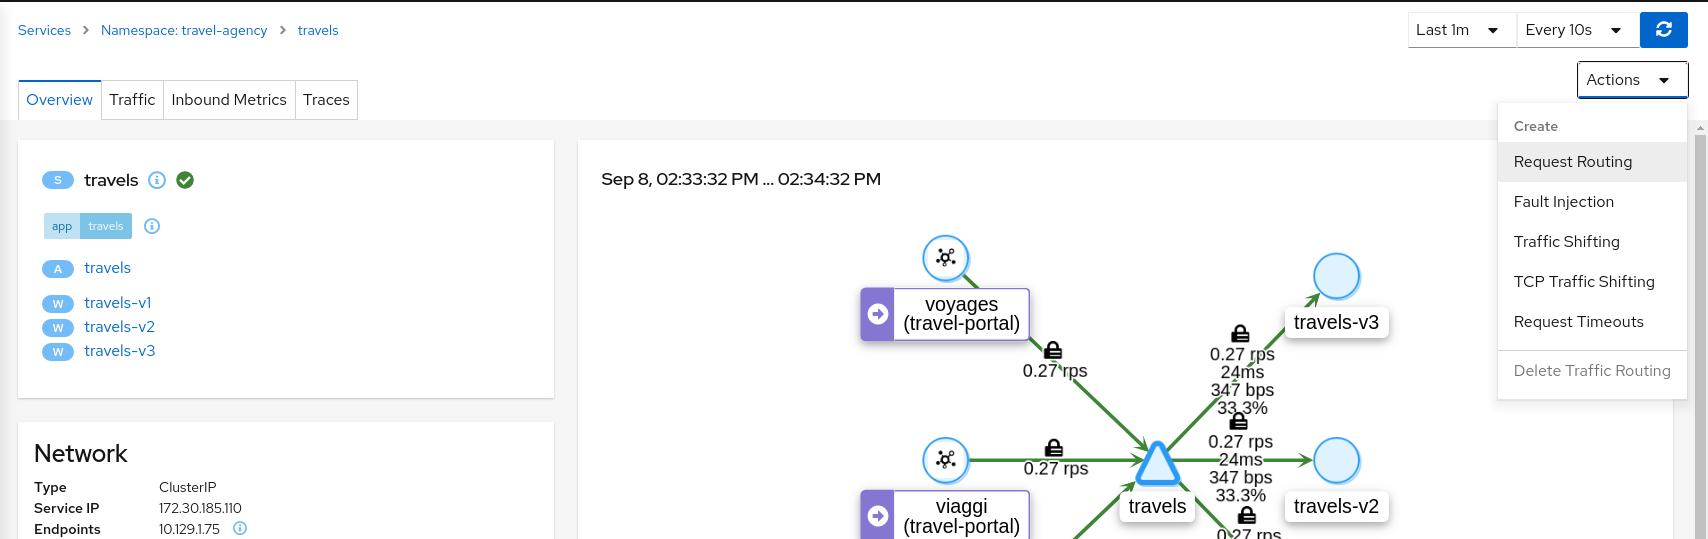
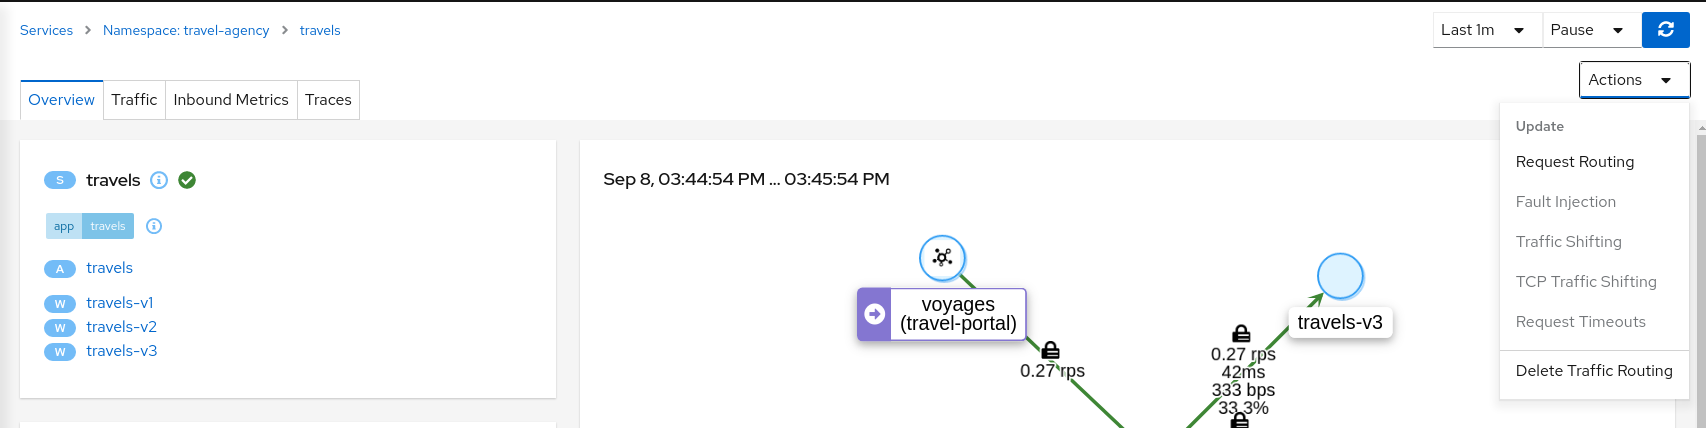
| Step 5: Update or delete Istio Configuration |
Kiali Wizards allow you to define high level Service Mesh scenarios and will generate the Istio Configuration needed for its implementation (VirtualServices, DestinationRules, Gateways and PeerRequests). These scenarios can be updated or deleted from the "Actions" menu of a given service.
To experiment further you can navigate to the travels service and update your configuration by selecting "Request Routing", as shown below. When you have finished experimenting with Routing Request scenarios then use the "Actions" menu to delete the generated Istio config.
Fault Injection
The Observe step has spotted that the hotels service has additional traffic compared with other services deployed in the travel-agency namespace.
Also, this service becomes critical in the main business logic. It is responsible for querying all available destinations, presenting them to the user, and getting a quote for the selected destination.
This also means that the hotels service may be one of the weakest points of the Travels Demo application.
This step will show how to test the resilience of the Travels Demo application by injecting faults into the hotels service and then observing how the application reacts to this scenario.
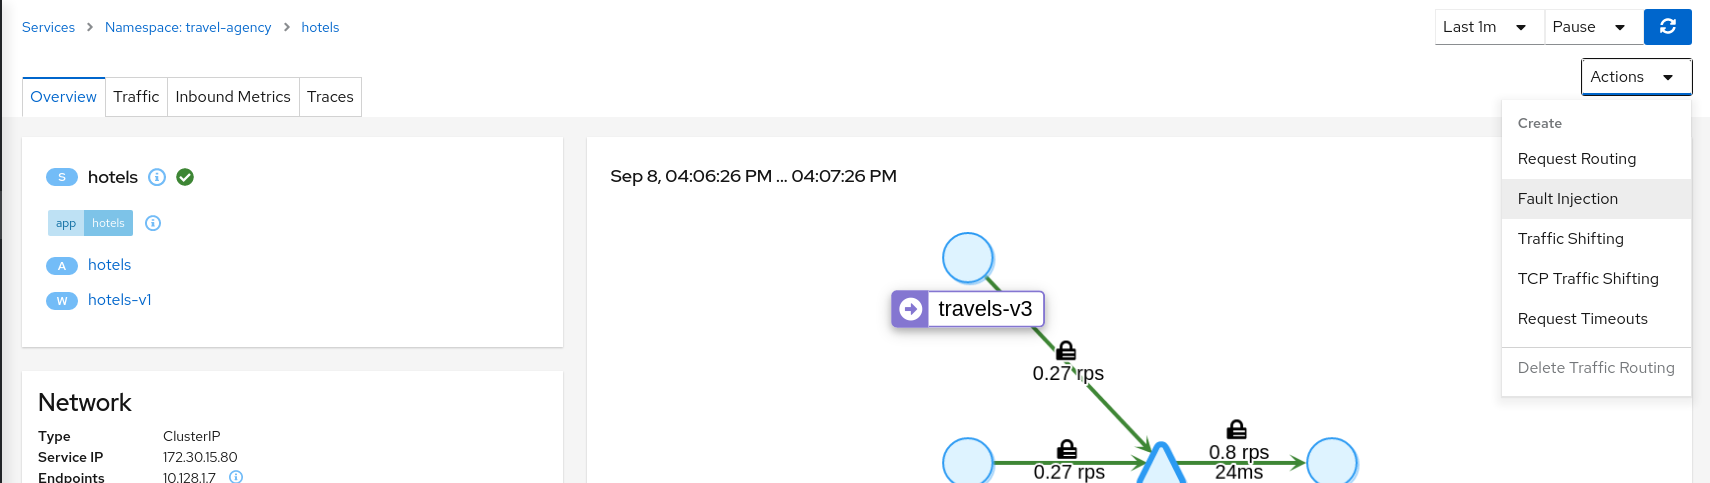
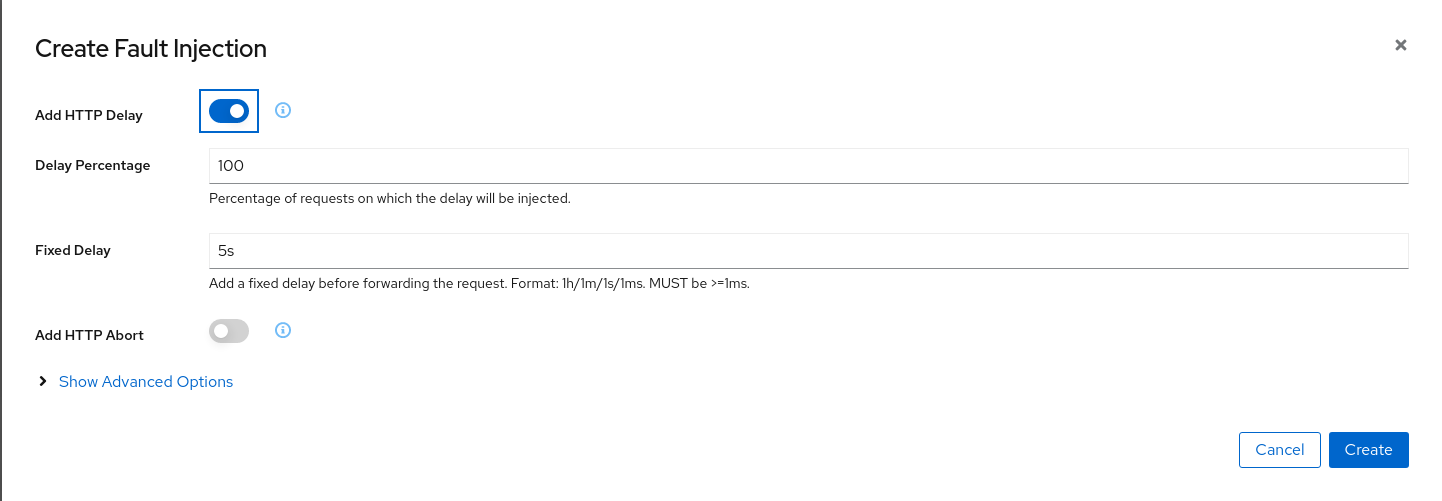
| Step 1: Use the Fault Injection Wizard on hotels service to inject a delay |
Select an HTTP Delay and specify the "Delay percentage" and "Fixed Delay" values. The default values will introduce a 5 seconds delay into 100% of received requests.
| Step 2: Understanding source and destination metrics |
Telemetry is collected from proxies and it is labeled with information about the source and destination workloads.
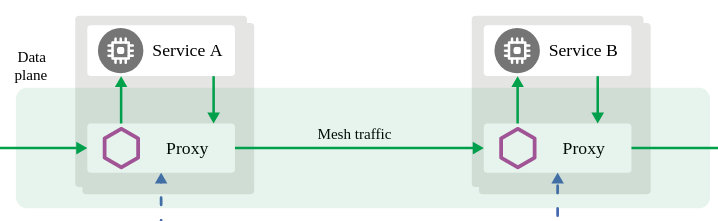
In our example, let’s say that travels service ("Service A" in the Istio diagram below) invokes the hotels service ("Service B" in the diagram). Travels is the "source" workload and hotels is the "destination" workload. The travels proxy will report telemetry from the source perspective and hotels proxy will report telemetry from the destination perspective. Let’s look at the latency reporting from both perspectives.
The travels workload proxy has the Fault Injection configuration so it will perform the call to the hotels service and will apply the delay on the travels workload side (this is reported as source telemetry).
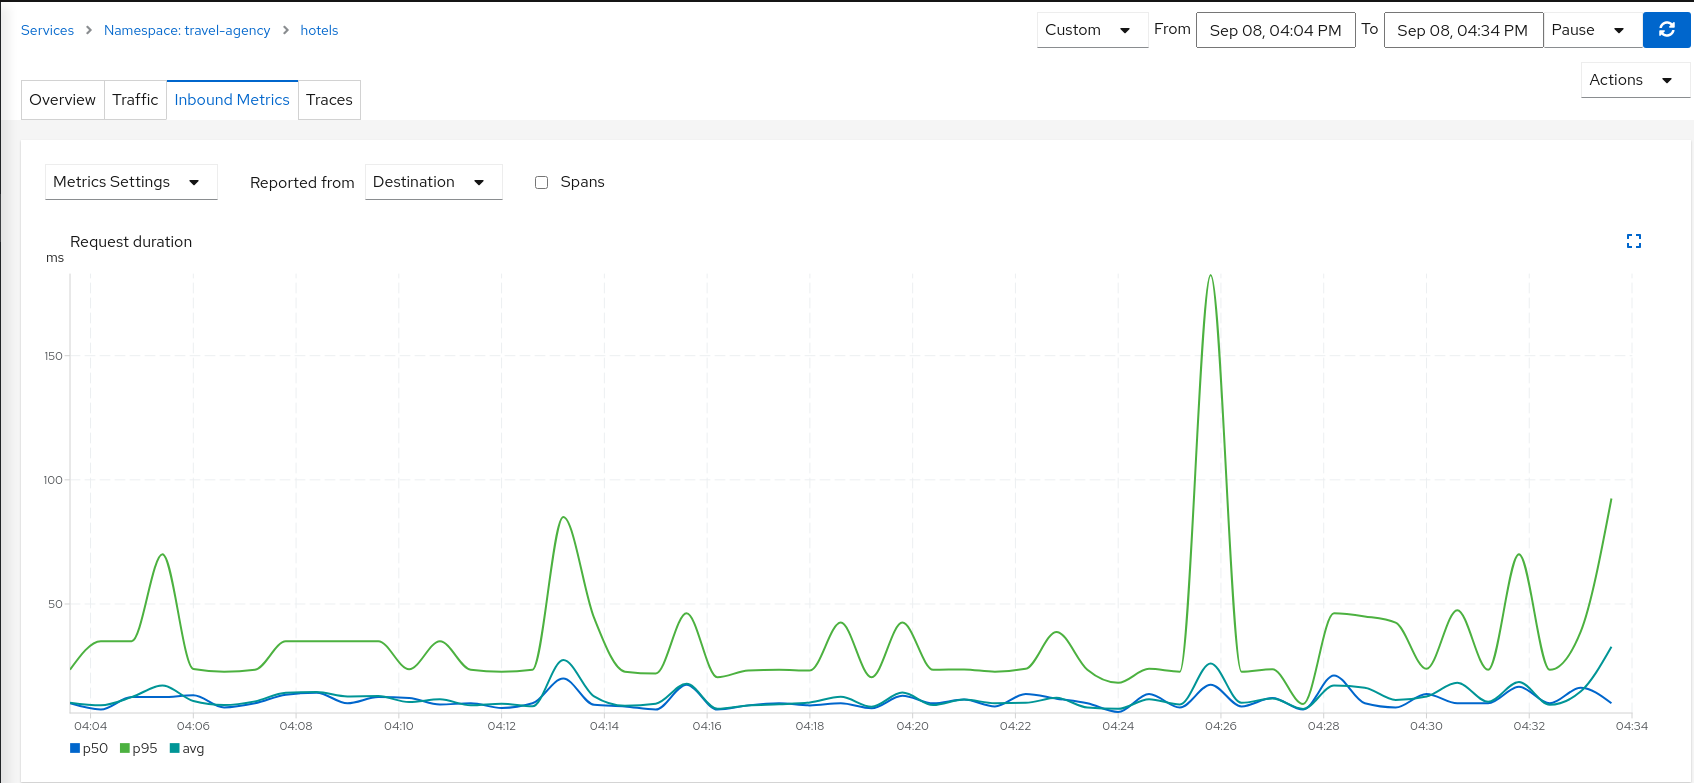
We can see in the hotels telemetry reported by the source (the travels proxy) that there is a visible gap showing 5 second delay in the request duration.

But as the Fault Injection delay is applied on the source proxy (travels), the destination proxy (hotels) is unaffected and its destination telemetry show no delay.
| Step 3: Study the impact of the travels service delay |
The injected delay is propagated from the travels service to the downstream services deployed on travel-portal namespace, degrading the overall response time. But the downstream services are unaware, operate normally, and show a green status.
| Step 4: Update or delete Istio Configuration |
As part of this step you can update the Fault Injection scenario to test different delays. When finished, you can delete the generated Istio config for the hotels service.
Traffic Shifting
In the previous Request Routing step we have deployed two new versions of the travels service using the travels-v2 and travels-v3 workloads.
That scenario showed how Istio can route specific requests to specific workloads. It was configured such that each portal deployed in the travel-portal namespace (travels.uk, viaggi.it and voyages.fr) were routed to a specific travels workload (travels-v1, travels-v2 and travels-v3).
This Traffic Shifting step will simulate a new scenario: the new travels-v2 and travels-v3 workloads will represent new improvements for the travels service that will be used by all requests.
These new improvements implemented in travels-v2 and travels-v3 represent two alternative ways to address a specific problem. Our goal is to test them before deciding which one to use as a next version.
At the beginning we will send 80% of the traffic into the original travels-v1 workload, and will split 10% of the traffic each on travels-v2 and travels-v3.
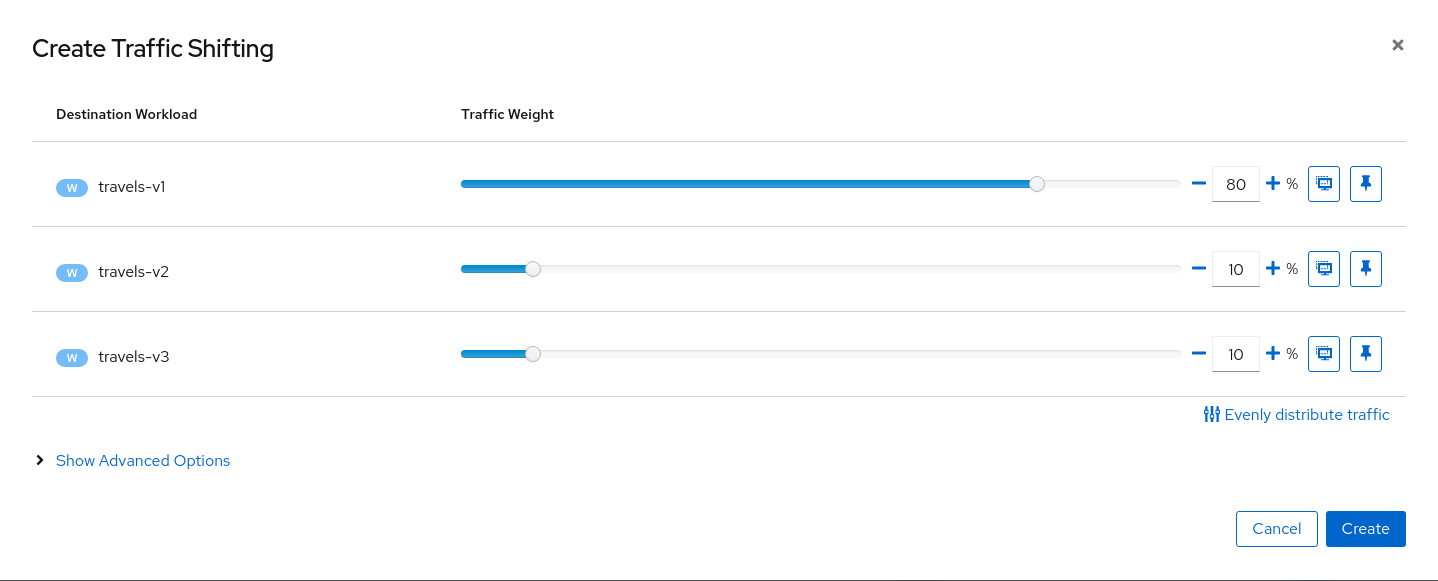
| Step 1: Use the Traffic Shifting Wizard on travels service |
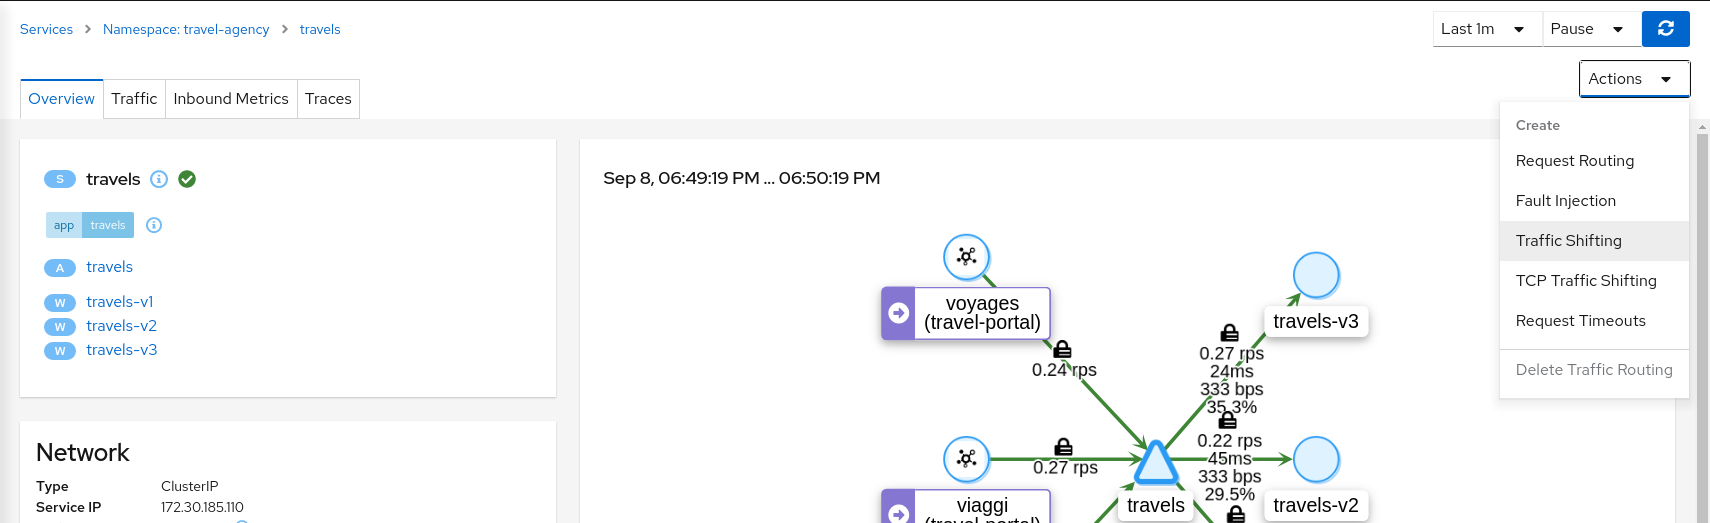
Create a scenario with 80% of the traffic distributed to travels-v1 workload and 10% of the traffic distributed each to travels-v2 and travels-v3.
| Step 2: Examine Traffic Shifting distribution from the travels-agency Graph |
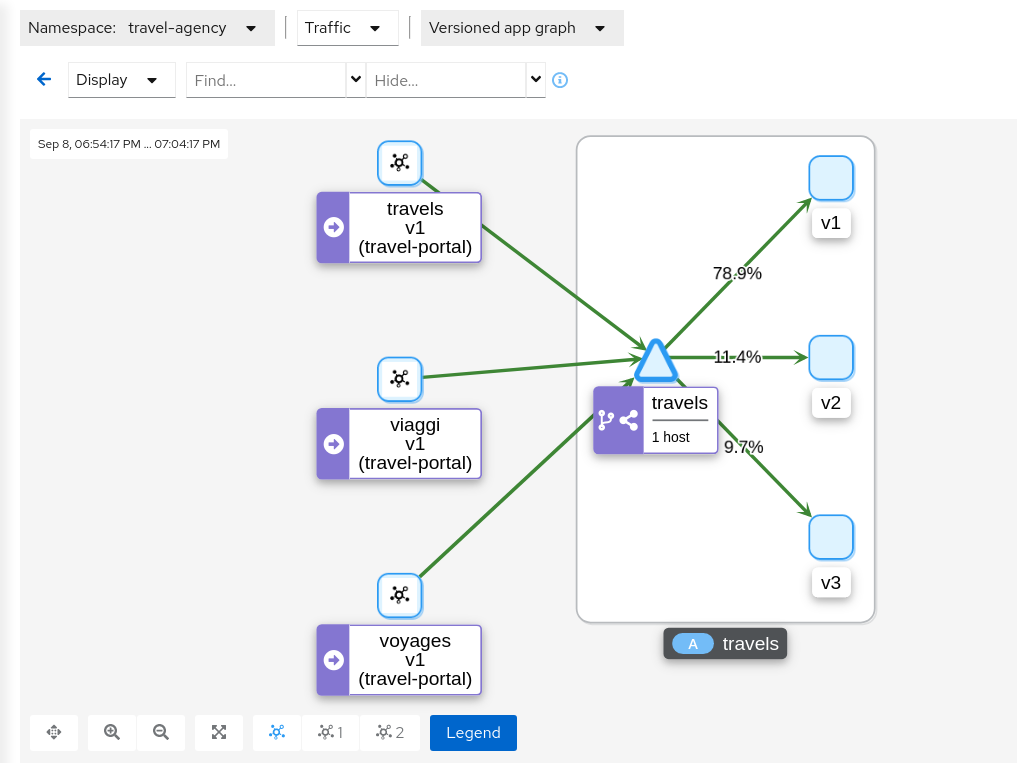
| Step 3: Compare travels workload and assess new changes proposed in travels-v2 and travels-v3 |
Istio Telemetry is grouped per logical application. That has the advantage of easily comparing different but related workloads, for one or more services.
In our example, we can use the "Inbound Metrics" and "Outbound Metrics" tabs in the travels application details, group by "Local version" and compare how travels-v2 and travels-v3 are working.
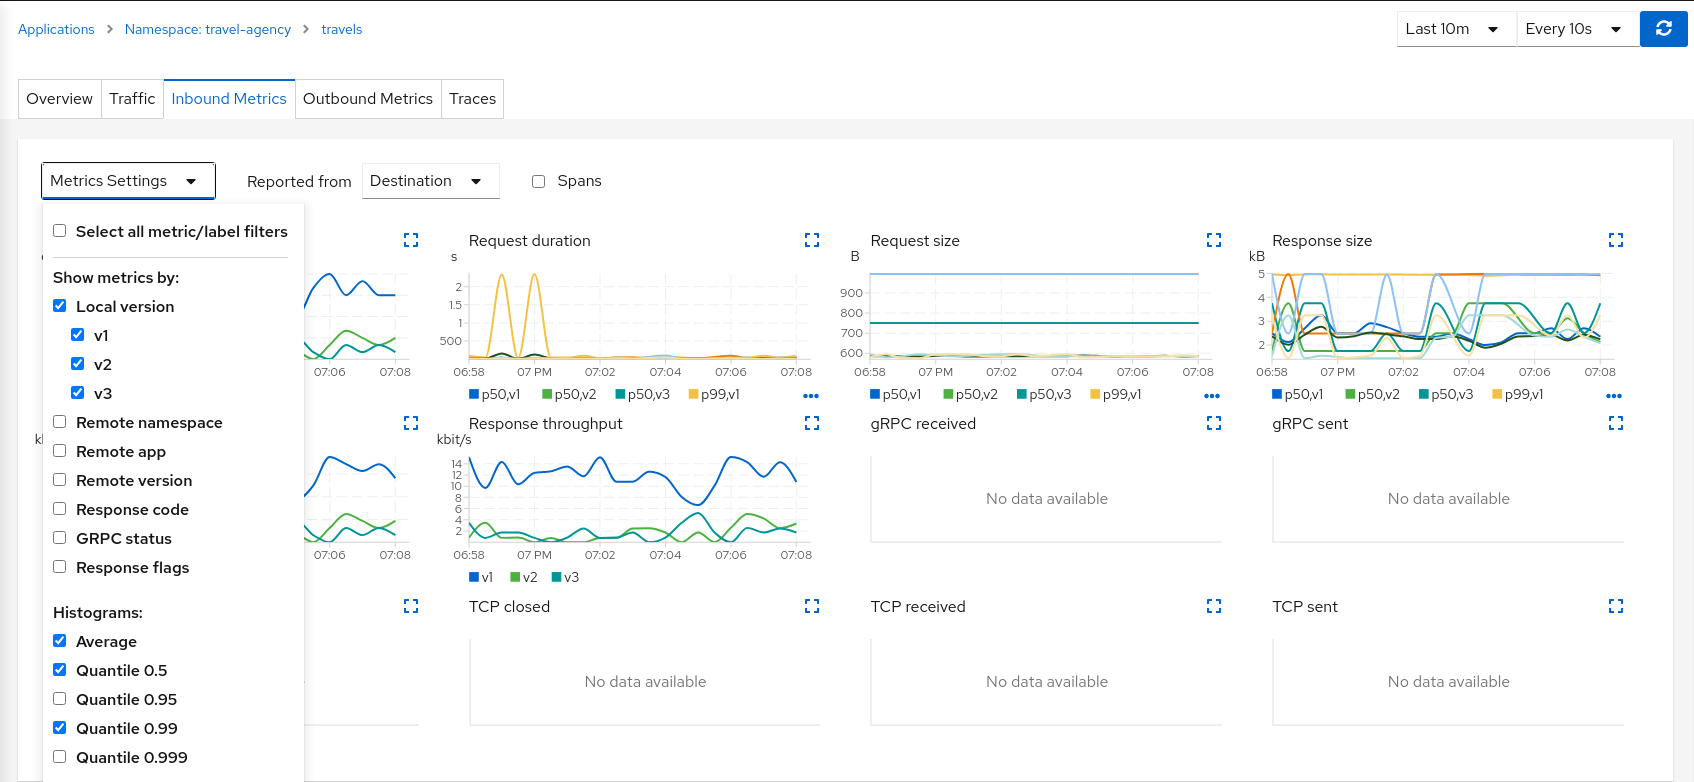
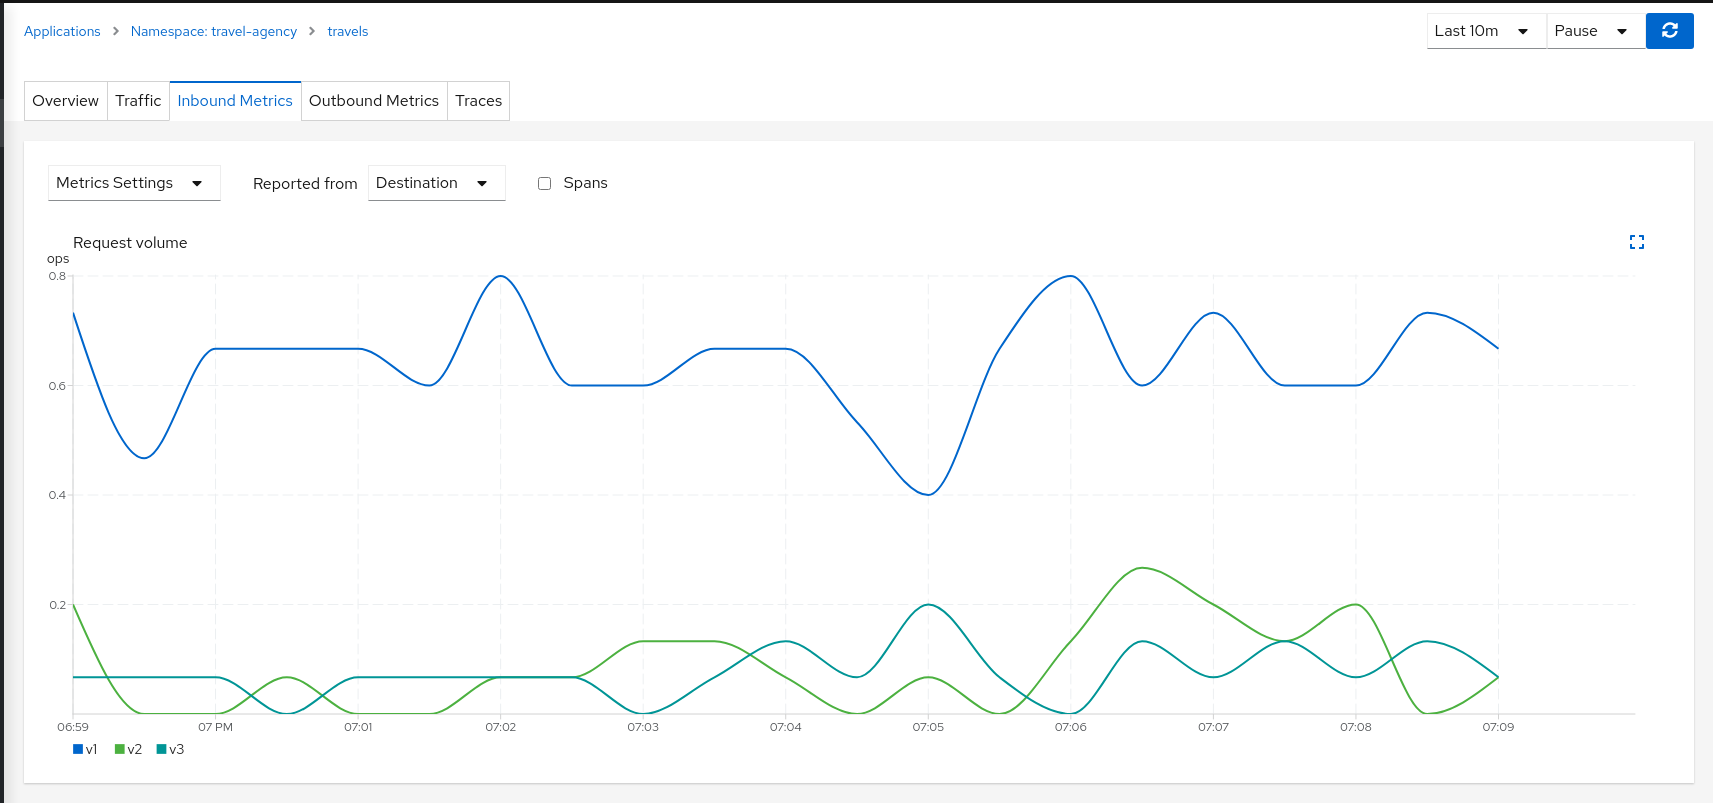
The charts show that the Traffic distribution is working accordingly and 80% is being distributed to travels-v1 workload and they also show no big differences between travels-v2 and travels-v3 in terms of request duration.
| Step 4: Update or delete Istio Configuration |
As part of this step you can update the Traffic Shifting scenario to test different distributions. When finished, you can delete the generated Istio config for the travels service.
TCP Traffic Shifting
The Travel Demo application has a database service used by several services deployed in the travel-agency namespace.
At some point in the lifecycle of the application the telemetry shows that the database service degrades and starts to increase the average response time.
This is a common situation. In this case, a database specialist suggests an update of the original indexes due to the data growth.
Our database specialist is suggesting two approaches and proposes to prepare two versions of the database service to test which may work better.
This step will show how the "Traffic Shifting" strategy can be applied to TCP services to test which new database indexing strategy works better.
| Step 1: Deploy mysqldb-v2 and mysqldb-v3 workloads |
To deploy the new versions of the mysqldb service execute the commands:
kubectl apply -f <(curl -L https://raw.githubusercontent.com/kiali/demos/master/travels/mysql-v2.yaml) -n travel-agency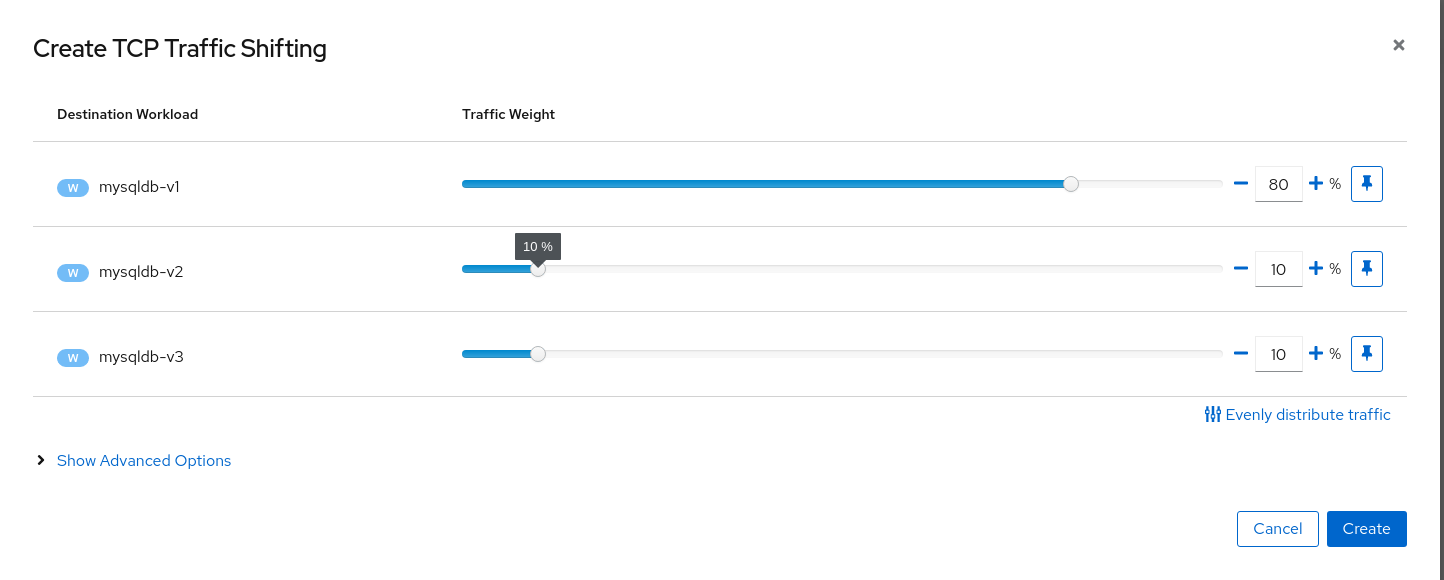
kubectl apply -f <(curl -L https://raw.githubusercontent.com/kiali/demos/master/travels/mysql-v3.yaml) -n travel-agency| Step 2: Use the TCP Traffic Shifting Wizard on mysqldb service |
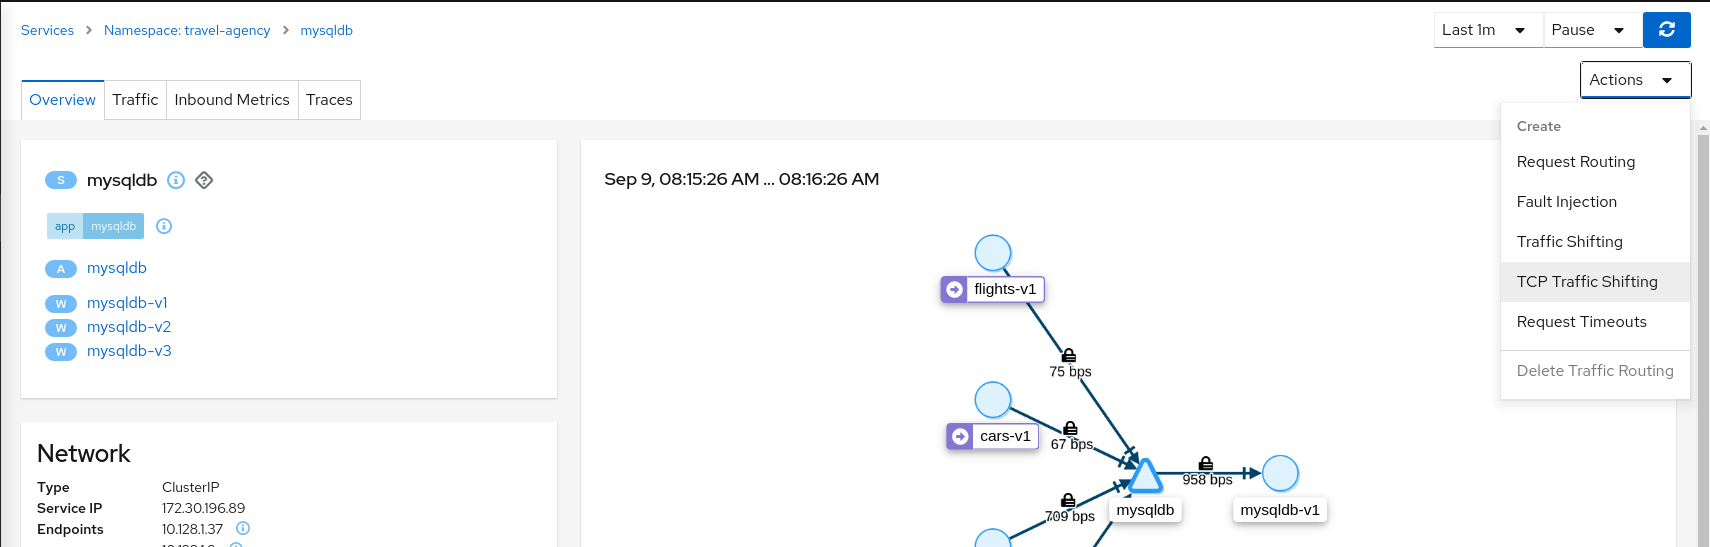
Create a scenario with 80% of the traffic distributed to mysqldb-v1 workload and 10% of the traffic distributed each to mysqldb-v2 and mysqldb-v3.
| Step 3: Examine Traffic Shifting distribution from the travels-agency Graph |
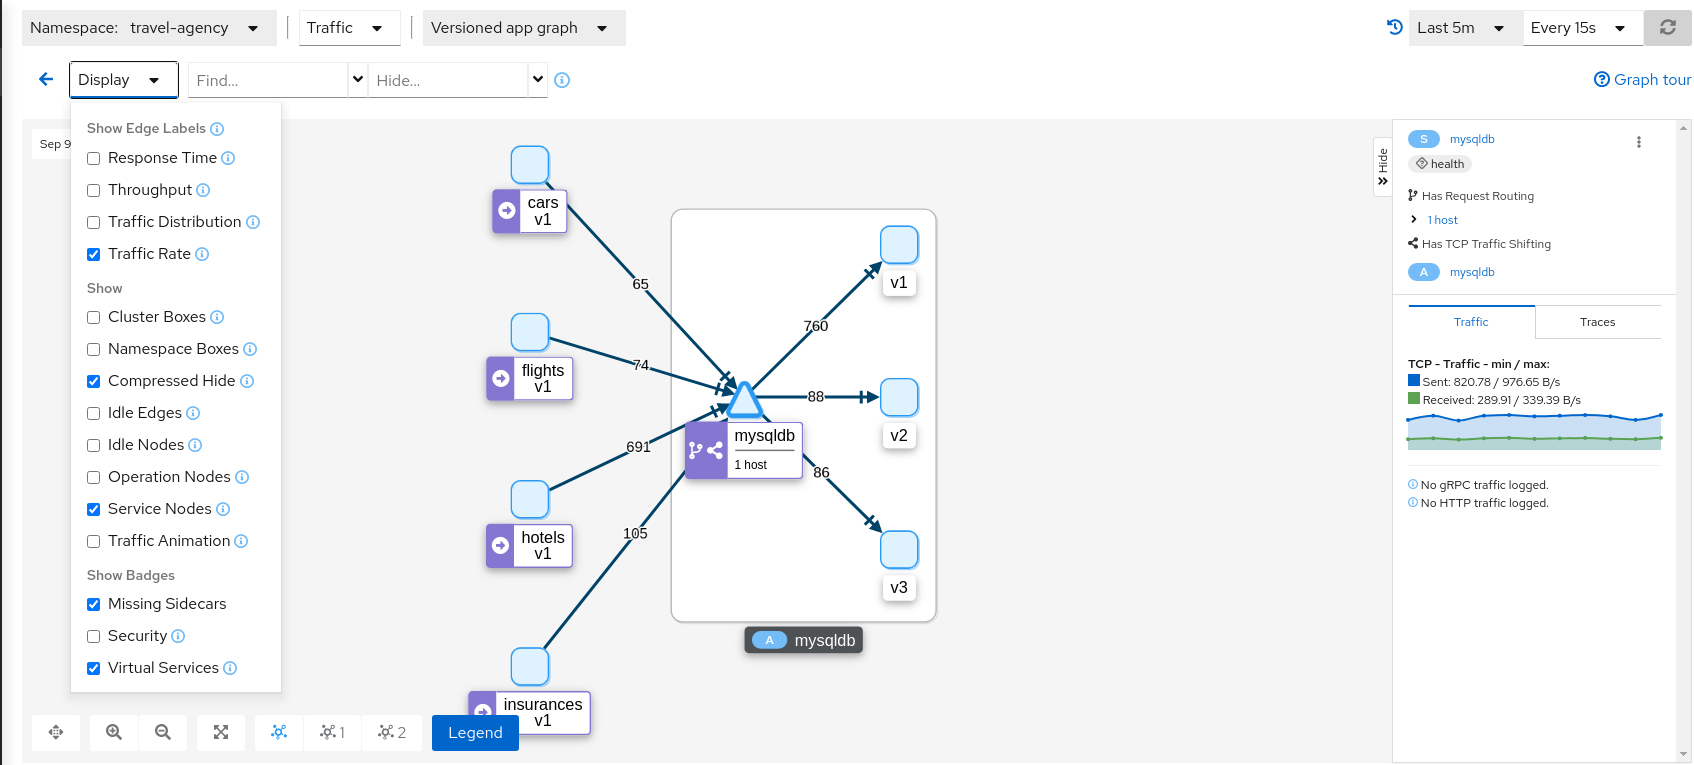
Note that TCP telemetry has different types of metrics, as "Traffic Distribution" is only available for HTTP/gRPC services, for this service we need to use "Traffic Rate" to evaluate the distribution of data (bytes-per-second) between mysqldb workloads.
| Step 4: Compare mysqldb workload and study new indexes proposed in mysqldb-v2 and mysqldb-v3 |
TCP services have different telemetry but it’s still grouped by versions, allowing the user to compare and study pattern differences for mysqldb-v2 and mysqldb-v3.

The charts show more peaks in mysqldb-v2 compared to mysqldb-v3 but overall a similar behavior, so it’s probably safe to choose either strategy to shift all traffic.
| Step 5: Update or delete Istio Configuration |
As part of this step you can update the TCP Traffic Shifting scenario to test a different distribution. When finished, you can delete the generated Istio config for the mysqldb service.
Request Timeouts
In the Fault Injection step we showed how we could introduce a delay in the critical hotels service and test the resilience of the application.
The delay was propagated across services and Kiali showed how services accepted the delay without creating errors on the system.
But in real scenarios delays may have important consequences. Services may prefer to fail sooner, and recover, rather than propagating a delay across services.
This step will show how to add a request timeout for one of the portals deployed in travel-portal namespace. The travel.uk and viaggi.it portals will accept delays but voyages.fr will timeout and fail.
| Step 1: Use the Fault Injection Wizard on hotels service to inject a delay |
Repeat the Fault Injection step to add delay on hotels service.
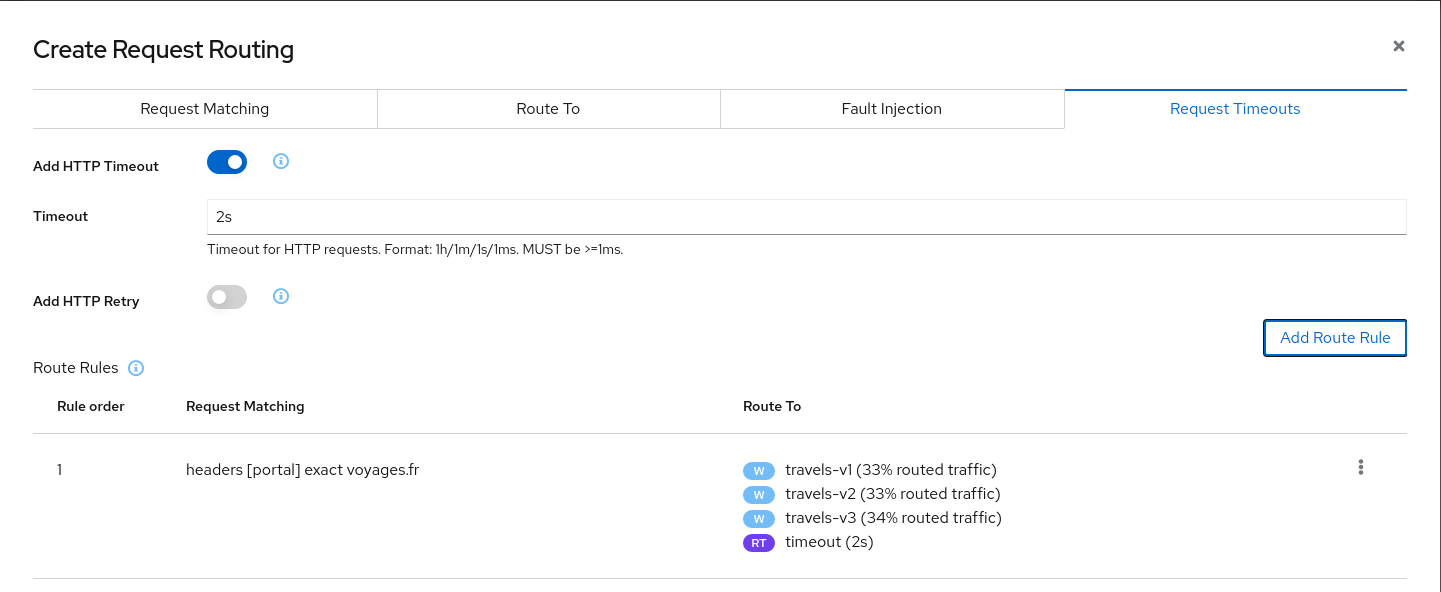
| Step 2: Use the Request Routing Wizard on travels service to add a route rule with delay for voyages.fr |
Add a rule to add a request timeout only on requests coming from voyages.fr portal:
-
Use the Request Matching tab to add a matching condition for the portal header with voyages.fr value.
-
Use the Request Timeouts tab to add an HTTP Timeout for this rule.
-
Add the rule to the scenario.

A first rule should be added to the list like:
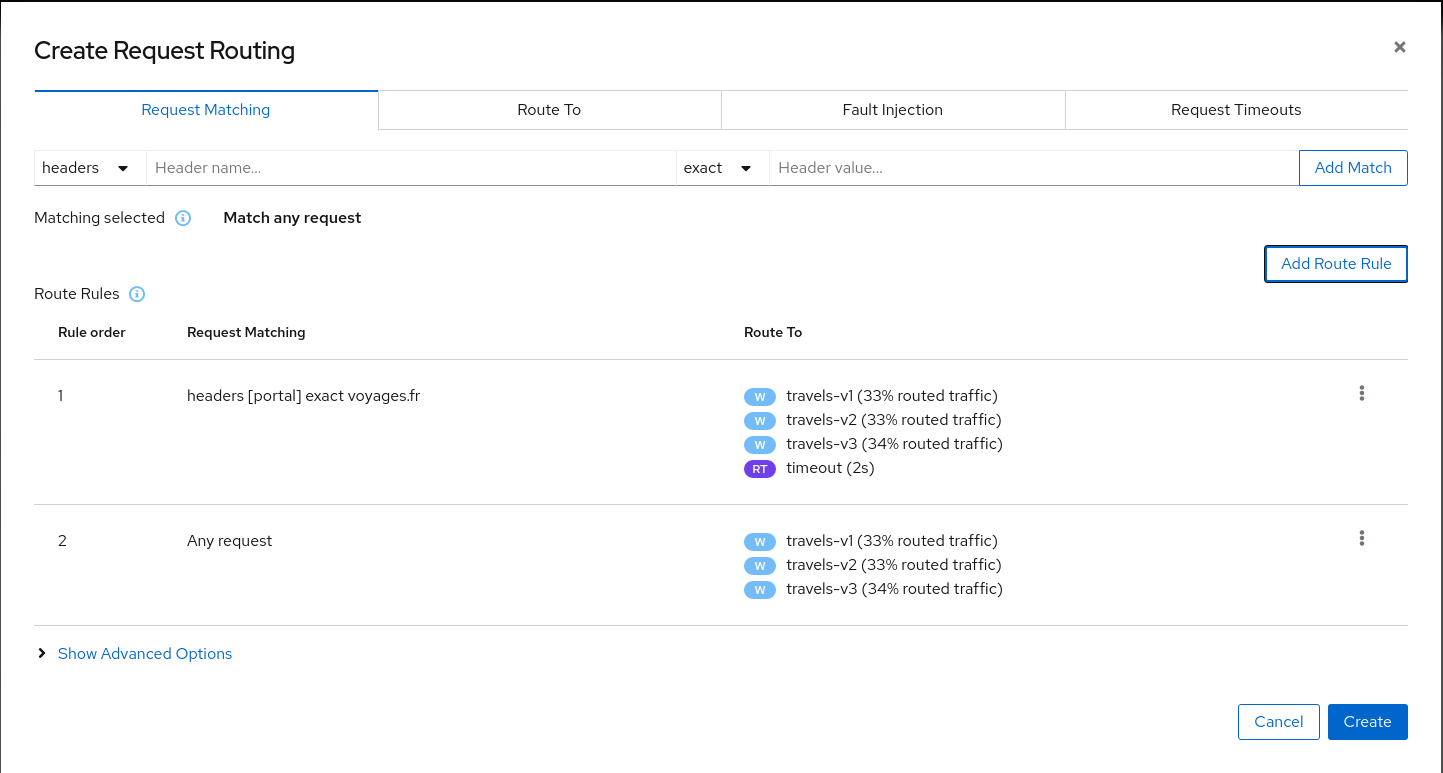
Add a second rule to match any request and create the scenario. With this configuration, requests coming from voyages.fr will match the first rule and all others will match the second rule.
| Step 3: Review the impact of the request timeout in the travels service |
Create the rule. The Graph will show how requests coming from voyages.fr start to fail, due to the request timeout introduced.
Requests coming from other portals work without failures but are degraded by the hotels delay.
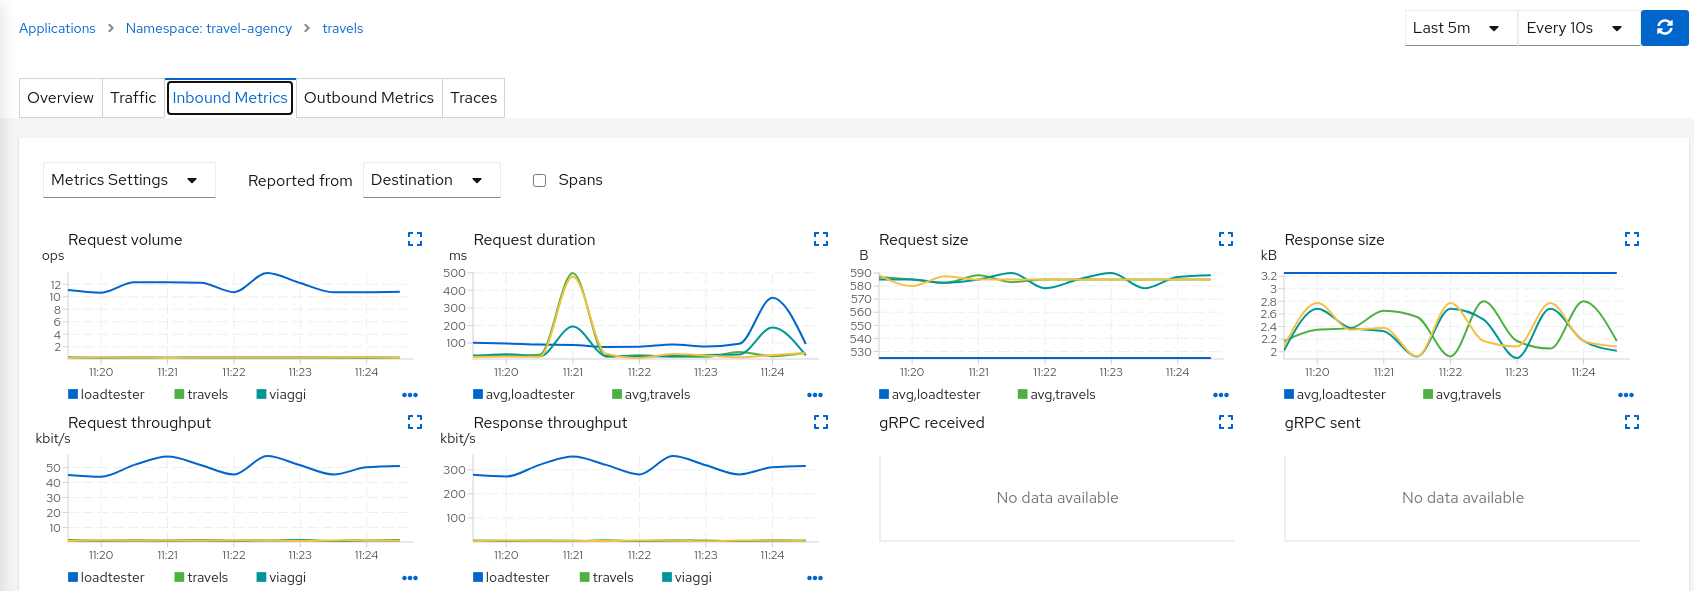
This scenario can be visualized in detail if we examine the "Inbound Metrics" and we group by "Remote app" and "Response code".
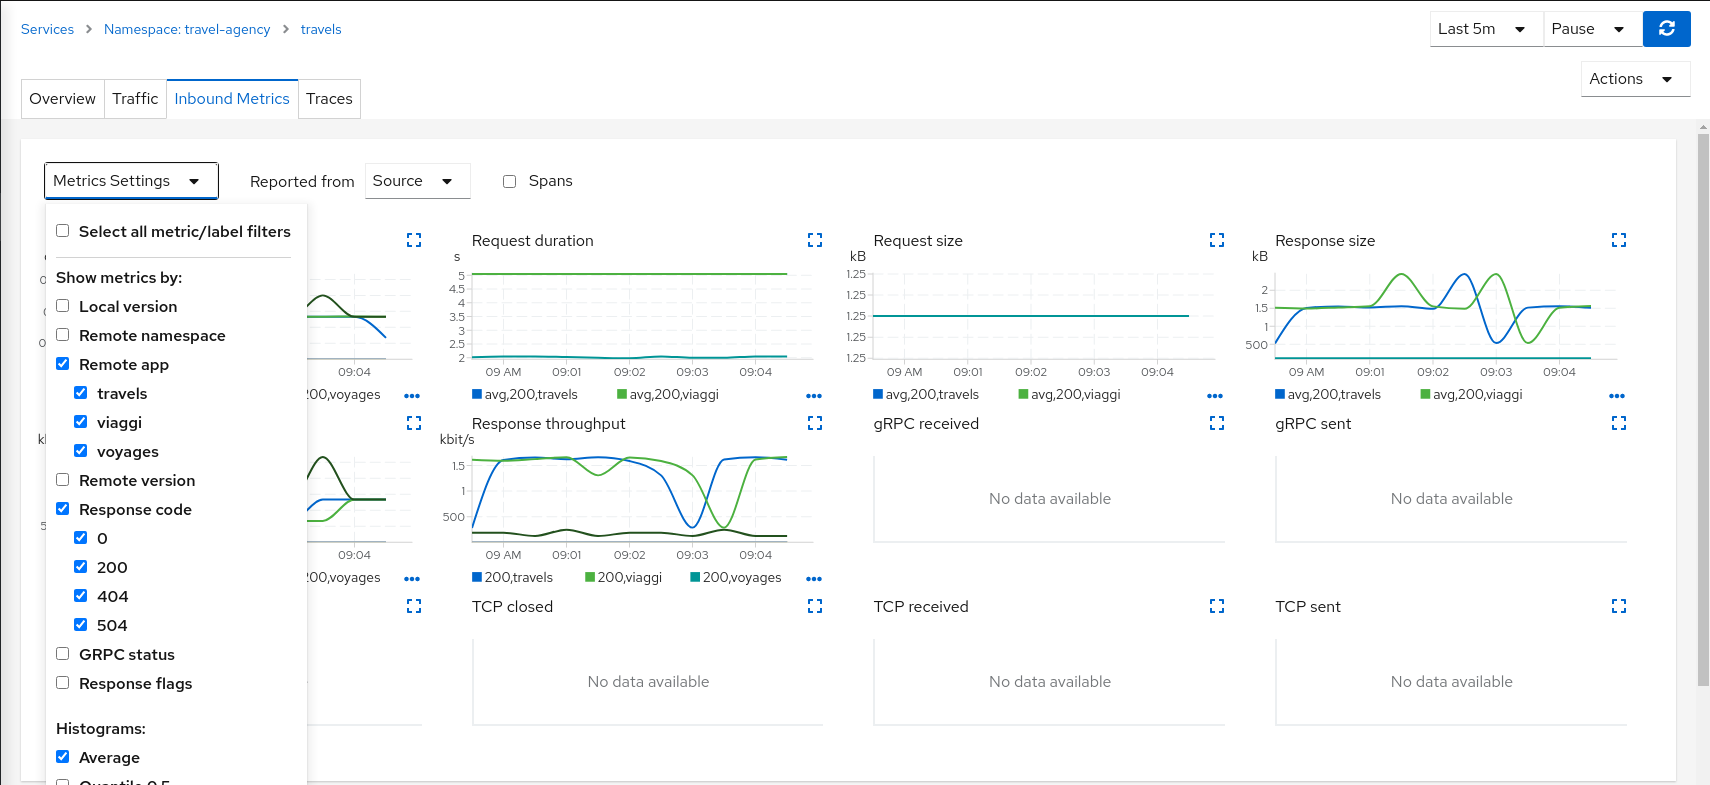
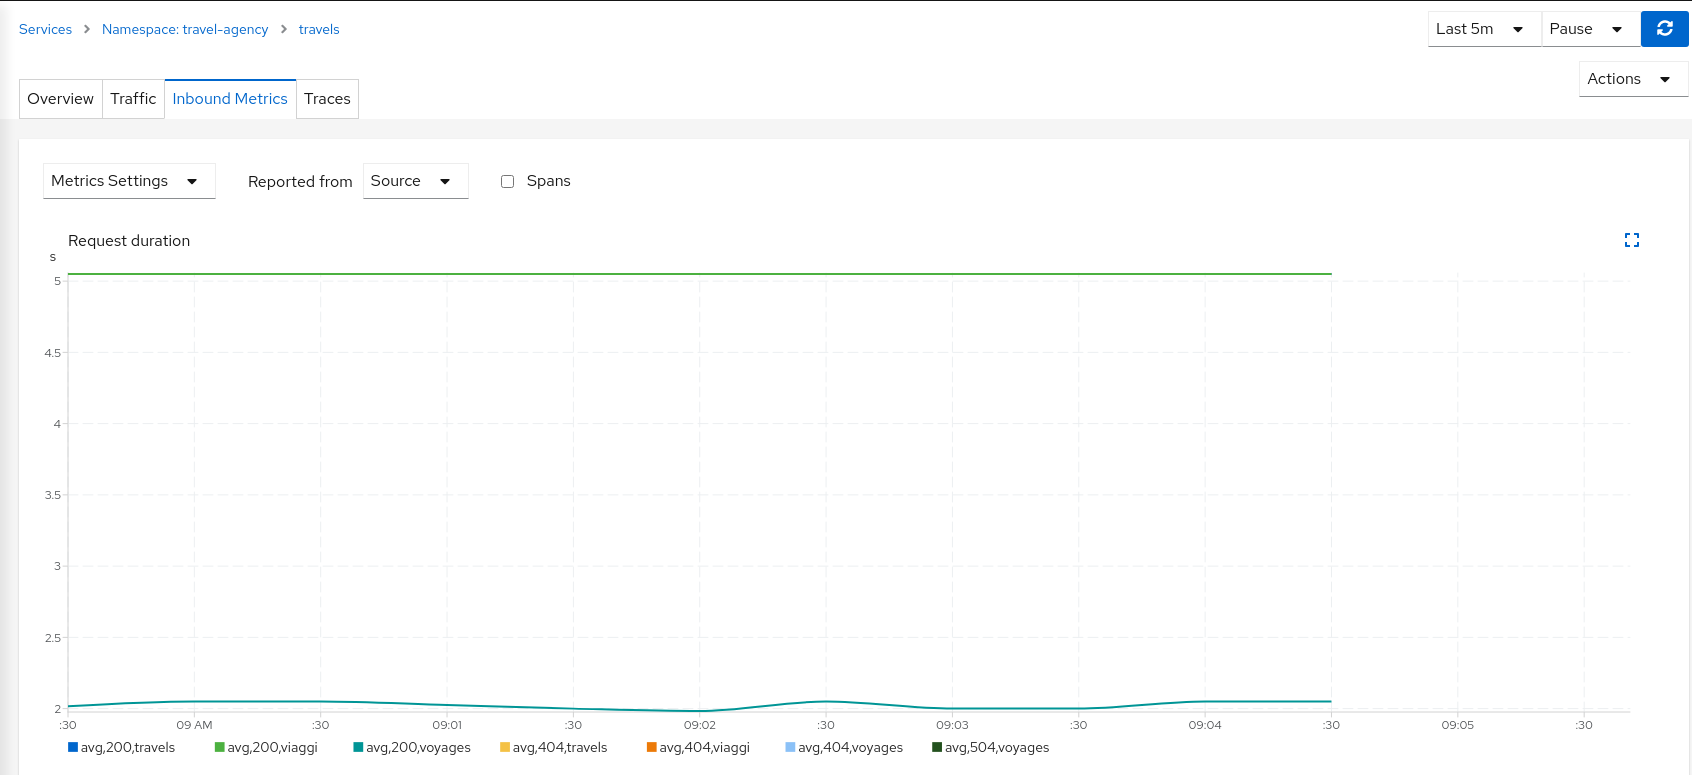
As expected, the requests coming from voyages.fr don’t propagate the delay and they fail in the 2 seconds range, meanwhile requests from other portals don’t fail but they propagate the delay introduced in the hotels service.
| Step 4: Update or delete Istio Configuration |
As part of this step you can update the scenarios defined around hotels and travels services to experiment with more conditions, or you can delete the generated Istio config in both services.
Circuit Breaking
Distributed systems will benefit from failing quickly and applying back pressure, as opposed to propagating delays and errors through the system.
Circuit breaking is an important technique used to limit the impact of failures, latency spikes, and other types of network problems.
This step will show how to apply a Circuit Breaker into the travels service in order to limit the number of concurrent requests and connections.
| Step 1: Deploy a new loadtester portal in the travel-portal namespace |
In this example we are going to deploy a new workload that will simulate an important increase in the load of the system.
OpenShift users may need to also add the associated loadtester serviceaccount to the necessary securitycontextcontraints.
kubectl apply -f <(curl -L https://raw.githubusercontent.com/kiali/demos/master/travels/travel_loadtester.yaml) -n travel-portalThe loadtester workload will try to create 50 concurrent connections to the travels service, adding considerable pressure to the travels-agency namespace.
The Travels Demo application is capable of handling this load and in a first look it doesn’t show unhealthy status.
But in a real scenario an unexpected increase in the load of a service like this may have a significant impact in the overall system status.
| Step 2: Use the Traffic Shifting Wizard on travels service to generate a traffic rule |
Use the "Traffic Shifting" Wizard to distribute traffic (evenly) to the travels workloads and use the "Advanced Options" to add a "Circuit Breaker" to the scenario.
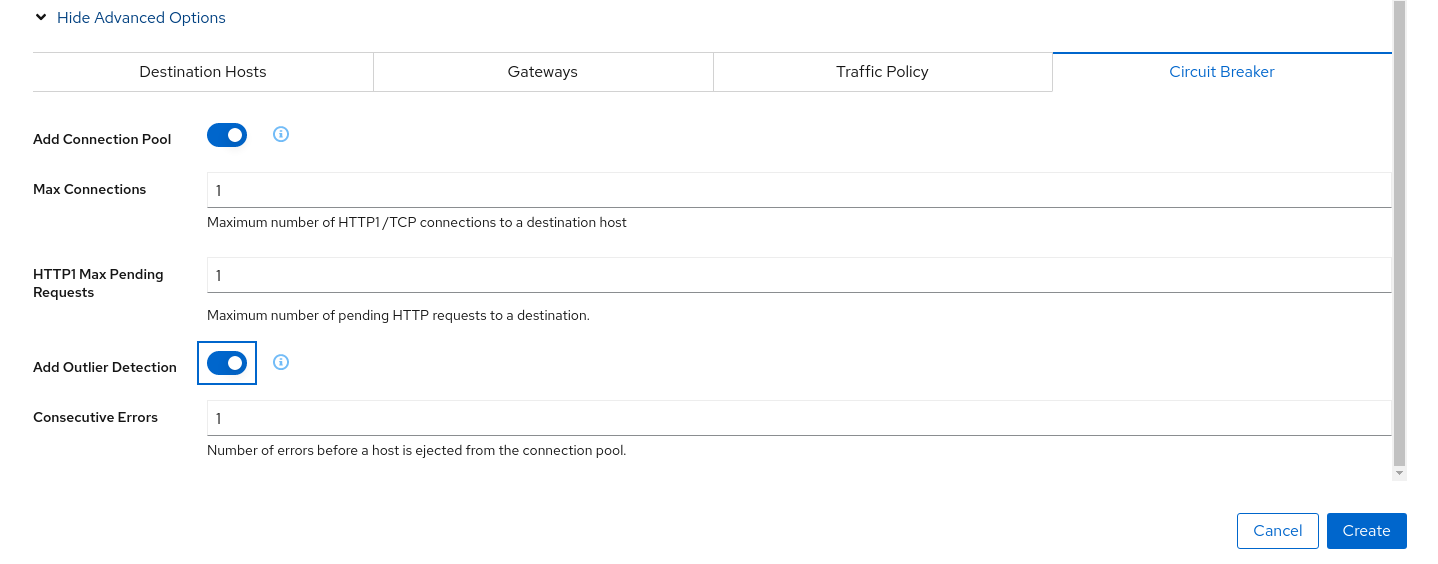
The "Connection Pool" settings will indicate that the proxy sidecar will reject requests when the number of concurrent connections and requests exceeds more than one.
The "Outlier Detection" will eject a host from the connection pool if there is more than one consecutive error.
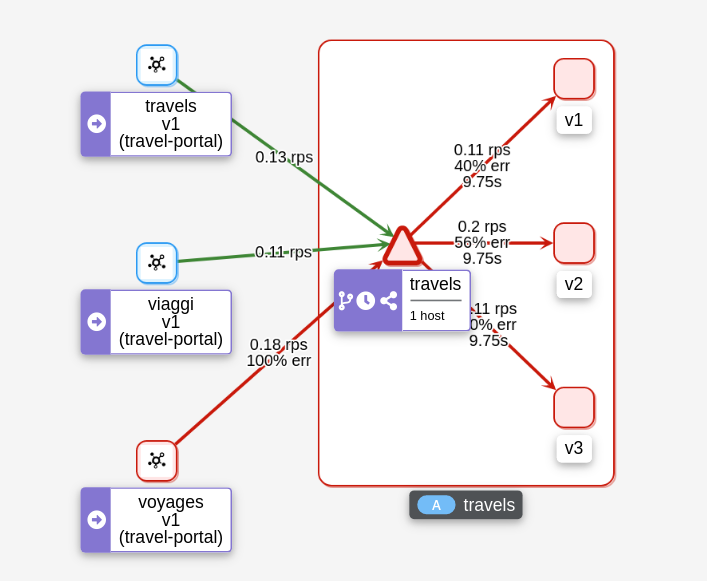
| Step 3: Study the behavior of the Circuit Breaker in the travels service |
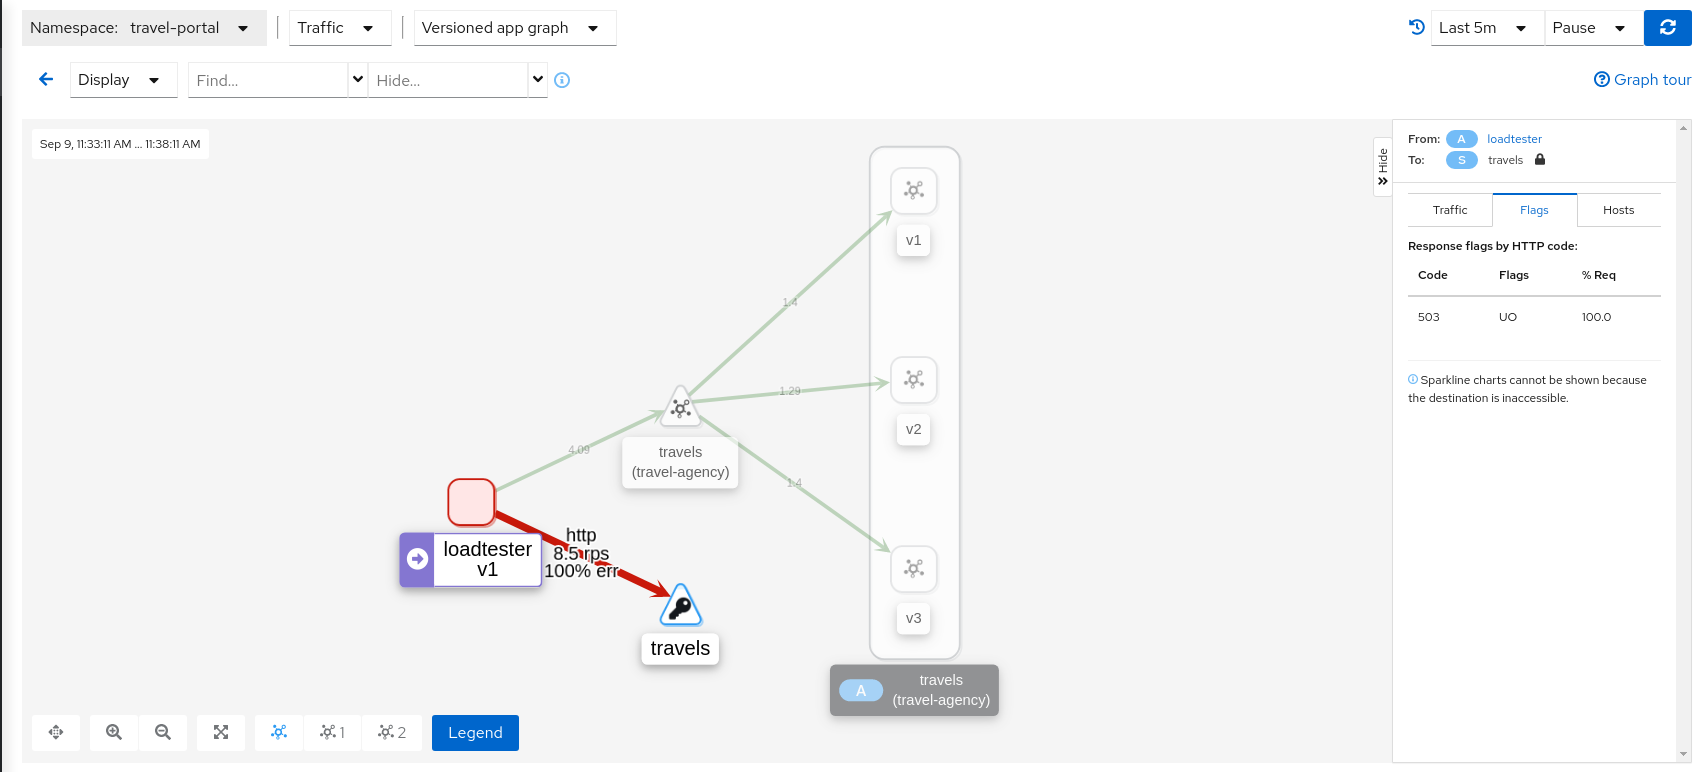
In the loadtester versioned-app Graph we can see that the travels service’s Circuit Breaker accepts some, but fails most, connections.
Remember, that these connections are stopped by the proxy on the loadtester side. That "fail sooner" pattern prevents overloading the network.
Using the Graph we can select the failed edge, check the Flags tab, and see that those requests are closed by the Circuit breaker.
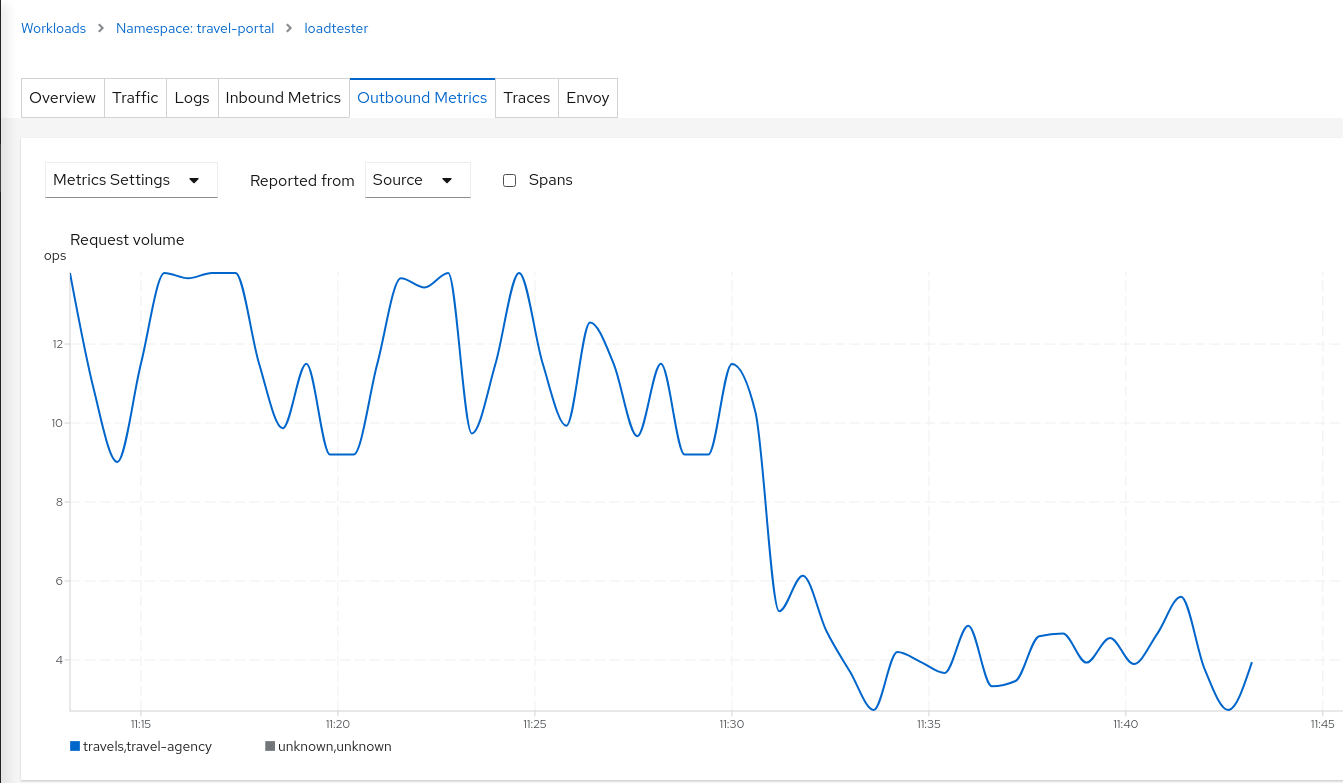
If we examine the "Request volume" metric from the "Outbound Metrics" tab we can see the evolution of the requests, and how the introduction of the Circuit Breaker made the proxy reduce the request volume.
| Step 4: Update or delete Istio Configuration |
As part of this step you can update the scenarios defined around the travels service to experiment with more Circuit Breaker settings, or you can delete the generated Istio config in the service.
Understanding what happened:
Mirroring
This tutorial has shown several scenarios where Istio can route traffic to different versions in order to compare versions and evaluate which one works best.
The Traffic Shifting step was focused on travels service adding a new travels-v2 and travels-v3 workloads and the TCP Traffic Shifting showed how this scenario can be used on TCP services like mysqldb service.
Mirroring (or shadowing) is a particular case of the Traffic Shifting scenario where the proxy sends a copy of live traffic to a mirrored service.
The mirrored traffic happens out of band of the primary request path. It allows for testing of alternate services, in production environments, with minimal risk.
Istio mirrored traffic is only supported for HTTP/gRPC protocols.
This step will show how to apply mirrored traffic into the travels service.
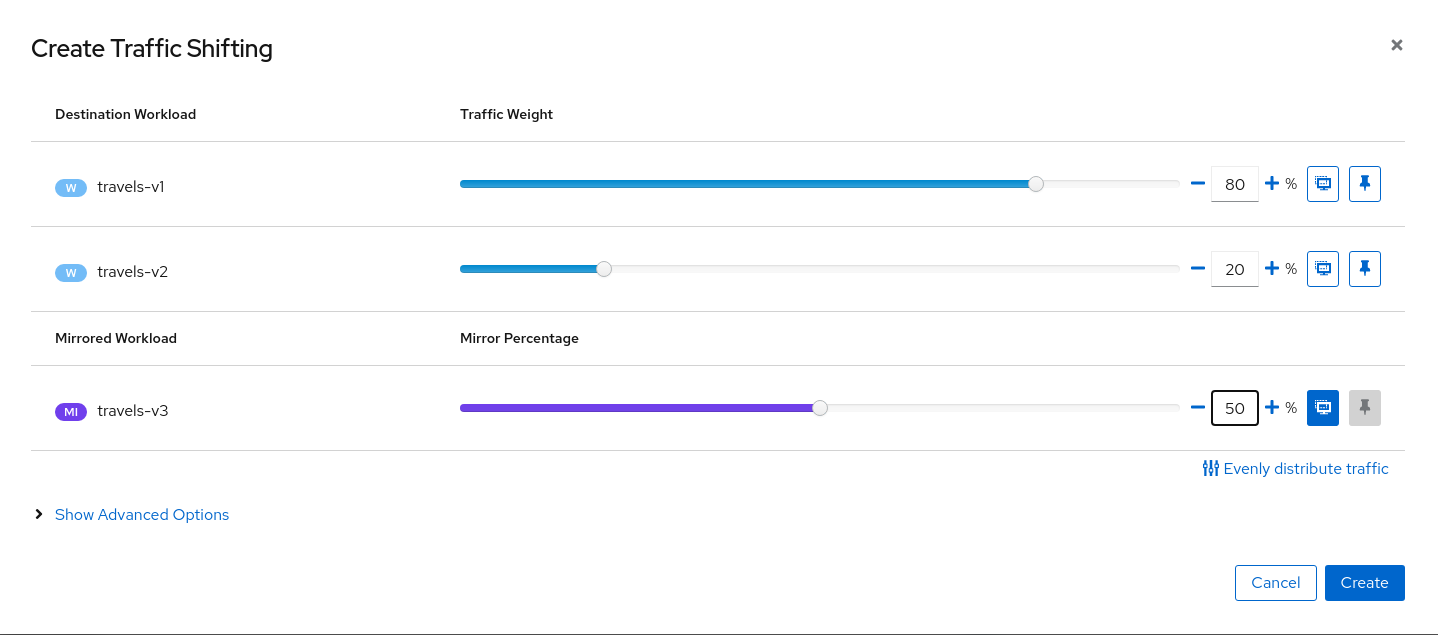
| Step 1: Use the Traffic Shifting Wizard on travels service |
We will simulate the following:
-
travels-v1 is the original traffic and it will keep 80% of the traffic
-
travels-v2 is the new version to deploy, it’s being evaluated and it will get 20% of the traffic to compare against travels-v1
-
But travels-v3 will be considered as a new, experimental version for testing outside of the regular request path. It will be defined as a mirrored workload on 50% of the original requests.
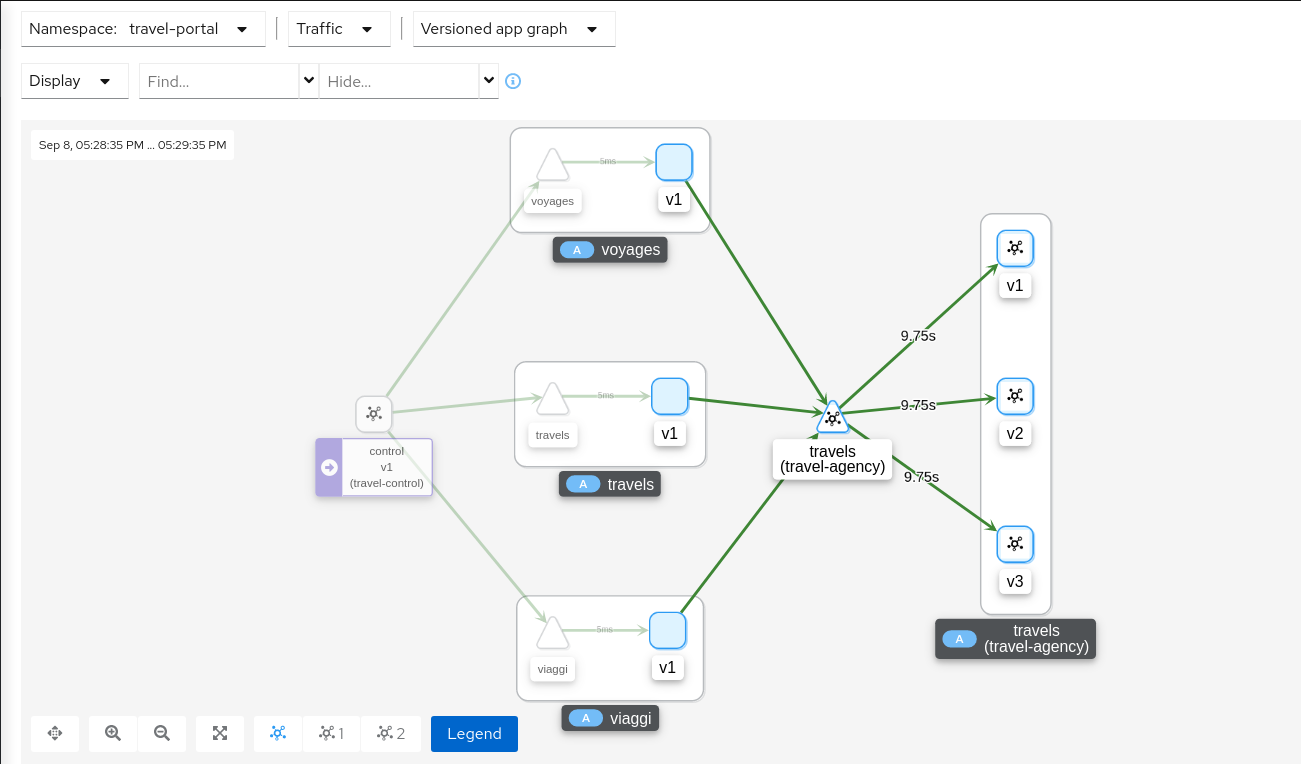
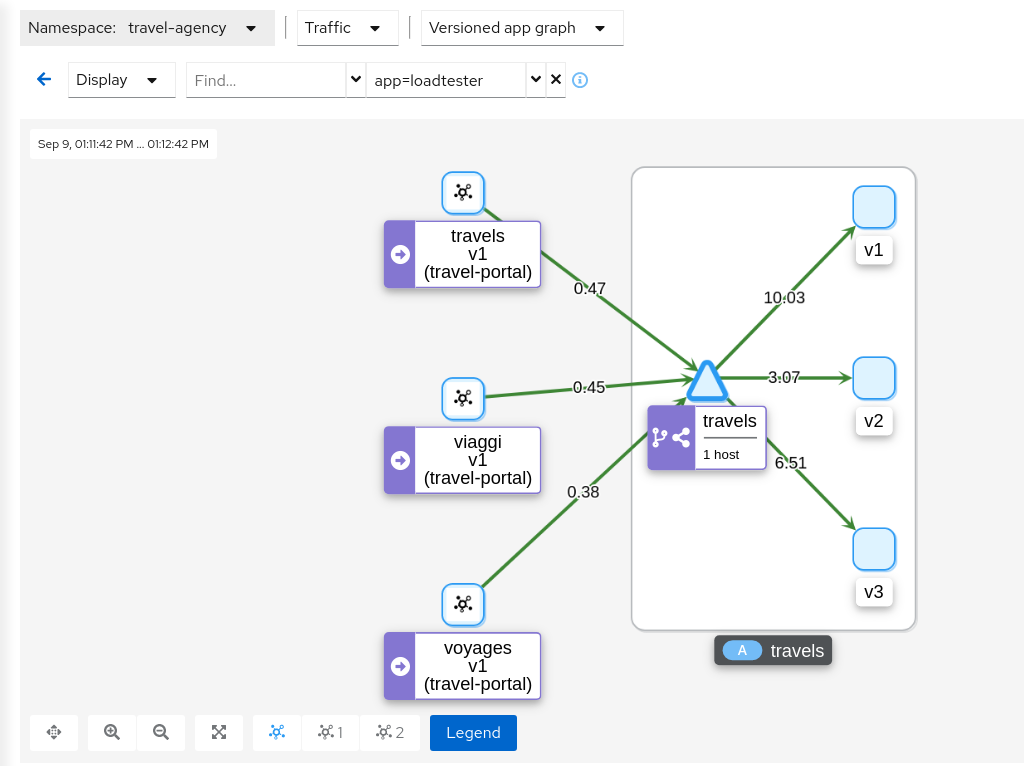
| Step 2: Examine Traffic Shifting distribution from the travels-agency Graph |
Note that Istio does not report mirrored traffic telemetry from the source proxy. It is reported from the destination proxy, although it is not flagged as mirrored, and therefore an edge from travels to the travels-v3 workload will appear in the graph. Note the traffic rates reflect the expected ratio of 80/20 between travels-v1 and travels-v2, with travels-v3 at about half of that total.
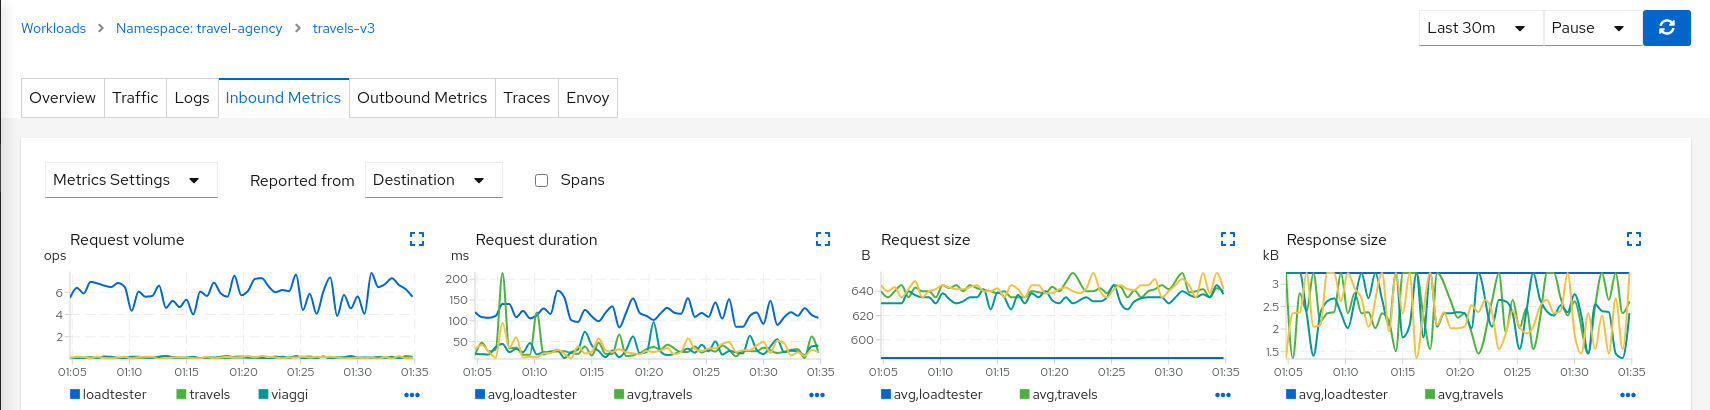
This can be examined better using the "Source" and "Destination" metrics from the "Inbound Metrics" tab.
The "Source" proxy, in this case the proxies injected into the workloads of travel-portal namespace, won’t report telemetry for travels-v3 mirrored workload.
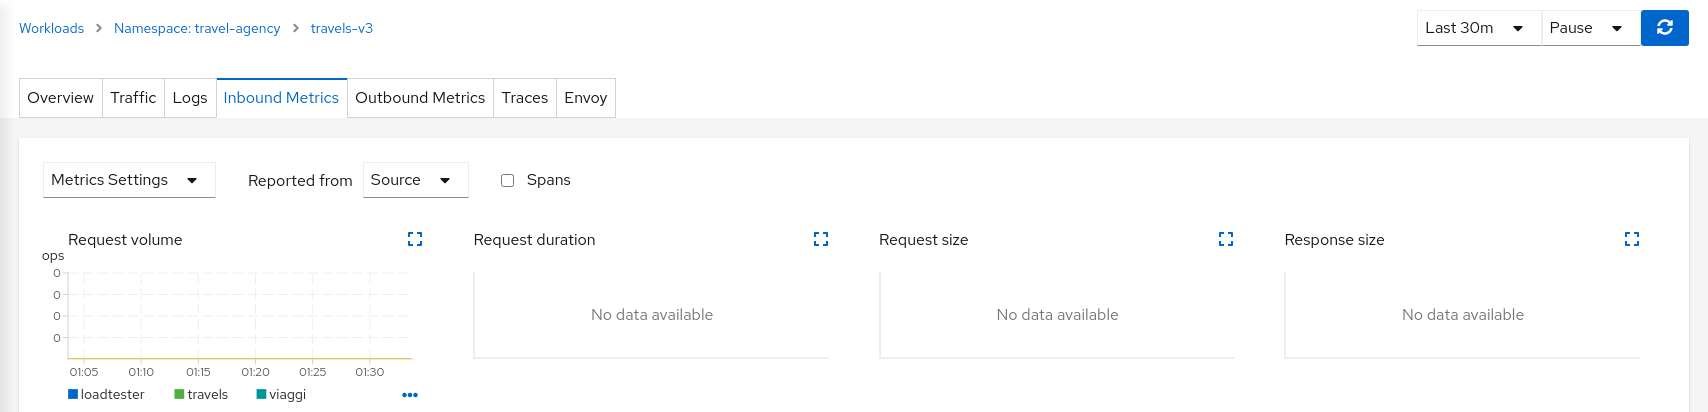
But the "Destination" proxy, in this case the proxy injected in the travels-v3 workload, will collect the telemetry from the mirrored traffic.
| Step 3: Update or delete Istio Configuration |
As part of this step you can update the Mirroring scenario to test different mirrored distributions. When finished you can delete the generated Istio config for the travels service.
Secure
Authorization Policies
Security is one of the main pillars of Istio features.
The Istio Security High Level Architecture provides a comprehensive solution to design and implement multiple security scenarios.
In this tutorial we will show how Kiali can use telemetry information to create security policies for the workloads deployed in a given namespace.
Istio telemetry aggregates the ServiceAccount information used in the workloads communication. This information can be used to define authorization policies that deny and allow actions on future live traffic communication status.
This step will show how we can define authorization policies for the travel-agency namespace in the Travel Demo application, for all existing traffic in a given time period.
Once authorization policies are defined, a new workload will be rejected if it doesn’t match the security rules defined.
| Step 1: Undeploy the loadtester workload from travel-portal namespace |
In this example we will use the loadtester workload as the "intruder" in our security rules.
If we have followed the previous tutorial steps, we need to undeploy it from the system.
kubectl delete -f <(curl -L https://raw.githubusercontent.com/kiali/demos/master/travels/travel_loadtester.yaml) -n travel-portalWe should validate that telemetry has updated the travel-portal namespace and "Security" can be enabled in the Graph Display options.
| Step 2: Create Authorization Policies for current traffic for travel-agency namespace |
Every workload in the cluster uses a Service Account.
travels.uk, viaggi.it and voyages.fr workloads use the default cluster.local/ns/travel-portal/sa/default ServiceAccount defined automatically per namespace.
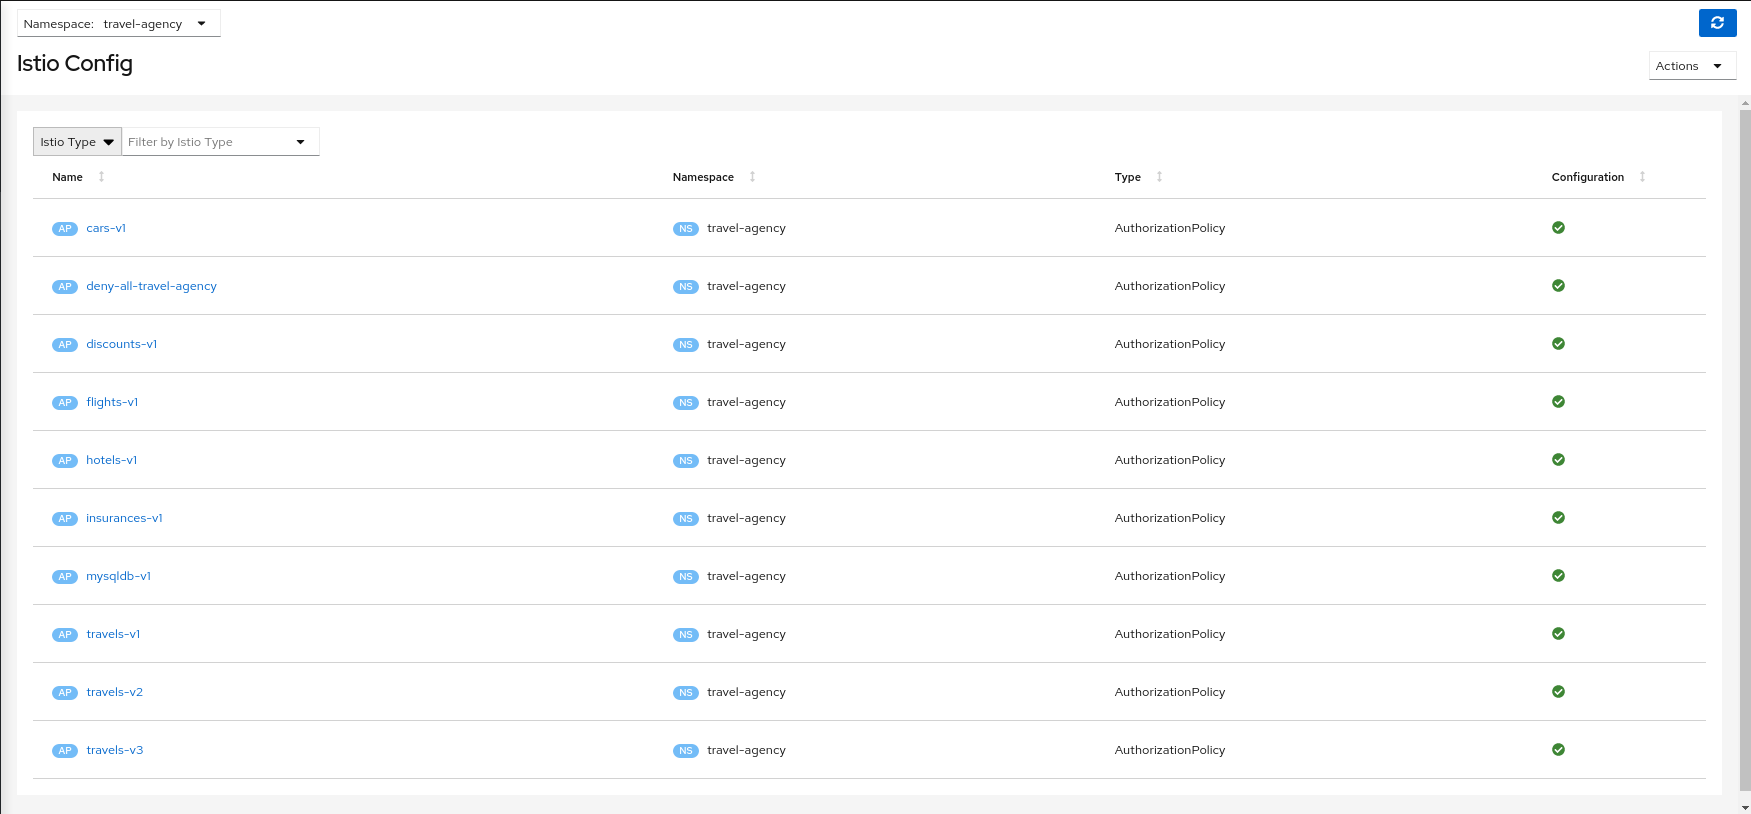
This information is propagated into the Istio Telemetry and Kiali can use it to define a set of AuthorizationPolicy rules using the "Create Traffic Policies" action located in the Overview page.
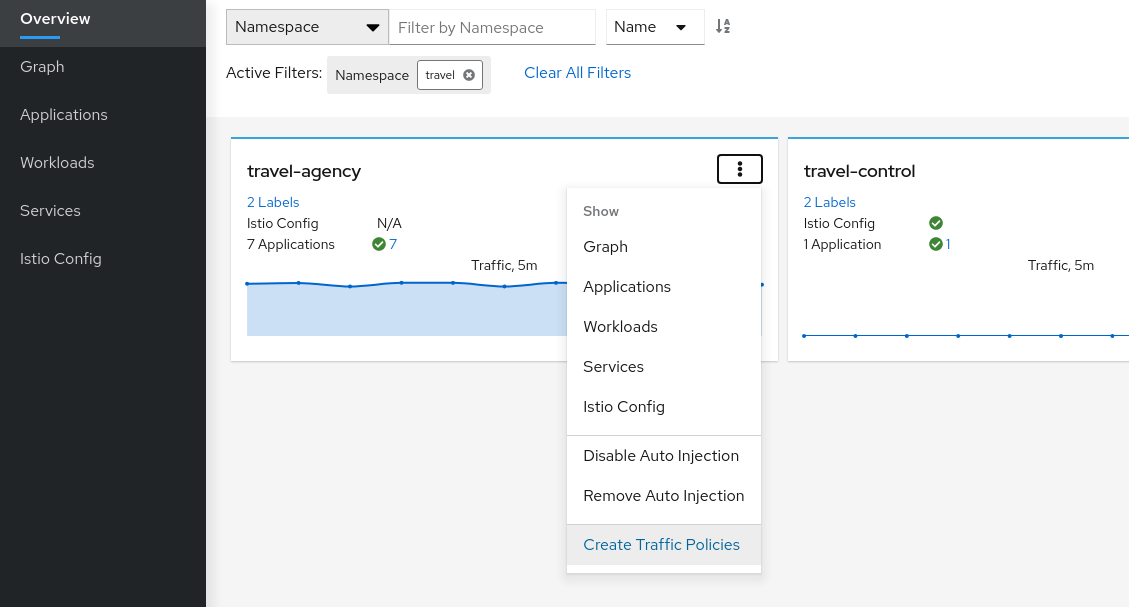
This will generate a main DENY ALL rule to protect the whole namespace, and an individual ALLOW rule per workload identified in the telemetry.
| Step 3: Deploy the loadtester portal in the travel-portal namespace |
If the loadtester workload uses a different ServiceAccount then, when it’s deployed, it won’t comply with the AuthorizationPolicy rules defined in the previous step.
OpenShift users may need to also add the associated loadtester serviceaccount to the necessary securitycontextcontraints.
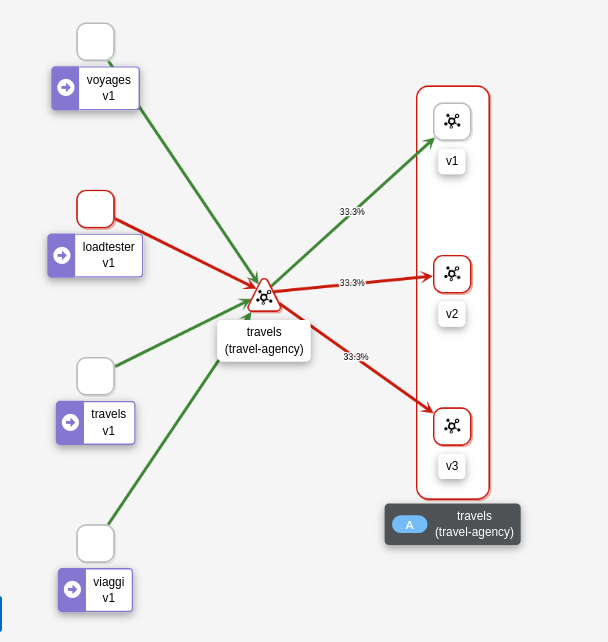
kubectl apply -f <(curl -L https://raw.githubusercontent.com/kiali/demos/master/travels/travel_loadtester.yaml) -n travel-portalNow, travels workload will reject requests made by loadtester workload and that situation will be reflected in Graph:
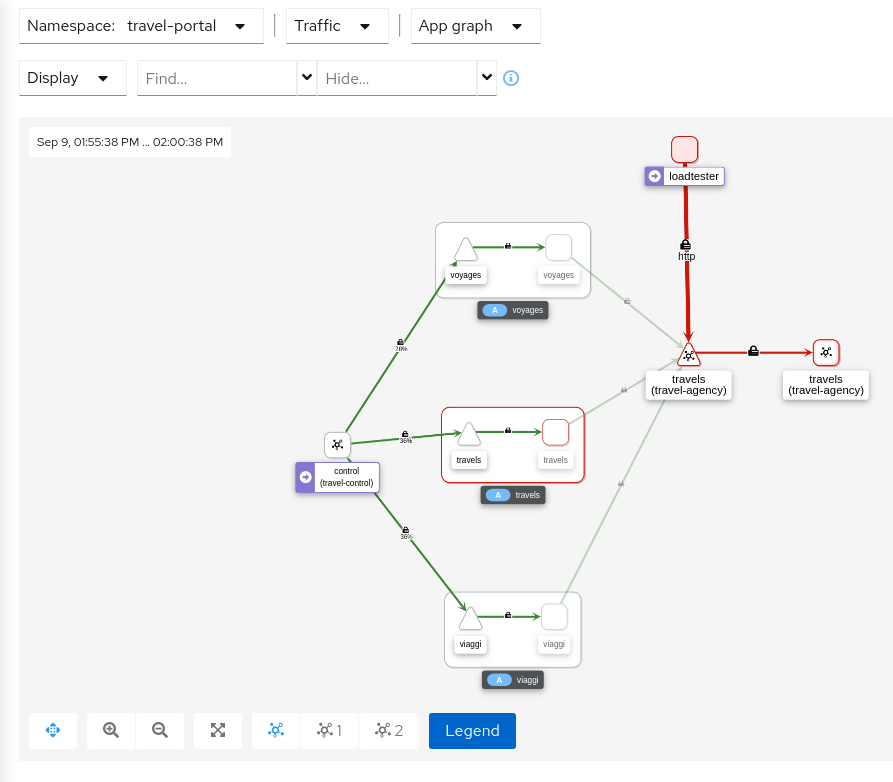
This can also be verified in the details page using the Outbound Metrics tab grouped by response code (only the 403 line is present).
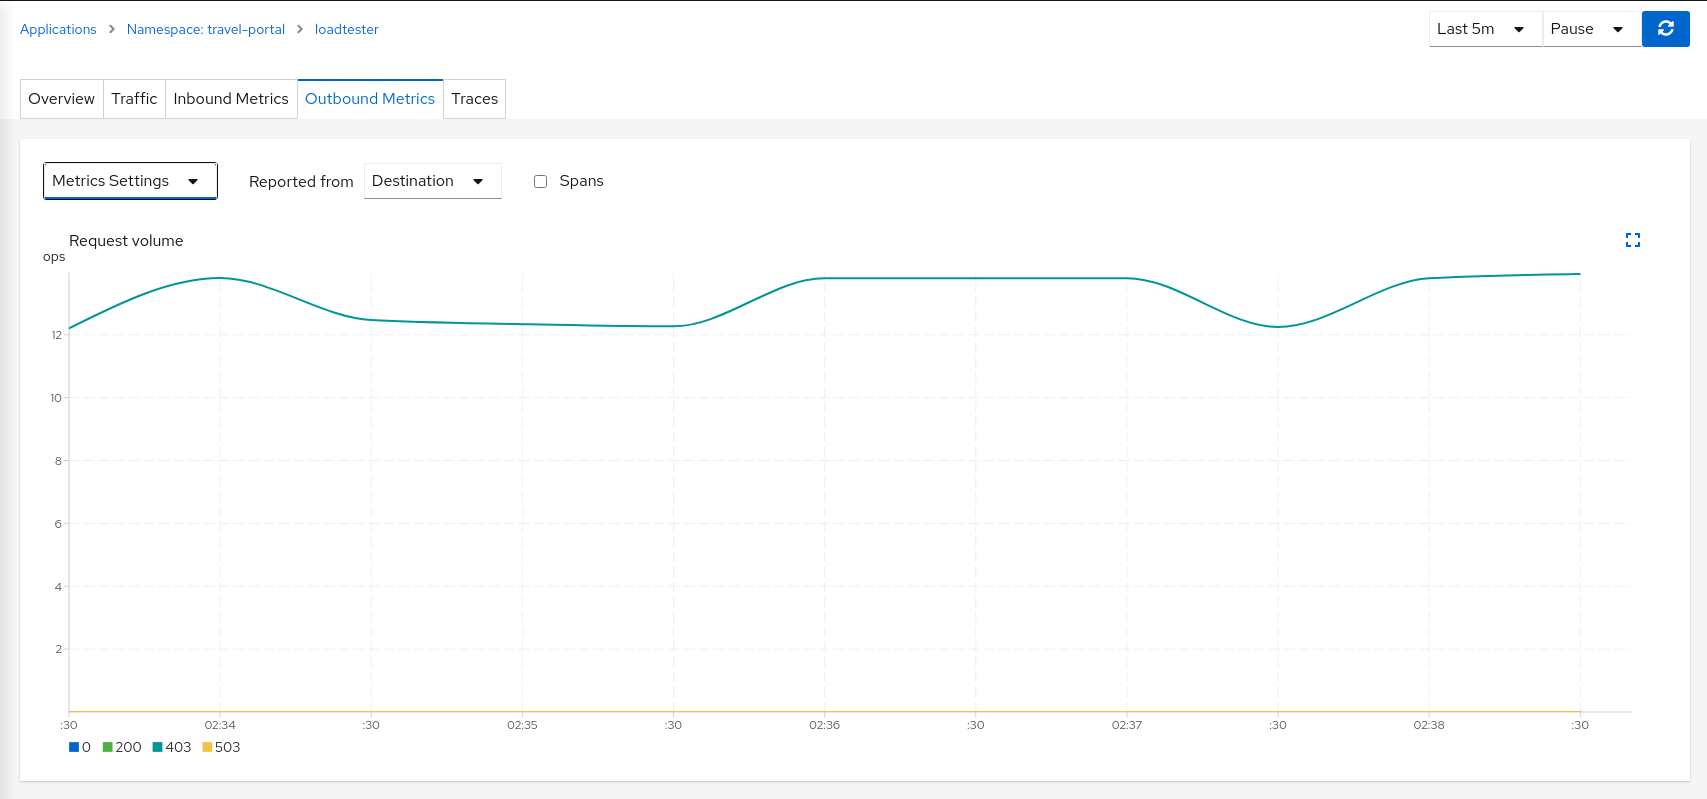
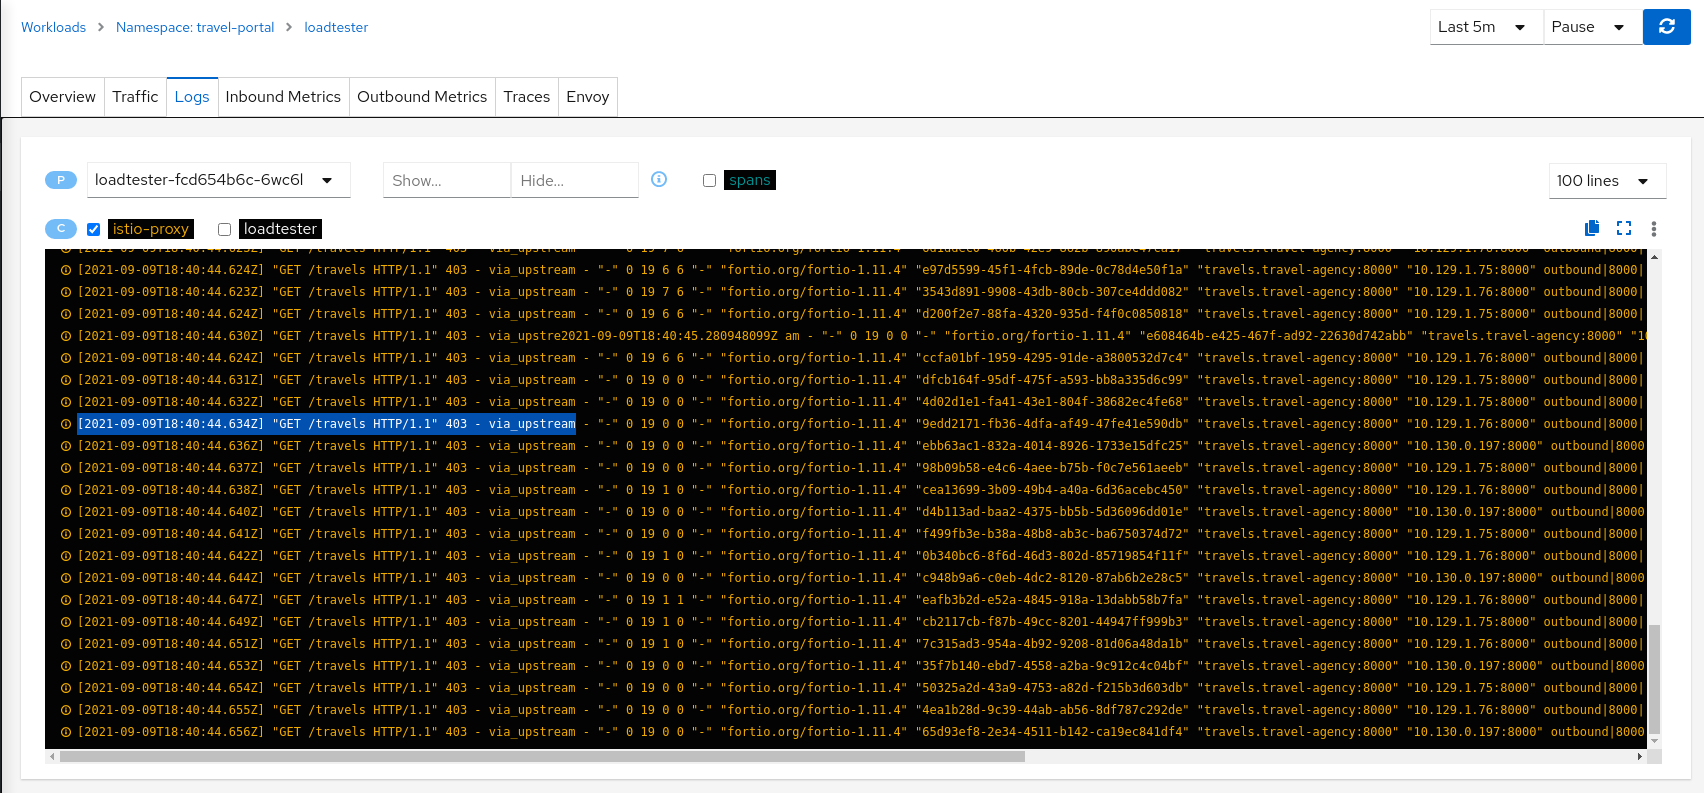
Inspecting the Logs tab confirms that loadtester workload is getting a HTTP 403 Forbidden response from travels workloads, as expected.
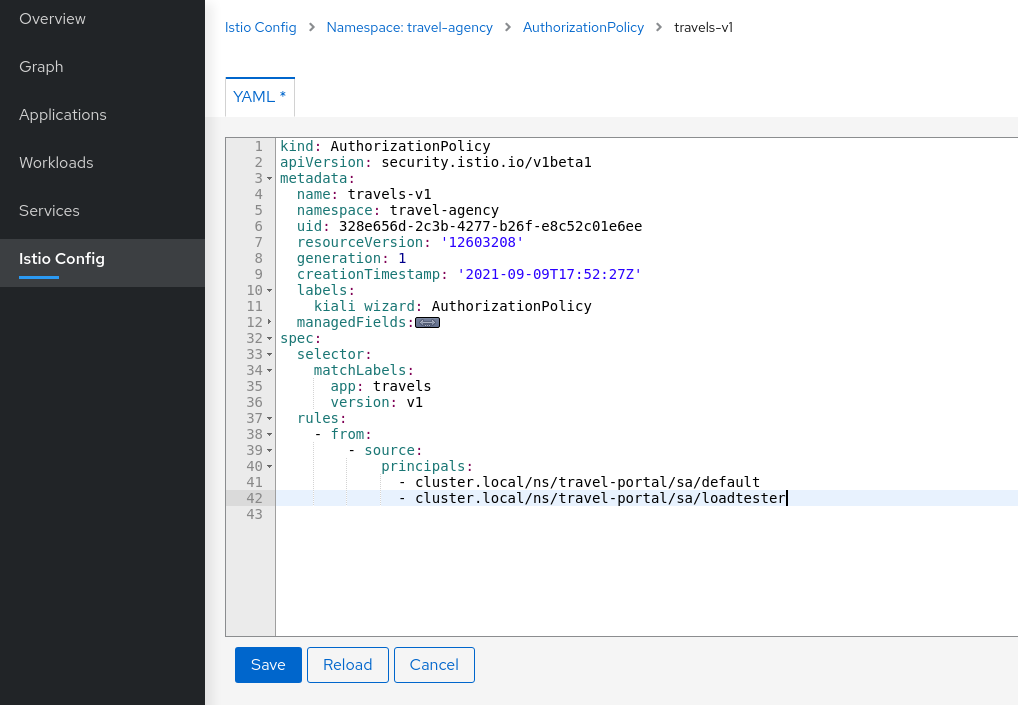
| Step 4: Update travels-v1 AuthorizationPolicy to allow loadtester ServiceAccount |
AuthorizationPolicy resources are defined per workload using matching selectors.
As part of the example, we can show how a ServiceAccount can be added into an existing rule to allow traffic from loadtester workload into the travels-v1 workload only.
As expected, now we can see that travels-v1 workload accepts requests from all travel-portal namespace workloads, but travels-v2 and travels-v3 continue rejecting requests from loadtester source.
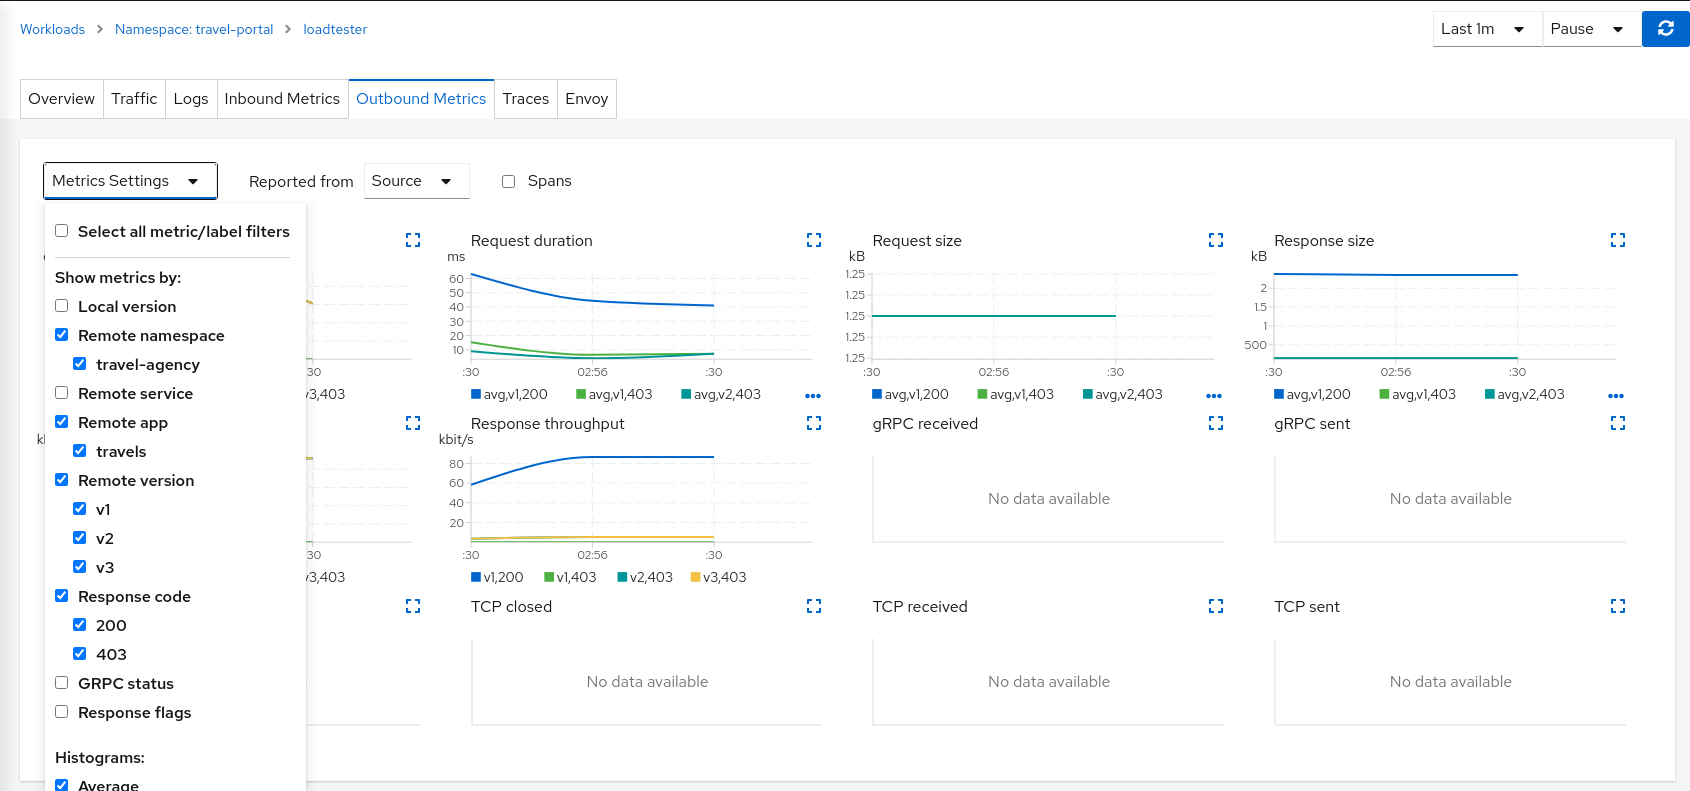
Using "Outbound Metrics" tab from the loadtester workload we can group per "Remote version" and "Response code" to get a detailed view of this AuthorizationPolicy change.
| Step 5: Update or delete Istio Configuration |
As part of this step you can update the AuthorizationPolicies generated for the travel-agency namespace, and experiment with more security rules, or you can delete the generated Istio config for the namespace.
Uninstall
Undeploy the Travel Demo
To uninstall the Travels Demo application perform the following commands:
kubectl delete namespace travel-agency
kubectl delete namespace travel-portal
kubectl delete namespace travel-control